Red Chilaquiles: Authentic and Bold
- Time: 10 min active + 20 min cook = Total 30 minutes
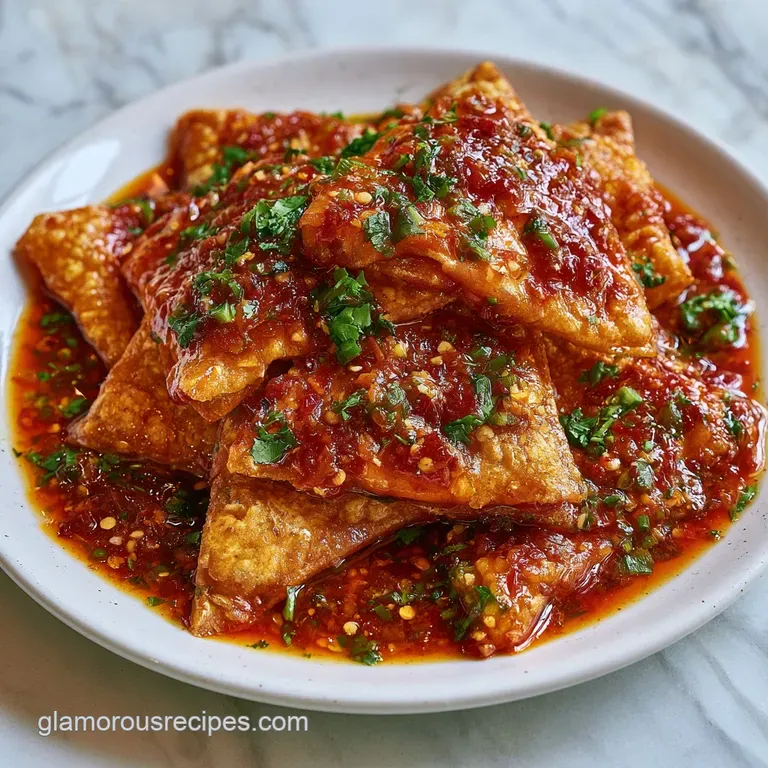
- Flavor/Texture Hook: Shattering corn chips drenched in a deep mahogany, smoky sauce
- Perfect for: Boozy weekend brunches or a bold Monday morning wake up call
That specific sound, the rhythmic crack shatter of a perfectly toasted corn tortilla, is the only way to start a morning. I remember the first time I tried making these at home, I thought the secret was just drowning everything in salsa.
I ended up with a bowl of corn porridge that tasted fine but had the structural integrity of wet cardboard. It was a total letdown.
Forget everything you've heard about needing a giant vat of bubbling oil to get the right crunch. You don't need to deep fry your tortillas to achieve that restaurant style snap. I discovered that over high heat roasting actually concentrates the corn flavor, making the Red Chilaquiles taste more toasted and nutty, which stands up way better to the sauce.
This version is all about building layers of intensity. We're talking charred aromatics, rehydrated dried chilies for that deep earthiness, and a finish of cool, tangy toppings. It's a bold, global approach to a classic that turns a simple breakfast into something adventurous.
Trust me, once you feel that contrast of hot, spicy sauce and cold Greek yogurt, you won't go back to the bland stuff.
The Bold Flavor of Red Chilaquiles
The magic here is in the tension. You have the heat from the sauce fighting the coolness of the avocado and yogurt, while the chips transition from a shattering crisp to a slightly softened, sauce soaked bite. It's a high energy dish that wakes up your palate.
If you're looking for a drink to match this energy, a classic red sangria makes for an exciting brunch pairing. The fruitiness of the wine cuts right through the smoky heat of the chilies.
Why These Flavors Work
Starch Crystallization: Rapidly removing moisture from tortillas at 350°F (175°C) creates a rigid structure that resists immediate sogginess.
Charring Effect: Blistering the tomatoes and onions creates carbonized notes that add a smoky depth the raw sauce lacks.
Capsaicin Layering: Combining Guajillo and Ancho chilies provides both a bright, tea like heat and a dark, raisiny undertone.
Acid Balance: The Greek yogurt provides lactic acid which neutralizes the capsaicin, allowing you to taste the corn and garlic more clearly.
| Method | Time | Texture | Best For |
|---|---|---|---|
| air fried | 6-8 mins | Shattering, light | Quick weekday prep |
| Oven Baked | 10-12 mins | Rigid, uniform | Large party batches |
| Deep Fried | 3-5 mins | Greasy, porous | Maximum indulgence |
Right then, let's look at what's actually happening inside the pan. Most people just toss things in a blender, but the sequence of heat is what creates that bold profile.
Component Deep Dive
Understanding your ingredients helps you tweak the heat levels without ruining the base. For instance, if you want more smoke, you can char the garlic a bit longer under the broiler.
| Ingredient | Science Role | Pro Secret |
|---|---|---|
| Guajillo Chili | Primary color and mild heat | Soak in hot water first to unlock oils |
| Roma Tomatoes | Umami and acidity | Broil until blackened for a campfire taste |
| Corn Tortillas | Structural base | Use slightly stale tortillas for faster crisping |
| Queso Fresco | Salt and creaminess | Don't melt it; let it stay as distinct salty pops |
Now, let's get into the gear. You don't need a professional kitchen, but a few specific tools make this a lot smoother.
The Right Tools
First, you'll need a blender that can handle thick pastes. If you have a high powered one, great, but a standard one works as long as you add the broth. A wide skillet is non negotiable. You want a large surface area so the sauce simmers and reduces quickly rather than boiling in a deep pool.
For the chips, an air fryer is my go to for speed, but a parchment lined baking sheet is the way to go for crowds. Also, keep a sharp knife handy for the avocado and red onion. The cleaner the cut, the better the presentation.
Components and Swaps
I've listed everything you need below. Stick to the Schema quantities for the best balance of heat and salt. Honestly, don't even bother with low-fat cheese here - you need the fat to carry the chili flavors.
- 12 corn tortillas, cut into triangles (approx. 450g) Why this? Provides the essential corn flavor and crunch
- 2 tbsp extra virgin olive oil Why this? High smoke point for roasting
- 1/2 tsp sea salt Why this? Enhances the corn's natural sweetness
- 3 medium roma tomatoes, halved (approx. 340g) Why this? Lower water content than beefsteak tomatoes
- 3 dried guajillo chilies, stems and seeds removed (approx. 28g) Why this? Adds a smooth, tea like heat
- 1 dried ancho chili, stems and seeds removed (approx. 14g) Why this? Deep, raisin like smokiness
- 3 cloves garlic, peeled (approx. 9g) Why this? Pungent base for the sauce
- 1/2 medium white onion, sliced (approx. 50g) Why this? Adds subtle sweetness when charred
- 1 cup low sodium vegetable or chicken broth Why this? Controls the sauce thickness
- 1 tsp dried oregano Why this? Earthy, herbal contrast
- 1 tbsp avocado oil Why this? Neutral oil for simmering
- 1/2 cup crumbled queso fresco Why this? Salty, crumbly texture
- 1/4 cup Greek yogurt Why this? Tangy alternative to crema
- 1 ripe avocado, sliced (approx. 150g) Why this? Rich, buttery mouthfeel
- 1/4 cup thinly sliced red onion Why this? Sharp, fresh bite
- 1/4 cup chopped fresh cilantro Why this? Bright, citrusy finish
| Original Ingredient | Substitute | Why It Works |
|---|---|---|
| Queso Fresco | Feta Cheese | Similar saltiness and crumble. Note: Slightly tangier flavor |
| Greek Yogurt | Mexican Crema | Traditional choice. Note: More liquid, less tangy than yogurt |
| Vegetable Broth | Water + Bouillon | Same salt/umami. Note: Check for MSG if sensitive |
| Corn Tortillas | Flour Tortillas | Still works for crunch. Note: Much oilier and less structural |
Let's crack on with the actual cooking. This is where we build those layers of flavor.
Step-by-step Method
Phase 1: Achieving the Shattering Crust
- Toss tortilla triangles with olive oil and salt. Air fry at 350°F (175°C) for 6-8 minutes, shaking halfway through, or bake on a parchment lined sheet at 375°F (190°C) for 10-12 minutes until golden brown and rigid. Note: Don't overcook or they'll taste burnt once the sauce hits.
Phase 2: Crafting the Velvety Rojo Sauce
Place tomatoes, garlic, and onion under a broiler for 5 minutes until the skins blister and blacken. Note: This char is where the "bold" flavor comes from.
Soak dried guajillo and ancho chilies in hot water for 10 minutes until they feel pliable and soft. Note: This removes the harsh bitterness of the dried skin.
Combine charred vegetables, soaked chilies, broth, and oregano in a blender and process until completely smooth. Note: If it's too thick, add a tablespoon of the chili soaking water.
Heat avocado oil in a skillet over medium heat. Pour in the sauce and simmer for 8-10 minutes until it thickens and turns a deep mahogany color. Note: You'll smell the raw garlic disappear and a rich, roasted aroma emerge.
Phase 3: The Final Assembly
Reduce heat to low. Add the crispy chips to the skillet and fold into the sauce for 30-60 seconds until every chip is coated but still holds its shape. Note: Working fast here is the secret to avoiding mush.
Plate immediately and garnish with crumbled queso fresco, Greek yogurt, sliced avocado, red onion, and fresh cilantro. Note: The cold toppings provide the critical temperature contrast.
Chef's Note: To get an even deeper flavor, try adding a pinch of espresso powder or a tiny square of dark chocolate to the sauce. It doesn't make it taste like dessert; it just pushes the mahogany color and the earthiness of the ancho chilies to the next level.
Fixing Common Errors

The biggest struggle with Red Chilaquiles is usually the texture. You either have chips that are too hard or a plate of spicy corn mush. It's all about the timing of the fold.
Troubleshooting Common Issues
| Issue | Solution |
|---|---|
| Why Your Chips Got Soggy | This usually happens because the sauce was too thin or you left the chips in the pan for too long. If the sauce hasn't reduced to that mahogany thickness, it penetrates the tortilla too quickly. |
| Why the Sauce Tastes Bitter | Bitterness often comes from two places: not removing the seeds from the dried chilies or burning the garlic under the broiler. The seeds carry a sharp, acrid heat that can overwhelm the dish. |
| Why the Sauce is Too Thin | If your sauce is watery, it's likely because the tomatoes released too much moisture and you didn't simmer it long enough. You want it to coat the back of a spoon. |
Common Mistakes Checklist
- ✓ Did you remove the seeds from the Guajillo and Ancho chilies?
- ✓ Did you let the sauce reduce to a deep mahogany color before adding chips?
- ✓ Are your tortillas completely rigid and golden before they hit the pan?
- ✓ Did you add the cold toppings immediately after plating?
- ✓ Did you use a wide skillet to ensure the sauce reduced properly?
Adjusting the Serving Size
If you're just cooking for yourself, you can easily scale this down. For a half batch, use 6 tortillas and 1.5 tomatoes. I find that reducing the cook time by about 20% for the sauce works best since there's less liquid to evaporate. For the eggs or chicken, just scale them linearly.
When scaling up for a party, don't just quadruple the chilies. Spices and heat can compound in weird ways. I recommend scaling the chilies and salt to 1.5x or 2x first, then tasting and adjusting. Work in batches when frying the tortillas; if you crowd the pan or the air fryer, they'll steam instead of shatter.
If you're hosting a late night gathering, you can serve these as a bold appetizer. For a cocktail hour vibe, pair a smaller portion of Red Chilaquiles with a Red Snapper drink for an adventurous flavor combination.
| Goal | Adjustment | Impact |
|---|---|---|
| Lower Heat | Remove Ancho | Lighter, brighter flavor |
| More Crunch | Double fry chips | Harder shell, resists sauce longer |
| Creamier | Double the yogurt | Milder heat, velvety texture |
Let's clear up some of the noise you might hear about this dish. There are a few "rules" that just don't hold up in a real kitchen.
The Truth About Chips
One common myth is that you must use store-bought tortilla chips for the best crunch. In reality, homemade roasted triangles have a much more complex corn flavor. store-bought chips are often over salted and fried in oils that can mask the taste of your homemade salsa roja.
Another misconception is that you need to boil the chilies. Boiling can actually destroy the delicate volatile oils that give the Guajillo its tea like aroma. A simple soak in hot water is all you need to make them pliable without stripping the flavor.
Finally,, some say you have to fry the sauce for hours. While a slow simmer is great, the charring of the vegetables does 90% of the heavy lifting for the flavor. Ten minutes of simmering is plenty to marry the ingredients.
Storage and Scraps
If you have leftover sauce (without the chips), it's a goldmine. Store the sauce in an airtight container in the fridge for up to 5 days. It actually tastes better the next day as the chilies continue to meld. To reheat, just warm it in a small pot over medium heat.
The chips, however, cannot be stored once they've hit the sauce. They will inevitably turn into a porridge. If you have extra plain roasted chips, keep them in a sealed bag at room temperature for 3 days.
For zero waste, don't throw away the chili soaking water! According to guidelines on food flavor extraction, this liquid is packed with water soluble compounds. Use it as a base for a soup or add a splash to your next pot of beans for an earthy, spicy kick.
Plating Your Dish
To get that restaurant style look, focus on the color contrast. The deep mahogany of the Red Chilaquiles provides the perfect backdrop for the bright white of the queso fresco and the vivid green of the avocado.
Start by piling the sauce coated chips in the center of a shallow bowl. Instead of mixing the yogurt in, place a generous dollop right in the center. This allows the diner to swirl the coolness into the heat as they eat.
Arrange the avocado slices in a fan shape along one side. Sprinkle the red onion and cilantro haphazardly over the top to give it a fresh, organic feel. The goal is to make it look abundant and bold, not meticulously placed.
By following these steps, your Red Chilaquiles will have that professional edge while remaining a comforting, home cooked meal. It's all about the layers - the shatter of the corn, the velvet of the sauce, and the punch of the fresh toppings. Now, go get that skillet heating up!
Recipe FAQs
What ingredients are needed for red chilaquiles?
Corn tortillas, dried guajillo and ancho chilies, and fresh aromatics. You will also need roma tomatoes, garlic, white onion, broth, and oregano for the sauce, plus queso fresco, Greek yogurt, avocado, red onion, and cilantro for garnish.
How do I make the red chilaquiles sauce?
Broil tomatoes, garlic, and onion for 5 minutes, then blend with soaked chilies, broth, and oregano. Simmer the mixture in avocado oil over medium heat for 8-10 minutes until it reaches a deep mahogany color.
What toppings should I add to the dish?
Garnish with queso fresco, Greek yogurt, sliced avocado, red onion, and fresh cilantro. These additions balance the heat; for a heartier meal, serve them alongside some pan-seared steak tips.
How to prepare the tortilla chips?
Toss tortilla triangles with olive oil and salt. Air fry at 350°F (175°C) for 6-8 minutes or bake at 375°F (190°C) for 10-12 minutes until golden brown and rigid.
Is it true that assembled chilaquiles can be stored in the fridge?
No, this is a common misconception. While the sauce stores well for 5 days, the chips turn into porridge once coated and must be served immediately.
Why did my chilaquiles turn out soggy?
The sauce was likely too thin or the chips stayed in the pan too long. Ensure the sauce reduces to a thick mahogany consistency and only fold in the chips for 30-60 seconds.
Why does the sauce taste bitter?
You likely left the seeds in the dried chilies or burnt the garlic. Always remove stems and seeds from the guajillo and ancho chilies to avoid an acrid, overwhelming heat.
Red Chilaquiles