Pumpkin Pie Crisp: Velvety and Crunchy
- Time:10 minutes active + 40 minutes baking = Total 60 minutes
- Flavor/Texture Hook: Warm, spiced pumpkin base with a deep mahogany, crunchy streusel
- Perfect for: Thanksgiving dinner, cozy weekend gatherings, or a sophisticated fall treat
- Making a Classic Pumpkin Pie Crisp
- Avoiding the Soggy Base
- Why the Texture Works
- Component Analysis
- Your Essential Ingredient List
- Required Kitchen Tools
- Precision Baking Steps
- Fixes for Common Issues
- Troubleshooting Common Issues
- Flavor Variations and Swaps
- Scaling Adjustments
- Truth About Pumpkin Baking
- Storage and Zero Waste
- Gourmet Pairing Suggestions
- Recipe FAQs
- 📝 Recipe Card
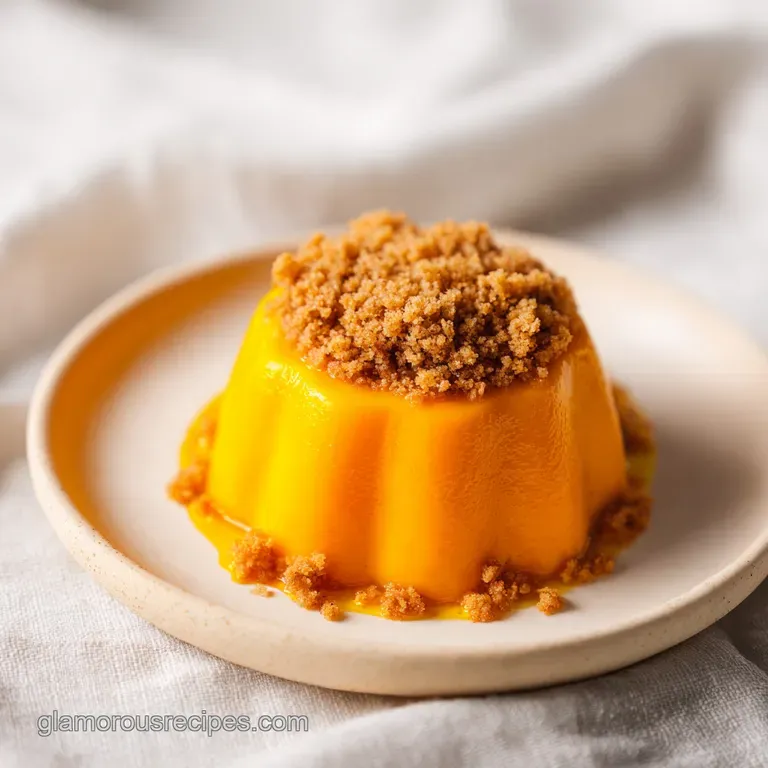
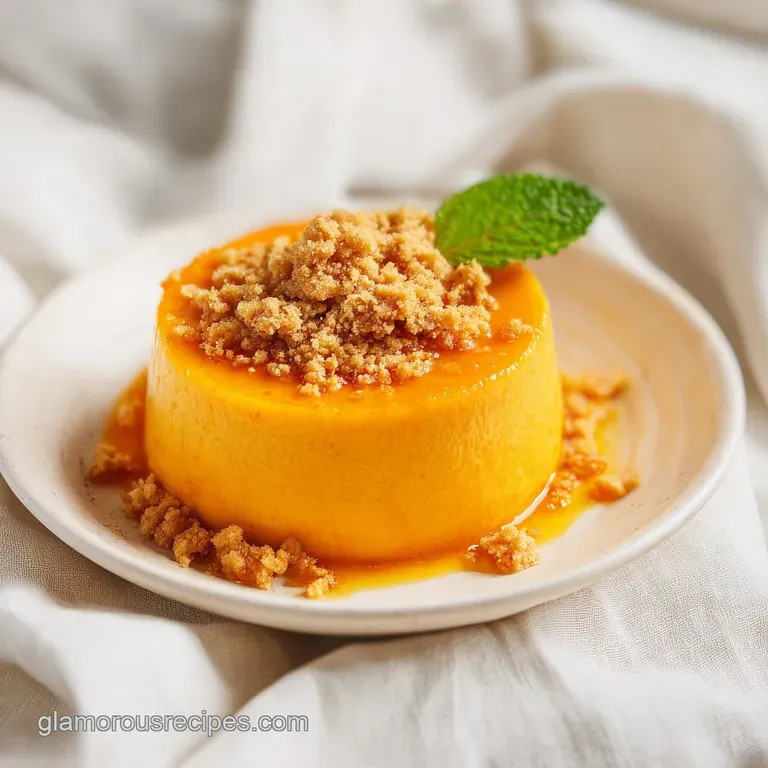
The air in my kitchen usually transforms the second that cinnamon hits the heat. There is this specific moment when the scent of toasted brown sugar and nutmeg begins to swirl, signaling that the house is officially in "autumn mode." It's a scent that feels like a weighted blanket for your brain, cozy and deeply comforting.
I've always felt that traditional pies are a bit too formal for a casual Tuesday, but a crisp offers that same refined flavor with a much more relaxed execution. The hero here is the pumpkin puree. I always insist on a high-quality, 100% pure pumpkin - not the pre mixed pie filling.
Pure puree provides a clean, earthy canvas that allows the spices to sing without being drowned out by corn syrup or artificial thickeners. When you use the right puree, you get a dense, velvety consistency that feels like a hug in a bowl, and that's exactly what makes this Pumpkin Pie Crisp so special.
You can expect a dessert that hits every sensory note. The base is smooth and creamy, almost like a thick pudding, while the topping provides a rhythmic crunch. It's all about the balance of textures. If the filling is too runny, the topping disappears. If the topping is too sandy, it lacks character.
We're aiming for a precise intersection of silk and shatter.
Making a Classic Pumpkin Pie Crisp
To get this right, we have to treat the pumpkin base with the same precision as a formal custard. It's not just about mixing ingredients; it's about creating a stable emulsion. The evaporated milk is a secret weapon here.
Unlike regular milk, it has a lower water content, which means the filling sets up with a more concentrated, rich flavor and a smoother mouthfeel.
When you pour that orange velvet into your baking dish, you're setting the stage for the streusel. A great Pumpkin Pie Crisp depends on the contrast. I've found that if you over mix the topping, you lose those precious pea sized lumps of butter that create the pockets of crunch.
You want those little islands of fat to fry the flour and oats from the inside out as they bake.
For those who love other autumn flavors, this approach is similar to how I handle my Pumpkin Spice Cookies, where the goal is to keep the moisture balanced so the texture stays consistent. In this case, the moisture is concentrated in the base, allowing the top to reach a deep, toasted mahogany color.
Avoiding the Soggy Base
The biggest frustration with any "crisp" is when the topping becomes a sponge. To prevent this, we focus on the ratio of fats to solids in the streusel. By using cold, cubed butter and working it in quickly, we ensure the fat doesn't melt before it hits the oven.
This creates a barrier that keeps the moisture of the pumpkin filling from migrating upward.
Another trick is the "edge seal." When you sprinkle your topping, make sure it goes slightly over the edges of the custard. This prevents the pumpkin mixture from bubbling up and caramelizing against the side of the pan, which can create a sticky, chewy ring that distracts from the shatter of the crust.
If you're looking for something with a different kind of crust, you might enjoy the technique used in my Sourdough Focaccia, where the focus is on creating a distinct separation between a crisp exterior and a soft interior. The principle is the same: control the moisture to control the crunch.
Why the Texture Works
Instead of getting bogged down in textbook definitions, let's look at what's actually happening in the pan.
The Moisture Barrier: Cold butter creates tiny steam pockets. When these pockets burst during baking, they leave behind a porous, crispy structure that refuses to go soggy.
The Sugar Bind: Brown sugar doesn't just sweeten; it melts into a syrup that glues the oats and flour together into clumps. This is what gives you those satisfying, chunky bits of topping.
The Protein Set: Eggs act as the structural glue for the filling. They coagulate as the heat rises, transforming a liquid puree into a stable, velvety custard that can support the weight of the streusel.
The Oat Buffer: Rolled oats provide a structural chew. Unlike flour alone, which can become cakey, oats maintain their individual shape, adding a rustic, artisanal feel to the dish.
| Method | Prep Time | Texture | Best For |
|---|---|---|---|
| Oven Bake | 10 mins | Set custard + Crunchy top | Traditional presentation |
| Stovetop (Pot) | 15 mins | Soft base + Toasted top | Quick, rustic portions |
| Slow Cooker | 3 hours | Very soft + Slightly soggy | Hands off gatherings |
Component Analysis
Understanding the role of each ingredient helps you tweak the recipe without ruining the result.
| Ingredient | Science Role | Pro Secret |
|---|---|---|
| Evaporated Milk | Concentrated creamy base | Use full fat for a more velvety finish |
| Cold Butter | Creates steam pockets | Freeze cubes for 5 mins for extra crunch |
| Rolled Oats | Textural contrast | Don't use instant oats; they turn to mush |
| Pumpkin Puree | Main structure & flavor | Roast your own for a deeper, nuttier taste |
Your Essential Ingredient List
For the Pumpkin Pie Crisp base: - 1 can (15 oz / 425g) Pumpkin Puree Why this? Provides the body and earthy base flavor - 3/4 cup (180ml) Evaporated Milk Why this? Reduces water for a thicker, richer set - 1/2 cup (100g) Light Brown Sugar, packed
Why this? Adds a molasses depth compared to white sugar - 2 large Eggs Why this? Essential for the custard to set properly - 1 tsp (5g) Pumpkin Pie Spice Why this? The signature blend of warmth - 1/2 tsp (3g) Salt
Why this? Balances the sweetness and heightens spice
For the Cinnamon Streusel topping: - 3/4 cup (90g) All Purpose Flour Why this? Binds the topping together - 3/4 cup (75g) Old Fashioned Rolled Oats Why this? Adds the necessary "shatter" and chew - 1/2 cup (100g) Light Brown Sugar, packed
Why this? Caramelizes for a deep mahogany color - 1 tsp (5g) Ground Cinnamon Why this? Enhances the woodsy notes of the pumpkin - 1/2 cup (113g) Unsalted Butter, cold and cubed Why this? The secret to a non soggy topping -
1/4 tsp (1.5g) Salt Why this? Prevents the topping from tasting flat
| Original Ingredient | Substitute | Why It Works |
|---|---|---|
| Evaporated Milk | Heavy Cream | Similar fat content. Note: Results in a much denser, richer custard |
| All Purpose Flour | Oat Flour | gluten-free alternative. Note: Topping will be slightly softer and more crumbly |
| Rolled Oats | Chopped Pecans | Adds a nutty crunch. Note: Changes the texture from "crisp" to "crumble" |
| Brown Sugar | Coconut Sugar | Similar flavor profile. Note: Slightly less caramelization during baking |
Required Kitchen Tools
You don't need a professional kitchen, but a few specific tools make the process much smoother. I highly recommend a 9x9 inch baking dish; using a larger pan will make the filling too thin, leading to overcooking and a rubbery texture.
A pastry cutter is my go to for the topping, but if you don't have one, two forks worked in a criss cross motion do the job perfectly. The goal is to avoid using your hands too much, as the warmth from your palms can melt the butter, which is the enemy of the crunch.
Precision Baking Steps
- Preheat your oven to 350°F (175°C). Note: Ensure the rack is in the center for even heat distribution
- In a large bowl, whisk together the pumpkin puree, evaporated milk, brown sugar, eggs, pumpkin pie spice, and salt until the mixture is completely smooth and the sugar has dissolved.
- Pour the pumpkin mixture into a 9x9 inch baking dish, spreading it evenly to the edges.
- In a medium bowl, combine flour, oats, brown sugar, cinnamon, and salt.
- Add the cold, cubed butter. Use a pastry cutter or forks to work the butter into the dry ingredients until the mixture resembles coarse crumbs with some pea sized lumps of butter remaining.
- Sprinkle the topping evenly over the pumpkin base, ensuring you cover the edges to prevent the custard from over browning.
- Bake for 40 to 45 minutes until the edges of the filling are set and slightly puffed, and the topping is a deep mahogany brown.
- Remove from the oven and let it rest for 10 minutes before serving. Note: Resting allows the custard to fully firm up
Fixes for Common Issues
Even with a precise plan, things can happen. The most common issue is a "soupy" center. This usually happens if the oven temperature is off or the eggs were too small.
Troubleshooting Common Issues
| Issue | Solution |
|---|---|
| Why Your Filling Is Too Soft | If the center jiggles like gelatin after 45 minutes, it hasn't reached the coagulation point. This is often caused by under baking or using a dish that is too deep. According to [Serious Eats](https:/ |
| Why Your Topping Is Sandy | A sandy texture means the butter was incorporated too well. Instead of pea sized lumps, you created a uniform paste. This prevents the "shatter" effect and results in a more cookie like top. |
| Why Your Crust Is Burnt | If the top is dark brown but the filling is liquid, your oven might be running hot. In this case, tenting the dish with aluminum foil for the last 15 minutes protects the sugar from burning. |
Common Mistakes Checklist
- ✓ Did you use cold butter? (Essential for the crunch)
- ✓ Is the pumpkin 100% pure puree? (Avoid "pie mix")
- ✓ Did you let it rest for 10 minutes? (Prevents the filling from running)
- ✓ Did you avoid over mixing the streusel? (Keep those butter lumps!)
- ✓ Is the oven preheated to exactly 350°F? (Ensures stable custard set)
Flavor Variations and Swaps
If you want to move away from the traditional profile, there are a few ways to pivot this Pumpkin Pie Crisp. For a nuttier, restaurant style finish, fold in 1/2 cup of toasted pecans or walnuts into the streusel. The oil from the nuts interacts with the butter to create a more complex, savory crunch.
For those needing a gluten-free pumpkin crisp, replace the all purpose flour with a 1:1 gluten-free blend. I've found that adding a tablespoon of cornstarch to the gluten-free mix helps mimic the binding power of wheat, ensuring the topping doesn't just slide off the base.
If you're aiming for a healthier pumpkin pie crisp, you can swap the evaporated milk for full fat coconut milk. This maintains the fat ratio needed for a velvety texture while introducing a subtle tropical note that pairs beautifully with cinnamon.
For an extra rich flavor profile, add a teaspoon of vanilla bean paste to the filling.
Decision Shortcut
- If you want more crunch → Increase oats by 2 tablespoons.
- If you want a denser base → Add an extra egg yolk.
- If you want less sweetness → Reduce brown sugar by 20% in the topping.
Scaling Adjustments
When you need to feed a crowd or just yourself, don't just multiply the numbers blindly.
Scaling Down (½ Batch): Use an 8x8 inch pan or a small oven safe skillet. Reduce the baking time by about 20%, but keep a close eye on the center wobble. If you're using one egg, beat it in a cup and measure out exactly half.
Scaling Up (2x Batch): Work in batches for the streusel to avoid over working the butter. When doubling, only increase the salt and spices by 1.5x; too much cinnamon can become bitter in large quantities.
Use two 9x9 pans rather than one giant pan to ensure the heat penetrates the center of the custard.
If you double the recipe in one deep pan, lower the temperature to 325°F (160°C) and extend the baking time by 15-20 minutes. This prevents the edges from burning before the middle sets.
Truth About Pumpkin Baking
There are a few myths that often confuse home cooks. First, some believe that adding cornstarch is the only way to thicken a pumpkin base. This is false. The eggs and the reduced water content in evaporated milk provide all the structure you need for a professional set.
Another misconception is that you must "blind bake" the topping first. In a crisp, the topping and base cook together. The moisture from the pumpkin actually helps steam the bottom of the crust, while the dry heat of the oven toasts the top, creating that essential textural contrast.
Storage and Zero Waste
To keep your Pumpkin Pie Crisp fresh, let it cool completely before covering it with plastic wrap. Store it in the refrigerator for up to 4 days. When you're ready to eat it again, avoid the microwave, which will make the topping soggy.
Instead, pop a slice in the oven at 300°F (150°C) for 5-8 minutes to revive the crunch.
For freezing, you can freeze individual slices for up to 2 months. Wrap them tightly in parchment paper and then foil. Thaw in the fridge overnight before reheating in the oven.
Zero Waste Tips:
- Pumpkin Scraps: If you roasted your own pumpkin, don't toss the seeds. Toss them in the leftover melted butter from your streusel prep and roast them at 325°F until golden.
- Leftover Puree: Use any remaining pumpkin puree to make a quick batch of pumpkin pancakes or stir it into your morning oatmeal for a fall twist.
- Butter Wrappers: If you have small bits of butter left in the wrapper, freeze them and add them to your next batch of sautéed vegetables.
Gourmet Pairing Suggestions
To truly turn this into a presentation piece, focus on the color balance. The deep orange of the pumpkin and the mahogany of the crust need a vivid contrast to pop.
- 1. Bright White
- Add a dollop of cold crème fraîche or a swirl of whipped cream right before serving. The stark white against the orange is a classic visual.
- 2. Deep Green
- A single sprig of fresh mint or a dusting of finely chopped pistachios adds a fresh, organic element to the plate.
- 3. Vivid Red
- A few pomegranate seeds scattered around the base provide a jewel like contrast and a tart burst of flavor that cuts through the richness.
For a drink pairing, a glass of chilled dessert wine or a spicy chai latte complements the warmth of the cinnamon. If you're serving this at a party, a small carafe of salted caramel sauce on the side allows guests to customize their level of sweetness.
The salt in the caramel interacts with the pumpkin's earthiness to create a sophisticated, rounded flavor profile.
Recipe FAQs
What is a pumpkin crisp?
A baked dessert featuring a spiced pumpkin custard base topped with a crunchy oat crumble. It combines the creamy texture of a pumpkin pie with a rustic, textured topping.
How do you make pumpkin crisps?
Whisk the pumpkin puree, evaporated milk, sugar, eggs, and spices, then pour into a 9x9 inch dish. Top with a mixture of flour, oats, brown sugar, and cold cubed butter, then bake at 350°F for 40 to 45 minutes.
What's the difference between crisp and streusel?
The primary difference is the addition of oats. A crisp uses oats for a hearty crunch, while a streusel consists only of flour, sugar, and butter for a finer, cake like crumb.
How to make the pumpkin crisp topping crispy?
Cut cold, cubed butter into the dry ingredients until pea-sized lumps remain. Over mixing the butter creates a uniform paste, which results in a sandy texture instead of a crisp shatter.
Is it true that pre-sweetened pumpkin pie fill works just as well as puree?
No, this is a common misconception. Pie fill contains added sugars and spices that will throw off the balance of the ingredients and may make the dessert overly sweet.
Why is my filling still soupy in the center?
The custard likely hasn't reached its coagulation point. This occurs if the baking dish is too deep or if the dessert has not baked for the full 45 minutes.
What should I serve with Pumpkin Pie Crisp?
Serve warm with a dollop of whipped cream or vanilla ice cream. For an extra layer of crunch and flavor, these pair perfectly with cinnamon sugar pecans.
Pumpkin Pie Crisp

