Christmas Cookies with Royal Icing: Crisp Base

- Time: 15 min active + 10 min cook
- Taste & Texture: Buttery, crisp edges with a smooth, matte icing finish
- Perfect for: Seasonal dessert trays and holiday gatherings
In my house, the aroma of warm butter and almond extract signals that the holidays have truly arrived. There is a certain peace to a December afternoon, spent in a warm kitchen with the oven glowing, where decorating these treats becomes a cherished ritual.
During this time, the focus on detail feels less like a chore and more like a festive joy.
When juggling numerous holiday tasks, waiting hours for dough to chill is often a major inconvenience. I rely on a technique that allows for instant baking while still maintaining the clean edges of a gingerbread person or a star.
Once the vanilla scented, pale cookies emerge from the oven, the true artistry starts with the icing.
These Royal Icing Christmas Cookies are perfect for anyone wanting an elegant result through a dependable method. We use a simple, buttery base to support a polished look, ensuring your festive spreads look as though they were crafted by a professional baker.
Why This Method Works
- Cold Butter Base: Using cold, cubed butter instead of softened butter limits the air incorporated during mixing. This prevents the cookies from puffing up, which keeps your cut out shapes precise.
- Cornstarch Addition: Adding cornstarch softens the proteins in the flour. This results in a tighter crumb and a smoother surface, meaning the icing doesn't sink into pores or air bubbles.
- Meringue Powder: Using meringue powder instead of raw egg whites ensures a stable, food safe icing that dries hard. This is what allows you to stack the cookies without the designs smudging.
| Goal | What to change |
|---|---|
| Sharper Edges | Chill cut shapes 10 mins before baking |
| Softer Bite | Reduce bake time by 1 minute |
| Brighter Colors | Use gel dyes instead of liquid |
Gathering Your Essentials
To achieve a professional bakery result, a few key ingredients are essential. Opting for a premium vanilla bean extract significantly enhances the complexity of the cookie flavor. When making the icing, always sift your powdered sugar; even a tiny clump can block your piping tip and smudge your decorations.
Adding cornstarch to the dough helps the cookies maintain their shape during baking. For more festive inspiration, try pairing these with my chewy peanut butter cookies recipe, which provides a savory balance to the sweet royal icing.
For the Cookies: 225g unsalted butter, cold and cubed Why this? Maintains defined edges and stops over spreading 150g granulated sugar Why this? Adds sweetness and creates a crisp finish 1 large egg, room temperature Why
This? Acts as an emulsifier for better structure 5ml vanilla extract Why this? Essential for a traditional aroma 2.5ml almond extract Why this? Gives it a sophisticated bakery taste 340g all purpose flour Why this?
Provides the necessary base for the cookie 16g cornstarch Why this? Ensures a more delicate, tender texture 5g baking powder Why this? Gives a slight rise without puffing up 1.5g salt Why this? Offsets the sweetness
For the Royal Icing: 500g powdered sugar, sifted Why this? Forms the firm, polished exterior 25g meringue powder Why this? Ensures the frosting sets and stays stable 90-120ml warm water Why this? Used to reach the
Desired thickness Gel food coloring Why this? Adds vibrant hues without altering texture
Substitution Options
| Original Ingredient | Substitute | Why It Works |
|---|---|---|
| Almond Extract | Clear Vanilla | Similar sweetness; eliminates the nuttiness |
| Cornstarch | Arrowroot Powder | Comparable thickening effect; subtle texture change |
| Meringue Powder | Egg Whites | Old-school approach; takes more time to dry |
Essential Recipe Specifications
When working with Christmas Cookies With Royal Icing, precision is your best friend. The difference between a cookie that holds its shape and one that turns into a blob is often just a few degrees of butter temperature.
- 1. Butter Temp
- Ensure butter is cold (straight from fridge) and cubed into 1cm pieces.
- 2. Dough Thickness
- Use spacers to roll the dough to exactly 6mm (1/4 inch).
- 3. Bake Time
- Pull them out at exactly 10 minutes; they should look underbaked on top.
Method Comparison: Stovetop vs Oven
| Feature | Oven Method (Standard) | Stovetop/Dutch Oven |
|---|---|---|
| Heat Distribution | Even, dry heat | Intense bottom heat |
| Edge Quality | Consistent golden ring | Risk of burnt bottoms |
| Best For | Large batches of cut outs | Small batches/no oven |
Necessary Tools for Precision
You don't need a professional kitchen, though having the right equipment simplifies things. While a stand mixer like a KitchenAid is ideal for the butter, a hand mixer is perfectly fine as long as you avoid overmixing the dough.
For the icing, I suggest picking up small piping bags and a set of round metal tips (standard sizes 2 and 3). Alternatively, a sturdy Ziploc bag with a tiny corner snipped off will work for simple outlines. A digital scale is also essential, as measuring flour by the cup can often result in dry, crumbly cookies.
Bringing It Together
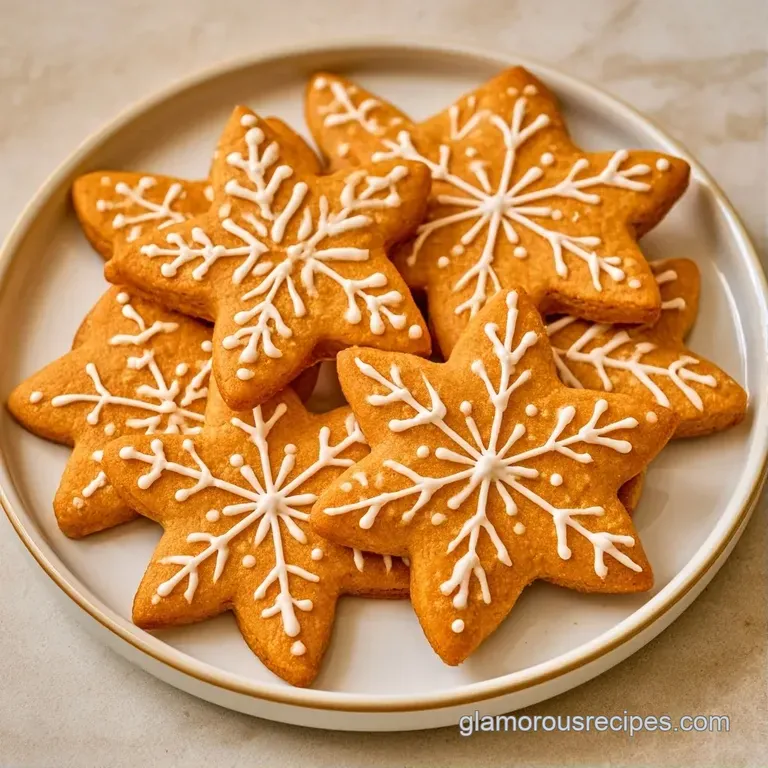
The process for these Christmas Cookies With Royal Icing is split into two distinct phases: the structural bake and the artistic finish.
Phase 1: The No Chill Dough
- Cream the Base. Beat the cold, cubed butter and 150g sugar on medium high. Mix for about 2 minutes until combined but not fluffy. Note: Over creaming adds air, which causes the cookies to puff and lose their shape.
- Emulsify. Add the egg, vanilla, and almond extracts. Mix on low speed until just incorporated.
- Dry Blend. In a separate bowl, whisk the flour, cornstarch, baking powder, and salt.
- Combine. Gradually add the dry ingredients to the butter mixture. Mix on low until a soft dough forms and pulls away from the bowl.
Phase 2: Precision Baking
- Roll and Cut. On a lightly floured surface, roll the dough to 6mm thickness. Cut into festive shapes and place on parchment paper.
- Bake. Bake at 180°C (350°F) for 10 minutes until edges are barely golden.
- Cool. Let the cookies cool completely on the pan for 5 minutes, then move to a wire rack. Note: Icing hot cookies will cause the sugar to melt and run.
Phase 3: Mastering the Royal Icing
- Mix the Base. Whisk the sifted powdered sugar and meringue powder in a bowl. Slowly add warm water, mixing until the icing is thick like toothpaste.
- Divide and Adjust. Split the icing into two bowls. Keep one thick for "piping" (outlines) and add a teaspoon of water to the other for "flooding" (filling).
- Decorate. Pipe the outline on your cooled Christmas Cookies With Royal Icing. Wait 20 minutes, then fill the center with the thinner flooding icing.
Chef's Tip: To get a perfectly smooth top, use a toothpick to swirl the flooding icing into the corners of your outline, popping any tiny air bubbles as you go.
Pro Tips and Pitfalls
Decorating is where most of the stress happens, but usually, it's just a matter of consistency. If you're feeling overwhelmed, you can always try my Christmas tree sugar cookies for a simpler shape.
Icing Bleeding Between Colors
This happens when the first color hasn't set enough before the second is added. The fix is patience. Ensure your outline has crusted over for at least 30 minutes before adding a contrasting flood color.
Cookies Puffed Up in Oven
If your cookies lost their sharp edges, you likely over creamed the butter or the oven was too cool. Use cold butter and ensure your oven is fully preheated. Serious Eats' testing on cookie chemistry shows that minimizing air incorporation is the key to preventing "spread."
Icing Won't Smooth Out
If your flooding icing looks lumpy or doesn't settle into a flat surface, it is too thick. Add warm water one drop at a time and stir slowly to avoid creating air bubbles.
Storage and Zero Waste
Once the frosting on your Christmas Cookies With Royal Icing is fully set (typically 12-24 hours), they are remarkably durable.
Storage Guidelines Store the cookies in a sealed container, ensuring they don't overlap, and keep them at room temperature for up to 2 weeks. For longer preservation, you can freeze the unbaked dough discs for up to 3 months.
When baking from frozen, just add 2 minutes to the baking time.
Zero Waste Tips Don't throw away any remaining icing! If you have extra but no more cookies, pipe tiny drops onto parchment paper and dry them in a low-heat oven (about 60°C) for one hour to create edible cake decorations.
Any dough remnants should be collected, rolled out once more, and cut into tiny "mini" cookies.
How to Serve and Enjoy
For a truly refined presentation, focus on your color balance. I recommend a palette of deep forest green, creamy white, and a pop of metallic gold or bright red.
Add your accent colors in small, precise dots or thin lines after the main flood icing has set. This creates a three dimensional effect. Serve these on a slate platter or a white porcelain tier to let the colors pop.
Because they are quite sweet, they pair best with a bitter beverage, like a strong espresso or a dark Earl Grey tea.
Creative Twists and Swaps
While the traditional vanilla almond base is a classic, you can easily adjust the flavor to suit your taste.
The Citrus Zest Twist Use the zest of one orange and one lemon instead of almond extract. This brightens the buttery dough, making the cookies taste lighter and more zesty.
Maple Brown Sugar Base Replace half of the granulated sugar with packed brown sugar and mix in a tablespoon of maple syrup with the wet ingredients. This creates a rich, caramelized flavor profile perfect for a cozy winter evening.
Lower Sugar Alternative You can reduce the granulated sugar in the dough by roughly 20g without compromising the structure. However, avoid reducing the sugar in the royal icing, as it's necessary for the structural "shell" that allows the cookies to be stacked.
Egg Free Adaptation For an egg-free version, use 60g of unsweetened applesauce or a commercial egg replacer. Note that the resulting texture will be slightly softer and less crisp, similar to my applesauce oatmeal cookies, though the icing will still hold up perfectly.
When you finally remove a tray of these Christmas Cookies With Royal Icing from the oven and see those clean, sharp edges, you'll know the precision paid off. It's a rewarding process that turns a basic treat into holiday art. Happy baking!
Recipe FAQs
What cookies go best with royal icing?
Sugar cookies with a firm structure are the best choice. This prevents the icing from soaking in or causing the cookie to warp.
Does royal icing get hard on cookies?
Yes, it dries to a hard, candy like finish. This typically takes between 12 to 24 hours to set completely.
How to make Christmas cookies from scratch?
Beat cold butter and sugar, then mix in the egg and extracts. Combine with whisked dry ingredients, roll to 1/4 inch thickness, and bake for 10 minutes.
How far in advance can I make royal icing?
Prepare your icing a day or two before you plan to decorate. Keep it sealed tightly to prevent it from crusting over before use.
Is it true that royal icing is the easiest topping for beginners?
No, this is a common misconception. It requires precise consistency control between the piping and flooding stages to look professional.
How to create the different icing consistencies?
Mix powdered sugar, meringue powder, and warm water. Divide the batch and add tiny amounts of water to one portion until it reaches a fluid flooding texture.
What is the secret to cookies that don't spread?
Cold, cubed butter and a touch of cornstarch ensure the shapes stay sharp. If you enjoyed learning about dough stability, explore a similar technique in our Linzer cookies recipe.
How to decorate cookies with specific characters?
Pipe a stiff outline of the character's shape first. Once the outline sets slightly, fill in the sections with flooding icing and add details last.
Christmas Cookies With Royal Icing