Failure-Proof Red Velvet Crinkle Cookies
- Time:20 mins active + 2 hours chilling = Total 2 hours 30 mins
- Flavor/Texture Hook: Tangy cocoa flavor with a shatter crisp sugar crust
- Perfect for: Holiday platters, Valentine's Day, or any time you need a "wow" dessert
That unmistakable scent of baking cocoa and a hint of tangy vinegar is something that always takes me back to my grandmother's kitchen during the holidays. In the American South, red velvet isn't just a color, it's a whole mood.
It's that specific, nostalgic comfort that comes from the reaction between cocoa and acid, creating a crumb that feels like a cloud and tastes like a memory.
For me, the first time I tried making these was a complete disaster. I skipped the chilling step because I was too impatient, and my cookies turned into flat, red puddles on the pan. Now, I know better. The secret is all in the patience and the double coat of sugar.
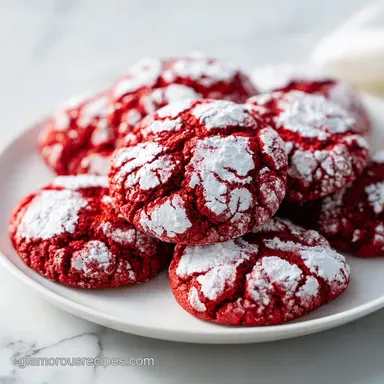
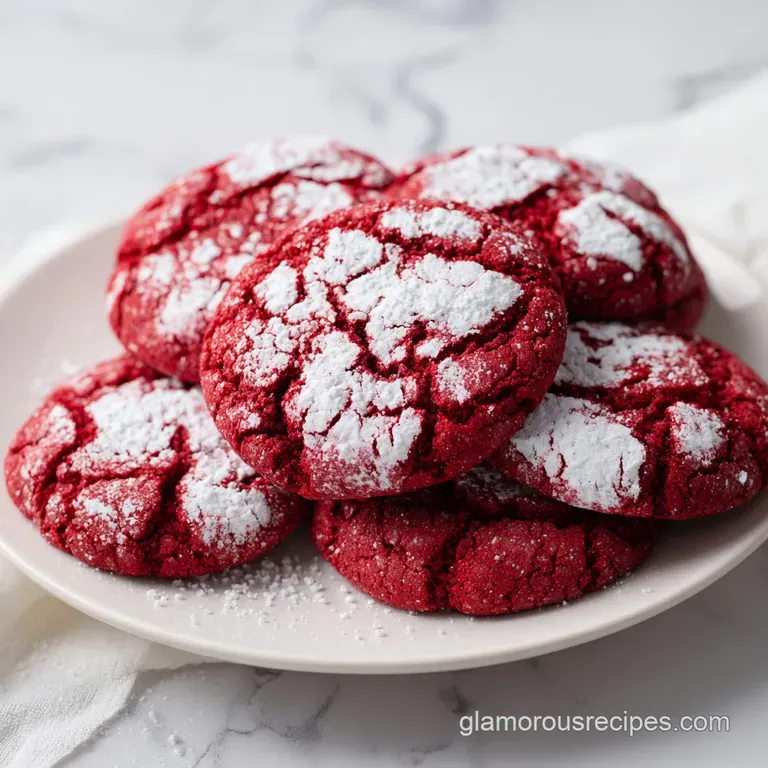
When you pull these out of the oven and see those deep, dramatic cracks against the white powdered sugar, it's honestly the most satisfying part of the process.
You can expect a cookie that is soft and fudgy on the inside but has a distinct, crisp snap on the outside. These Red Velvet Crinkle Cookies are designed to be a crowd pleaser, balancing the richness of chocolate with a slight tang that keeps them from being overly sweet.
Trust me on this, the wait for the dough to chill is where the magic happens.
The Secret to Those Cracks
The "crinkle" effect isn't just for looks, it's a result of how the cookie expands. Because we coat the outside in a thick layer of sugar, the dough underneath pushes through as it rises, creating those gorgeous fissures.
- Sugar Barrier
- The granulated sugar creates a dry layer that prevents the powdered sugar from soaking into the dough.
- Fat Stabilization
- Chilling the butter ensures the cookie doesn't spread too fast, giving the center time to rise before the edges set.
- Acid Reaction
- The white vinegar reacts with the baking soda to create tiny air bubbles, which helps the cookie lift and crack.
But what about the baking method? Some people wonder if they can skip the oven. Let's look at how different methods change the result.
| Method | Time | Texture | Best For |
|---|---|---|---|
| Traditional Oven | 12 minutes | Balanced crisp/soft | Classic crinkle look |
| Air Fryer | 8 minutes | Crispier edges | Small batches |
| Convection | 10 minutes | Evenly browned | Large quantities |
I've found that the traditional oven is the way to go for that soulful, home baked feel. It gives the cookies a consistent rise that you just don't get with faster methods.
Quick Recipe Specs
Before we get into the grit, let's talk about the numbers. I've found that keeping a close eye on the temperature is what separates a fudgy cookie from a dry one.
- Prep Time: 20 minutes
- Chilling Time: 2 hours
- Cook Time: 12 minutes
- Total Time: 2 hours 32 minutes
- Yield: 27 cookies
- Oven Temp: 350°F (175°C)
If you're planning a party, these are great to prep a day in advance. Just leave the dough balls in the fridge, and you can roll and bake them in batches when guests arrive.
Ingredients You'll Need
Right then, let's get your counter ready. I'm a big believer in using room temperature butter, as it incorporates the sugar much better. If you're wondering about flour measurement, it's the one place where people usually go wrong. According to King Arthur Baking, weighing your flour is the only way to ensure your cookies don't turn out cakey or dry.
Component Analysis
| Ingredient | Science Role | Pro Secret |
|---|---|---|
| Unsalted Butter | Structure & Fat | Use high fat European style for a richer taste |
| White Vinegar | Leavening Agent | Reacts with soda for a velvety crumb |
| Cocoa Powder | Flavor & Color | Sift it to avoid dark clumps in the red dough |
| Powdered Sugar | Visual Contrast | Roll heavily for the "snowy" look |
The Shopping List
- 1/2 cup (115g) unsalted butter, softened Why this? Provides the essential fat for a tender bite
- 3/4 cup (150g) granulated sugar Why this? Creates the structural base and sweetness
- 1 large egg (50g) Why this? Binds everything together for a chewy texture
- 1 tsp (5ml) vanilla extract Why this? Adds depth to the cocoa flavor
- 1 tbsp (15ml) red food coloring Why this? Gives that iconic vibrant red hue
- 1 tsp (5ml) white vinegar Why this? Activates the baking soda for lift
- 2 cups (250g) all purpose flour Why this? The main structure of the cookie
- 2 tbsp (15g) unsweetened cocoa powder Why this? Adds the subtle chocolate essence
- 1 tsp (5g) baking soda Why this? The primary leavening agent
- 1/4 tsp (1.5g) salt Why this? Balances the sweetness
- 1/2 cup (60g) granulated sugar (for coating)
- 1/2 cup (60g) powdered sugar (for coating)
Smart Swaps
| Original Ingredient | Substitute | Why It Works |
|---|---|---|
| All Purpose Flour | gluten-free 1:1 Blend | Similar structure. Note: May be slightly more fragile |
| Red Food Coloring | Beetroot Powder | Natural color. Note: Result is a muted brick red, not bright red |
| White Vinegar | Apple Cider Vinegar | Similar acidity. Note: Adds a very slight fruity undertone |
Tools for the Job
You don't need a professional kitchen to make these, but a few basics make the process way smoother. I usually use a stand mixer such as KitchenAid, but a handheld mixer works just as well.
- Electric Mixer: Essential for getting that butter and sugar pale and fluffy.
- Mixing Bowls: One for wet, one for dry.
- Baking Sheet: A heavy duty one helps prevent the bottoms from burning.
- Parchment Paper: Trust me, don't skip this, or you'll be scrubbing the pan for an hour.
- Cookie Scoop: A 1 inch scoop ensures every cookie is the same size.
Making Your Cookies

Let's crack on. The most important thing here is the aroma. You'll know you're on the right track when the smell of cocoa starts to fill the air during the mixing phase.
Phase 1: Crafting the Base
- Cream the softened butter and granulated sugar. Use your mixer on medium high until the mixture is pale and fluffy. It should smell like a sweet vanilla cake base.
- Beat in the egg, vanilla extract, red food coloring, and white vinegar. Mix until the color is a uniform, vibrant red with no streaks.
- In a separate bowl, whisk together the flour, cocoa powder, baking soda, and salt. Note: Sifting the cocoa powder here prevents those annoying dark spots.
- Gradually fold the dry ingredients into the wet ingredients. Stop as soon as a soft dough forms; overmixing will make the cookies tough.
Phase 2: The Critical Chill
- Scoop the dough into 1 inch balls. Place them on a tray, cover them with plastic wrap, and refrigerate for at least 2 hours. Note: This stabilizes the fats so they don't melt instantly in the oven.
Phase 3: The Double Coat and Bake
- Preheat your oven to 350°F (175°C) and line your baking sheet with parchment paper.
- Roll each chilled dough ball first in granulated sugar. This creates a moisture barrier. Then, roll it heavily in powdered sugar until the ball is completely white.
- Place the cookies on the sheet and bake for 10-12 minutes. Look for the edges to be set while the centers remain soft. You'll smell a toasted, chocolatey aroma when they're ready.
- Cool the cookies on the pan for 5 minutes. This allows the centers to firm up so they don't shatter when you move them. Transfer to a wire rack to cool completely.
Avoid These Common Mistakes
It's easy to get over excited and rush these, but that's usually where things go wrong. The most common issue is the "disappearing sugar," where the white coating vanishes into the dough.
Troubleshooting Common Issues
| Issue | Solution |
|---|---|
| Why Your Cookies Are Too Flat | This usually happens because the dough was too warm. When the butter is already soft, the cookies spread before the baking soda can lift the center. If this happens, pop the remaining dough back in th |
| Why the Sugar Disappears | If you only use powdered sugar, it absorbs the moisture from the dough and melts away. That's why the double roll (granulated then powdered) is non negotiable. |
| Why the Centers Are Raw | Over coating the cookies in sugar can sometimes insulate the dough. If the edges are done but the center is gooey, give them another 2 minutes. |
Common Mistakes Checklist:
- ✓ Did I cream the butter and sugar until pale?
- ✓ Did I sift the cocoa powder to avoid lumps?
- ✓ Was the dough chilled for at least 2 hours?
- ✓ Did I roll in granulated sugar before the powdered sugar?
- ✓ Did I avoid overmixing the flour?
Creative Flavor Twists
Once you've got the basic Red Velvet Crinkle Cookies down, you can start playing with the recipe. I love adding a bit of a surprise inside.
For a truly decadent treat, push a small piece of chilled cream cheese (about a teaspoon) into the center of the dough ball before rolling in sugar. When they bake, you get a melted, tangy center that tastes like a mini cheesecake.
If you're craving something sweet but don't want to turn on the oven, my edible cookie dough recipe is a great alternative for a quick snack.
A Few More Ideas:
- Chocolate Chip Twist: Fold in 1/2 cup of mini semi sweet chocolate chips.
- Orange Zest: Add the zest of one orange to the butter mixture for a citrusy brightness.
- Almond Extract: Swap half the vanilla for almond extract to give it a more "bakery" flavor.
Adjusting the Batch Size
If you're just baking for yourself, you can halve the recipe. Beat one egg in a small bowl and use half of it (about 25g). Use a smaller baking sheet and reduce the bake time by about 20%.
When doubling the recipe, be careful with the leavening. I suggest only increasing the baking soda to 1.75 tsp rather than a full double, as too much can leave a metallic aftertaste. Work in batches so the dough doesn't warm up while you're rolling.
Common Baking Myths
Myth: You must use cake flour for red velvet. Truth: While cake flour makes them softer, all purpose flour provides the structure needed for a "crinkle" cookie. Using cake flour often makes them too fragile to hold the sugar coating.
Myth: The red color comes from the cocoa. Truth: In the old days, alkaline cocoa reacted with acid to turn reddish. Modern cocoa is processed differently, so we use food coloring to get that vibrant, soulful red we love.
Keeping Them Fresh
These cookies stay soft for a surprisingly long time if stored correctly. Since they have a high sugar content, they don't dry out as quickly as a standard shortbread.
Storage Guidelines:
- Room Temp: Store in an airtight container for up to 5 days.
- Fridge: 7-10 days (though they'll be firmer).
- Freezer: Up to 3 months. Freeze the baked cookies in a single layer on a tray before transferring to a bag.
Zero Waste Tip: If you have leftover powdered sugar that's become clumped, don't toss it. Sift it through a fine mesh strainer or pulse it in a mini food processor to make it fluffy again for your next batch.
Perfect Drink and Snack Pairings
Because these cookies are rich and slightly tangy, they pair best with things that cut through the sweetness. A cold glass of almond milk or a hot cup of black coffee is the classic choice.
If you're planning a big dessert spread, these pair beautifully with a slice of German Chocolate Cake for a total chocolate overload. For something lighter, try serving them with fresh raspberries and a dollop of whipped cream.
Trust me, these cookies are a total showstopper. Once you see that first tray come out of the oven with those snowy cracks, you'll realize why the chilling time is worth every single minute. Happy baking!
Recipe FAQs
Why must the dough be refrigerated for 2 hours?
It stabilizes the fats. Chilling prevents the cookies from spreading too quickly in the oven, which is essential for achieving a thick shape and the signature cracked surface.
Is it true that I only need powdered sugar for the coating?
No, this is a common misconception. Powdered sugar alone absorbs moisture and disappears; you must roll the dough in granulated sugar first to create a moisture barrier.
How to achieve the vivid white crinkle look?
Roll dough balls in granulated sugar first, then heavily in powdered sugar. This double roll technique ensures the outer layer remains bright white and opaque after baking.
How to tell when the cookies are perfectly baked?
Look for set edges and soft centers. Bake for 10-12 minutes at 350°F, then let them firm up on the pan for 5 minutes before moving them to a wire rack.
Can I use liquid food coloring instead of gel?
Yes, but be mindful of moisture. Liquid coloring works well, though gel is more concentrated and less likely to alter the dough's consistency.
What is the secret to preventing flat cookies?
Keep the dough cold. If the butter softens too much before entering the oven, the cookies will spread; return any warm dough to the fridge immediately.
Can I use this dough for other cookie styles?
Yes, by omitting the sugar coatings. If you enjoyed mastering the fat-stabilization technique here, see how the same principle works in our sugar cookie recipe.
Red Velvet Crinkle Cookies