Chicken Wings: Ultimate Crispy Baked

- Time: 10 min active + 50 min baking = Total 60 minutes
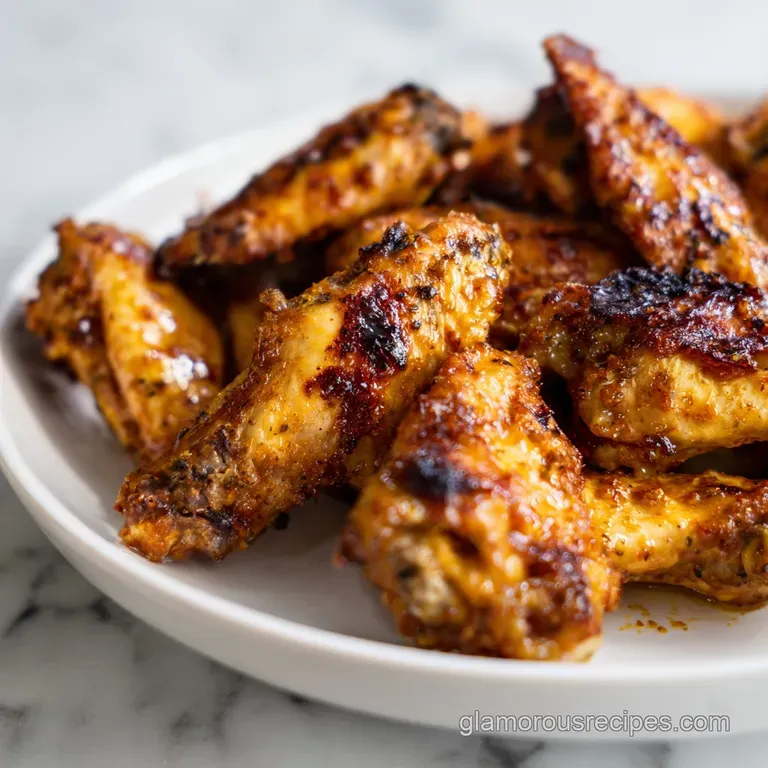
- Flavor/Texture Hook: Mahogany, crackling skin with a velvety honey glaze
- Perfect for: Game day feasts, family gatherings, or comfort food cravings
The sound is what hits you first, that specific, loud crackle when you bite into a wing that has actually been rendered right. I remember one rainy November Sunday, the house packed with cousins, the TV humming in the background, and the air thick with the scent of toasted paprika.
We were all huddled around the kitchen island, waiting for the timer to go off, knowing that the first batch was about to emerge from the oven.
There is something about sharing a platter of wings that just settles the soul. It's messy, it's communal, and it's the kind of comfort that doesn't need to be fancy to be meaningful.
I spent a long time trying to get that restaurant style crunch at home, often ending up with skin that was more rubbery than crispy, but once I stopped fighting the moisture and started working with it, everything changed.
You can expect a result that feels like a treat but doesn't require a vat of oil. These Chicken Wings come out with a deep, rich color and a sauce that clings to every curve without making the skin soggy.
It's the kind of recipe that makes you feel like the hero of the party, and honestly, it's much easier than it looks.
The Secret to Crispy Chicken Wings
Getting that shatter crisp texture in a home oven is all about managing the surface of the meat. Most people just toss them in sauce and bake, but that's a recipe for sogginess. By focusing on the skin first and the glaze last, we build layers of flavor and texture that actually stay put.
The Powder Trick: Baking powder raises the pH level of the skin. This breaks down the proteins and allows moisture to evaporate faster, creating those tiny, crisp bubbles.
Airflow Magic: Using a wire rack lets heat hit the bottom of the wing. Without it, the wings sit in their own juices and steam instead of roasting.
Tack up Time: Letting the glazed wings sit for two minutes allows the honey and butter to set. This prevents the sauce from sliding off the moment they hit the plate.
| Method | Time | Texture | Best For |
|---|---|---|---|
| Oven (Rack) | 50 mins | Shatter crisp | Large batches, healthier option |
| Stovetop | 15 mins | Greasy crunch | Very small batches, fast cravings |
| Air Fryer | 25 mins | Hard crunch | Single servings, maximum speed |
This approach ensures the meat stays juicy while the outside reaches that coveted mahogany hue. It's a balance of high heat and strategic drying that removes the need for heavy breading.
Texture Secrets and Logic
To really understand why this works, we have to look at the components. It's not just about heat, but about how the ingredients interact with the skin of the Chicken Wings during the roasting process.
| Ingredient | Science Role | Pro Secret |
|---|---|---|
| Baking Powder | Surface Alkalinity | Use aluminum free to avoid a metallic taste |
| Honey | Sugar Caramelization | Adds the "tack" that holds the glaze |
| Apple Cider Vinegar | Acid Balance | Cuts through the butter fat for a cleaner finish |
| Smoked Paprika | Color Development | Provides that deep red hue without overcooking |
Right then, let's look at what you need to get this right. Don't bother with low-fat butter here, as the fat is what carries the garlic and Sriracha flavors deep into the skin.
Essential Ingredients and Swaps
For the wings and rub: - 2 lbs chicken wings, split into flats and drums Why this? Balanced mix of meat and skin - 1 tbsp baking powder Why this? Essential for the alkaline crisp - ½ tsp salt Why this? Basic flavor
Enhancer - 1 tsp garlic powder Why this? Savory base note - 1 tsp smoked paprika Why this? For the deep mahogany color
For the signature glaze: - ½ cup unsalted butter, melted Why this? Velvety mouthfeel - ⅓ cup honey Why this? Natural sweetness and shine - 2 tbsp apple cider vinegar Why this? Brightness and tang - 1 tbsp
Sriracha Why this? Controlled, vinegary heat - 1 clove garlic, minced Why this? Fresh aromatic punch
| Original Ingredient | Substitute | Why It Works |
|---|---|---|
| Baking Powder | Cornstarch | Similar drying effect. Note: Slightly less "bubble" on skin |
| Honey | Maple Syrup | Similar viscosity. Note: Adds a woody, autumnal sweetness |
| Apple Cider Vinegar | Rice Vinegar | Milder acidity. Note: Less punchy than ACV |
| Sriracha | Gochujang | Fermented heat. Note: Thicker texture, deeper umami |
If you're looking for something to dip these in, a creamy garlic sauce provides a cool, sharp contrast to the honey heat of the glaze.
Required Kitchen Gear
You don't need a professional kitchen, but a few specific tools make the difference between a soggy wing and a crackling one. Trust me on the rack, it's the most important part.
- Rimmed baking sheet: To catch all the drippings.
- Wire cooling rack: This must fit inside the sheet to lift the Chicken Wings.
- Paper towels: You'll need a whole roll to get them truly dry.
- Tongs: For flipping without burning your fingers.
- Large mixing bowl: For an even coating of the rub.
It's a simple setup, but the goal is to maximize air circulation. If the wings are crowded, they'll just steam, and you'll lose that shatter effect we're after.
Step by step Assembly
Now, let's get into the rhythm of it. Take your time with the drying process, as that's where the magic happens.
- Pat every single wing dry with paper towels until no moisture remains on the skin. Note: This is the most critical step for crunch
- In a large bowl, toss the wings with the baking powder, salt, garlic powder, and smoked paprika until evenly coated.
- Arrange the wings in a single layer on a wire rack placed inside a rimmed baking sheet, ensuring they do not touch.
- Bake in a preheated oven at 425°F (220°C) for 25 minutes.
- Carefully flip each wing using tongs and bake for another 20-25 minutes until the skin is deep mahogany and the internal temperature reaches 165°F (74°C).
- While wings roast, whisk together the melted butter, honey, vinegar, Sriracha, and minced garlic in a bowl.
- Immediately toss the hot Chicken Wings in the glaze.
- Let them sit for 2 minutes until the sauce tacks up and clings to the skin.
Common Mistakes and Fixes
Even the best of us have a wing disaster now and then. Usually, it comes down to moisture or temperature. If your skin isn't cracking, check your oven temp with a separate thermometer.
Why Your Wings Are Soggy
This usually happens because the wings were too crowded on the pan or weren't dried enough before roasting. When steam has nowhere to go, it settles back onto the skin.
Why the Sauce Separates
If the butter was too hot or the honey was too cold, the glaze can split. A quick whisk right before tossing usually fixes this.
Fixing Undercooked Centers
Some drums take longer than flats. If the skin is dark but the center is pale, pop them back in for 5 minutes.
| Problem | Root Cause | Solution |
|---|---|---|
| Rubby skin | Too much moisture | Pat dry again; use a wire rack |
| Burnt edges | Oven too hot | Lower temp by 25°F; check placement |
| Bland taste | Under salted | Add a pinch of flaky salt after glazing |
Common Mistakes Checklist
- ✓ Used aluminum free baking powder to avoid metallic taste
- ✓ Wings are spaced at least half an inch apart
- ✓ Oven fully preheated to 425°F before wings went in
- ✓ Wings patted dry twice (once before rub, once after)
- ✓ Internal temperature checked at the thickest part of the drum
Bold Flavor Variations
Once you've got the base technique down, you can take these Chicken Wings in any direction. The honey Sriracha is a classic, but don't be afraid to play with the acidity.
For a zesty kick, you can substitute the honey with a bit of brown sugar and add a squeeze of lime. If you want a more savory, earthy vibe, swap the paprika for cumin and coriander. For those who love a dip, a zesty shawarma sauce works brilliantly as a side for these.
You could also try a "dry" version by skipping the butter and honey and just doubling the rub. This results in a more intense, concentrated flavor that's great for those who hate messy fingers.
Scaling for Big Crowds
When you're feeding a whole squad, the logic changes slightly. You can't just cram more wings onto one tray, or you'll end up with a soggy mess.
Scaling Down (½ batch): Use a smaller baking sheet and reduce the bake time by about 5-10 minutes. Since you're using less meat, the oven recovers heat faster.
Scaling Up (2x-4x batch): Work in batches. If you must use multiple racks in the oven, rotate the pans halfway through. I recommend increasing the salt and spices to only 1.5x rather than a full double to avoid over seasoning.
| Target Yield | Pan Count | Temp Adjustment | Time Adjustment |
|---|---|---|---|
| 2 Servings | 1 Small | None | -5 mins |
| 8 Servings | 3 Large | Lower 25°F | +10 mins |
| 12 Servings | 4-5 Large | Lower 25°F | +15 mins |
Just remember to leave plenty of space between each wing. It's better to bake two trays sequentially than one overcrowded tray that doesn't crisp.
Storage and Bone Waste
If you're lucky enough to have leftovers, store the Chicken Wings in an airtight container in the fridge for up to 4 days. To reheat, avoid the microwave at all costs, as it will turn the skin into rubber. Use an oven or air fryer at 400°F for 5 minutes to bring back the shatter.
For freezing, freeze the cooked, unglazed wings for up to 2 months. Glaze them only after reheating.
Don't throw away the wing tips or any stray bones. I love tossing them into a pot with some aromatics to make a rich, gelatinous stock. It's a wonderful way to nourish your kitchen and ensure nothing goes to waste.
Best Serving Methods
The way you present these is part of the experience. I love a big wooden platter piled high, with plenty of napkins scattered around. It tells your guests that it's okay to get messy.
Serve them with cold, crisp celery and carrot sticks to cut through the richness of the butter and honey. A side of blue cheese or ranch is standard, but a squeeze of fresh lime over the top right before serving adds a brightness that makes the flavors pop.
Ultimately, these Chicken Wings are about more than just the food. They're about the laughter and the togetherness that happens when everyone is digging into the same plate. Enjoy the process, embrace the mess, and let the food bring everyone closer.
Recipe FAQs
What is the best cooking method for chicken wings?
Oven roasting at 425°F on a wire rack. This allows hot air to circulate entirely around the wing, ensuring the skin reaches a deep mahogany color and a shatter crisp texture.
Are wings good for diabetics?
No, they are generally not ideal. The honey and Sriracha used in the glaze contain sugars that can cause significant blood glucose spikes.
What is the secret ingredient for crispy wings?
Baking powder. It raises the pH level of the skin, breaking down proteins and creating tiny bubbles that crisp up far more than using salt alone.
Are chicken wings good for collagen?
Yes, particularly when simmered into stock. Boiling the bones and skin creates a gelatinous liquid; if you enjoyed creating depth here, see how we use a similar velvety broth in our chicken and dumplings.
How to reheat wings without making them soggy?
Heat in an oven or air fryer at 400°F for 5 minutes. Avoid the microwave at all costs, as it traps steam and turns the crispy skin rubbery.
Is it true that I can bake these on a flat baking sheet for the same results?
No, this is a common misconception. Without a wire rack, the wings sit in their own rendered fat, which steams the bottom and prevents a uniform crunch.
How to prepare the wing glaze?
Whisk melted butter, honey, apple cider vinegar, Sriracha, and minced garlic. Toss the hot wings in this mixture immediately after baking and let them sit for 2 minutes to allow the sauce to tack up.
Crispy Baked Chicken Wings

