Potato Sourdough Starter
- Creating an Everlasting Potato Sourdough Starter
- Artisan Alchemy Behind the Starter
- Technical Specifications and Yield
- Selecting Your Artisan Components
- Essential Tools for Fermentation
- The Method of Creation
- Correcting Fermentation Deviations
- Scaling the Culture
- Flavor Variations and Profiles
- Longevity and Maintenance Rituals
- Storage & Maintenance Rituals
- Elegance in Presentation
- Potato Sourdough Starter FAQs
- 📝 Recipe Card
Creating an Everlasting Potato Sourdough Starter
Listen for that faint, rhythmic fizzing. It sounds like a secret being whispered in a jar. If you’ve ever felt the heartbreak of a traditional flour starter turning into a grey, neglected mess, this is your redemption.
We are going to transform humble flakes into a bubbling artisan engine that stays sweet and reliable for years.
Honestly, I used to treat sourdough like a high maintenance pet I wasn’t ready for. But then I discovered the magic of using potato flakes as the fuel. It is much more forgiving than flour based versions and gives your bakes a velvety crumb that flour just can't touch.
You’ll never have to worry about that aggressive, vinegary sourness again.
Right then, let's get into how we create this liquid gold. We are aiming for precision here, focusing on the chemistry of simple ingredients to create something truly elegant for your kitchen counter. Trust me on this, once you see those first bubbles dancing, you'll be hooked on the process.
Artisan Alchemy Behind the Starter
- Amylase Conversion: Enzymes in the potato flakes break down complex starches into simple sugars. This provides an immediate, accessible feast for the yeast cells to multiply rapidly.
- Lactobacillus Symbiosis: Beneficial bacteria consume the sugar and produce mild lactic acid. This lowers the pH just enough to prevent spoilage while keeping the flavor profile delicate and sweet.
- Osmotic Pressure Management: High sugar concentrations regulate the rate of fermentation. It ensures the yeast doesn't exhaust its food supply too quickly during the long 5 day initial rest.
| Method Type | Fermentation Time | Texture Result | Best For |
|---|---|---|---|
| Fast (Commercial) | 1 hour | Airy but dry | Basic sandwich bread |
| Classic (Flour) | 7 to 10 days | Chewy and tangy | Rustic boules |
| Potato Starter | 5 days (Initial) | Velvety and soft | Artisan rolls and strata |
The choice of method depends entirely on your patience and the desired crumb. While commercial yeast is fast, it lacks the depth of character we find here. This Potato Sourdough Starter bridges the gap by offering a more consistent rise than traditional wild yeast while maintaining an artisan soul.
Technical Specifications and Yield
The beauty of this recipe lies in its scalability and the way it integrates with other dishes. For instance, the soft texture of bread made from this starter would be a dream when used in a Breakfast Casserole recipe. It absorbs custard much better than standard store-bought loaves.
| Component | Science Role | Pro Secret |
|---|---|---|
| Instant Potato Flakes | Starch Source | Use unseasoned flakes only to avoid chemical interference. |
| Granulated Sugar | Primary Fuel | High sugar levels create the "Sweet Starter" profile. |
| Warm Water | Activation Medium | Keep water between 40°C and 43°C for optimal yeast health. |
| Active Dry Yeast | Microbial Base | This provides the initial kickstart for the culture. |
Precision with water temperature is the most critical checkpoint. If you go over 45°C, you risk killing the delicate yeast cells before they even begin to work their magic. Use a digital thermometer to be certain; guessing is the enemy of artisan baking.
Selecting Your Artisan Components
To begin, you will need 1 packet (7g) active dry yeast. If you prefer a more traditional approach, you can substitute this with 21g of fresh cake yeast, which provides a slightly more floral aroma. The yeast is our foundation, the spark that begins the life of the jar.
Next, prepare 2 cups (480ml) warm water, divided. It is best to use filtered water if your tap water has a heavy chlorine scent, as chlorine can inhibit fermentation. We also require 1.5 cups (300g) granulated sugar, divided.
While honey works as a substitute, it changes the flavor profile significantly and can make the fermentation more unpredictable.
Finally, the star of the show: 6 tbsp (30g) instant potato flakes, divided. Why this? Potato starch provides a unique moisture retaining quality that wheat flour cannot replicate. If you find yourself out of flakes, you can use very finely mashed, plain boiled potatoes, but the flakes offer a consistency that is easier to manage for beginners.
Essential Tools for Fermentation
You don’t need a laboratory, but a few specific items will make your life much easier. A glass or ceramic jar is non negotiable. Metal can sometimes react with the acidity of the starter over long periods. I personally use a large wide mouth Mason jar so I can easily see the bubble activity through the glass.
A wooden or plastic spoon is also vital. Again, we are avoiding reactive metals. You'll also need a clean kitchen towel or a loose fitting lid. The starter needs to breathe to let gases escape, but you want to keep dust and stray fruit flies out of your precious culture.
Right, once your tools are clean and your ingredients are weighed, we can start the assembly. Precision here leads to the most elegant results later on.
The Method of Creation

1. Activating the Base Culture
In your clean glass jar, combine the yeast packet with 1 cup (240ml) of the warm water and 3/4 cup (150g) of the sugar. Stir gently with your wooden spoon until the sugar is mostly dissolved and no dry yeast clumps remain.
2. Managing the Initial Ferment
Add 3 tablespoons (15g) of the instant potato flakes to the mixture. Whisk until the flakes are hydrated and the liquid looks like a thin, milky soup. This is the "nursery" stage for your microbes.
3. Executing Feeding Instructions
Cover the jar loosely with your towel or a lid that isn't tightened. Let it sit on your counter at room temperature. You need to leave it undisturbed for 5 days. You’ll notice it starts to smell slightly yeasty and sweet this is the magic happening.
4. Transitioning to Maintenance
On day 5, it is time for the first feeding. Add the remaining 1 cup (240ml) warm water, 3/4 cup (150g) sugar, and 3 tablespoons (15g) potato flakes. Stir well and let it sit out for another 8 to 12 hours until it is active and bubbly.
5. Refrigeration and Usage
Once bubbly, take out 1 cup of the starter to use in your baking. The remaining liquid goes into the refrigerator. This is now your "mother." You will need to feed it this same ratio of sugar, flakes, and water every 3 to 5 days to keep it alive.
6. The Bubbling Cue
Always look for the shimmering surface bubbles. If the starter looks flat and still after a feeding, it may need a warmer spot to kickstart the activity. A cold kitchen can often lead to a sluggish ferment.
7. Sensory Checkpoints
By day 3, the aroma should shift from "wet potato" to something reminiscent of a light, sweet beer. This is a sign that the yeast has successfully dominated the environment and the pH is balancing correctly.
8. Final Maturation
After the feeding on day 5, the starter should double in volume within a few hours. This is your cue that it is strong enough to lift dough. If it doesn't double, give it one more feeding cycle before the first bake.
Correcting Fermentation Deviations
Sometimes things go sideways. I once left my starter too close to a drafty window and it just... stopped. It looked like grey pond water. Don't panic. Most issues are easily fixed by adjusting the environment or the feeding schedule.
Reviving a Sluggish Starter
If your starter isn't bubbling after a feeding, it’s usually a temperature issue. Move the jar to a warmer spot, like the top of the refrigerator or inside an oven with just the light turned on. The gentle heat is often all it takes to wake up the microbes.
Dealing with "Hooch"
A clear or slightly dark liquid may form on top of your starter. This is called "hooch." It is simply alcohol, a byproduct of fermentation telling you the yeast is hungry.
| Problem | Root Cause | Solution |
|---|---|---|
| Dark Liquid on Top | Underfeeding | Pour off the liquid and feed immediately. |
| Sour/Vinegar Smell | Over fermentation | Discard half and feed with fresh sugar and flakes. |
| Pink or Orange Tint | Bacterial Infection | Discard the entire batch and sterilize the jar. |
Usually, the liquid is harmless. You can stir it back in for a sharper flavor or pour it off for a milder taste. However, if you see any fuzzy growth or strange colors, that's a hard "no" from me. Toss it and start over.
Common Mistakes Checklist
- ✓ Always use room temperature or warm water, never boiling.
- ✓ Ensure your jar is completely free of soap residue (soap kills yeast).
- ✓ Don't seal the lid tight; the gases need a way to escape.
- ✓ Keep the feeding schedule consistent set a reminder on your phone.
- ✓ Use unseasoned potato flakes; butter or garlic flavorings will ruin the culture.
Scaling the Culture
If you find yourself baking for a large crowd, you can easily double the starter. Simply double the water, sugar, and flakes during a feeding. Just ensure your jar is large enough to handle the expansion. It will grow significantly once it hits that peak fermentation stage.
For a smaller household, you can keep the starter at its original size but bake more frequently. If you need to hit the pause button, this starter is very resilient in the fridge. I've left mine for 10 days without a feeding, and while it was a bit grumpy, a double feeding brought it right back to life.
Baking for a smaller yield? You can halve the ingredients, but honestly, it’s easier to keep the full amount and share the extra starter with a friend. It’s the ultimate artisan gift.
Flavor Variations and Profiles
While the classic version is sweet, you can nudge the flavor profile. Adding a pinch of ginger powder can provide a subtle warmth that pairs beautifully with fruit based bakes. If you want a more rustic feel, you can experiment with using the leftover water from boiling potatoes instead of plain water.
Creating a gluten-free Foundation
For those looking for a potato flake sourdough starter gluten-free option, this recipe is naturally safe as long as your yeast and flakes are certified. It’s a game changer for gluten-free baking because potato starch provides the "pull" and moisture that many GF breads lack.
Going Sugar Reduced
If the 1.5 cups of sugar feels high, you can reduce it by a third, but be warned: the fermentation will be slower. The sugar isn't just for flavor; it's the primary fuel. Reducing it too much can lead to a weaker rise in your bread.
Longevity and Maintenance Rituals
"Sourdough needs to be fed daily." This is the biggest myth in baking. Flour starters might, but this potato version is much more chill. It can survive quite a while in the cold of the fridge because the sugar acts as a preservative.
Another myth is that you need "wild" yeast from the air. While that's how ancient starters worked, using a packet of active dry yeast ensures a consistent, safe, and delicious result every single time. It's about precision and control, not leaving your dinner up to luck.
Finally, don't believe that you have to use fresh potatoes. While you can, instant flakes are actually better because they are processed to have a consistent starch structure, which makes your fermentation more predictable.
Storage & Maintenance Rituals
Storage: Keep your mother starter in the refrigerator in a glass jar. It will stay healthy for months as long as you feed it every 3-5 days. If you're going on vacation, give it a big feeding and it should be fine for up to two weeks.
Zero Waste: Never just throw away "discard" starter! If you have too much, use the extra cup in pancake batter or waffle mix. It adds a fermented depth that makes breakfast feel like a high end pastry shop. You can even add it to a Greek Recipes inspired flatbread for an incredible texture.
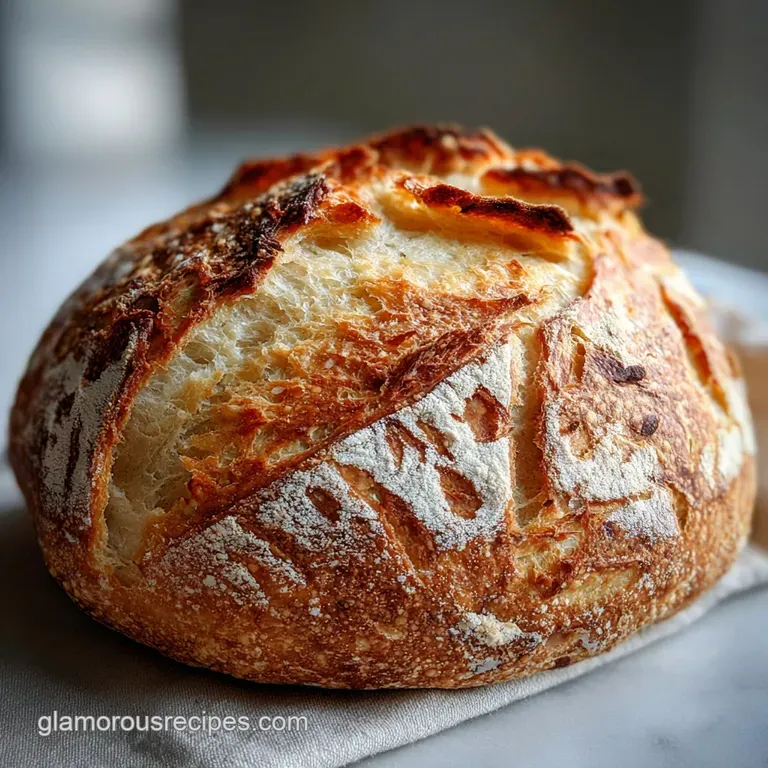
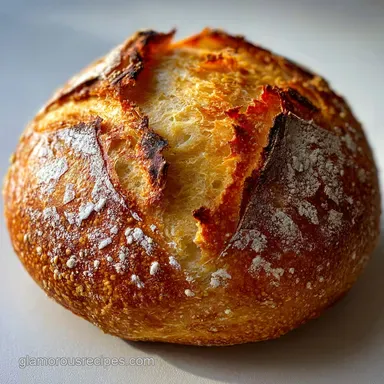
Elegance in Presentation
When you finally bake with this starter, the presentation is where you show your artisan flair. This isn't just bread; it's a centerpiece. To achieve a professional, elegant look, I focus on three specific color accents:
- Golden Honey: Brush the crust with a light honey water wash immediately after baking. This gives it a shimmering, sun drenched glow.
- Emerald Herbs: Sprinkle fresh, finely chopped rosemary over the top before the final rise. The green against the golden crust is stunning.
- Ruby Salts: A tiny pinch of pink Himalayan sea salt on the surface adds a delicate sparkle and a sharp contrast to the sweetness.
Add these accents right before the bread goes into the oven (for the herbs and salt) or immediately after it comes out (for the honey). It transforms a simple loaf into something truly magical.
Enjoy the process of watching your "Herman" grow it's a little bit of kitchen magic that pays off in every single bite.

Potato Sourdough Starter FAQs
Why use potato flakes in sourdough starter?
For enhanced moisture and a velvety crumb. Potato flakes contain starches that break down into sugars, providing readily available food for the yeast and bacteria, leading to a more consistent rise and a tender texture in your bakes.
Is potato flake sourdough real sourdough?
Yes, it is. Real sourdough relies on a culture of wild yeast and lactic acid bacteria to leaven dough, and a potato flake starter cultivates these same essential microbes, just with a different, more forgiving food source than traditional flour.
Can I feed my sourdough starter potato flakes?
Yes, you can. Potato flakes are an excellent and stable food source for a sourdough starter, providing the necessary starches and sugars for microbial activity and fermentation.
How to maintain a potato flake sourdough starter?
Feed regularly and store properly. Maintain the starter by feeding it with warm water, unseasoned potato flakes, and a bit of sugar every 3-5 days if kept at room temperature, or less frequently if stored in the refrigerator.
What's the difference between potato flake starter and flour starter?
Potato flake starters are generally more forgiving and produce a milder flavor. The flakes offer a more direct sugar source for the yeast, leading to quicker activity and less of the sharp, vinegary tang often associated with flour based starters.
Can I use seasoned potato flakes for my starter?
No, always use unseasoned flakes. Seasonings like salt, garlic, or onion powder can interfere with the delicate balance of yeast and bacteria in your starter, potentially harming the culture or introducing unwanted flavors.
How long does a potato flake sourdough starter last?
Potentially for years with proper care. When consistently fed and stored correctly, either at room temperature or in the refrigerator, a potato flake starter can remain active and productive indefinitely, much like its flour based counterparts.
Potato Sourdough Starter
Ingredients:
Instructions:
Nutrition Facts:
| Calories | 101 kcal |
|---|---|
| Protein | 0.7 g |
| Fat | 0.1 g |
| Carbs | 25.9 g |
| Fiber | 0.2 g |
| Sugar | 22.5 g |
| Sodium | 0.4 mg |
