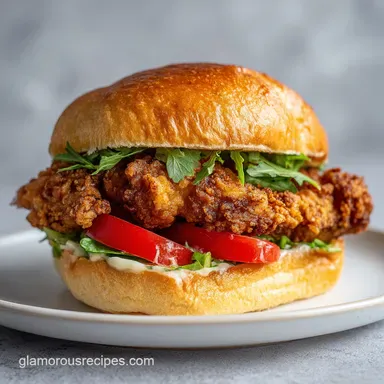
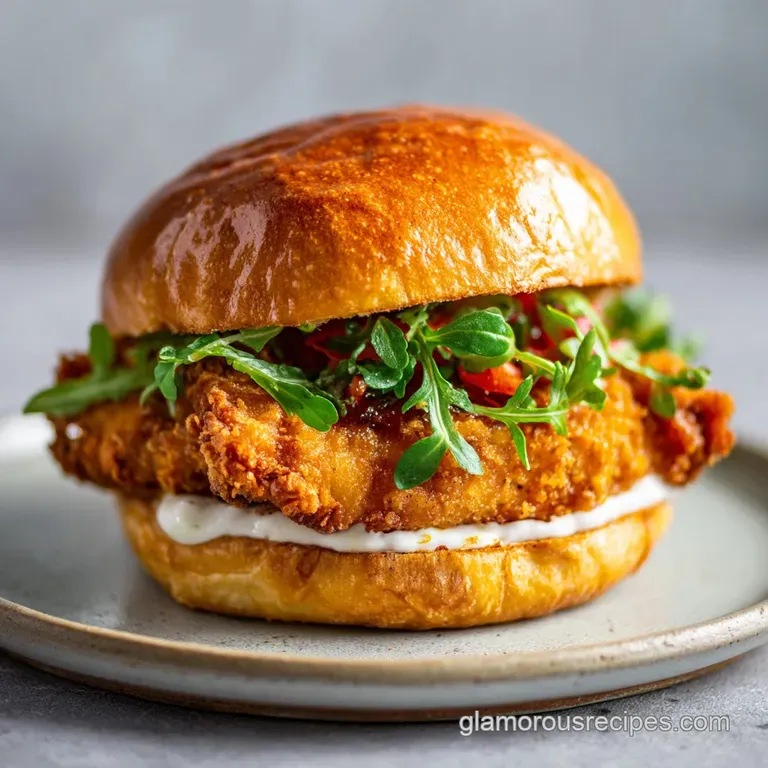
Crispy Chicken Sandwich: Golden and Juicy
- Time:30 minutes active + 30 minutes brining = 1 hour 10 mins total
- Flavor/Texture Hook: Shattering golden crust paired with a zesty, honey lemon yogurt sauce
- Perfect for: A cozy family game night or a comforting weekend lunch together
- The Best Crispy Chicken Sandwich Ever
- Why the Texture Actually Works
- Essential Component Breakdown
- The Must Have Kitchen Gear
- Bringing It Together
- Solving Common Cooking Mishaps
- Swap Your Ingredients Here
- Adjusting Your Batch Size
- Debunking Common Kitchen Myths
- Storage Guidelines
- Serving Your Final Plate
- High in Sodium
- Recipe FAQs
- 📝 Recipe Card
The Best Crispy Chicken Sandwich Ever
The sound of the first bite is what really gets me - that loud, satisfying crack that tells you everything is going right. I remember a rainy Saturday a few years back when the whole house was buzzing. We were all crammed into the kitchen, the air thick with the smell of toasted buns and warming oil.
It's the kind of afternoon where the food isn't just a meal, it's the event that brings everyone to the table, laughing and waiting for that first golden piece of chicken to hit the plate.
But it hasn't always been this smooth. I once tried to rush this process by skipping the brining step, thinking I could just season the outside and call it a day. The result? A sandwich that looked great but tasted like cardboard on the inside.
It was a humbling reminder that soul nourishing food takes a little patience. Now, this Crispy Chicken Sandwich has become our family's go to comfort meal, a classic that never fails to make the house feel warm, no matter the weather outside.
We're aiming for a beautiful contrast here. We want the heat of the cayenne to play against the cool, creamy Greek yogurt sauce, and the hearty chew of a whole wheat bun to balance the fragile, airy crunch of the chicken.
It's all about those opposing forces working together to create something that feels like a hug on a plate. Let's get into how we make this happen.
Why the Texture Actually Works
I've spent a lot of time wondering why some chicken is soggy and some is light. It turns out, it's not magic, just a few simple tricks with the ingredients we already have.
- Acidic Tenderization: The buttermilk breaks down the tight protein fibers in the chicken breast, making the meat velvety rather than rubbery.
- Starch Interference: Cornstarch prevents too much gluten from forming in the flour, which is why the crust feels light and shatters rather than feeling like a thick paste.
- Moisture Barrier: The dredging process creates a physical wall that keeps the internal juices from escaping during the over high heat fry.
- Oil Temperature: Keeping the oil at exactly 350°F ensures the exterior sears instantly, preventing the chicken from absorbing too much fat.
Before we dive into the ingredients, I found it helpful to compare how this homemade version stacks up against the fast food style we're all used to. This helps you decide exactly how you want to customize your experience.
| Feature | Fast Food Style | Classic Home style | Impact on Experience |
|---|---|---|---|
| Breading | Thin and uniform | Craggy and thick | More crunch in home style |
| Bun | Soft white brioche | Hearty whole wheat | Nutty contrast in home style |
| Chicken | Heavily processed | Whole breast | Better texture and flavor |
| Sauce | Heavy mayo base | Greek yogurt/honey | Lighter, brighter taste |
Essential Component Breakdown
When you look at the ingredients, it might seem like a long list, but each part has a specific job to do. I like to think of it as a team where everyone has a role.
| Ingredient | Science Role | Pro Secret |
|---|---|---|
| Buttermilk | Protein softener | Use low-fat for a cleaner taste that doesn't overpower the spices |
| Cornstarch | Crispness booster | Mix it 1:2 with flour for that "shatter" effect |
| Avocado Oil | Heat conductor | Higher smoke point than olive oil, so it won't burn at 350°F |
| Greek Yogurt | Acidic base | Provides a velvety texture and a tang that cuts through the fried fat |
If you're looking for a different way to enjoy chicken, you might like my Roasted Chicken and Vegetables for a lighter weeknight option, but for pure comfort, this Crispy Chicken Sandwich is the winner.
The Must Have Kitchen Gear
You don't need a professional kitchen to pull this off, but a few specific tools make the process much smoother.
First, a meat mallet is non negotiable. If you don't have one, a heavy rolling pin works just fine. The goal is to get that chicken breast to a uniform thickness so the edges don't burn before the center is cooked.
Second, a heavy bottomed skillet, like cast iron, is your best friend. It holds heat much better than thin aluminum pans, which means the oil temperature won't plumet the second you drop the chicken in. This is the difference between a soggy sandwich and a Crispy Chicken Sandwich that actually crunches.
Finally, a digital thermometer. Trust me on this. Guessing the oil temperature is a gamble I stopped taking years ago. Knowing you're at exactly 350°F is the only way to guarantee that golden brown finish.
Bringing It Together
Right then, let's get cooking. I've broken this down into phases so you can organize your station.
Phase 1: Brining for Tenderness
- Pound the boneless, skinless chicken breasts to an even thickness using a meat mallet or rolling pin. Note: This ensures the chicken cooks evenly throughout.
- In a large bowl, whisk together low-fat buttermilk, 1 tsp salt, 1 tsp black pepper, and 1/2 tsp cayenne pepper.
- Submerge the chicken breasts in the buttermilk mixture, cover, and refrigerate for at least 30 minutes (up to 4 hours). Note: The acid in the buttermilk tenderizes the meat.
Phase 2: Dredging for Texture
- In a shallow dish, whisk together all purpose flour, cornstarch, garlic powder, onion powder, paprika, 1/2 tsp salt, and 1/2 tsp black pepper.
- Remove chicken from the brine, letting excess drip off, and press firmly into the flour mixture to create a craggy coating. Note: Pressing hard creates those little bits of extra crust.
- Shake off any loose flour. Note: This prevents the oil from getting cloudy and burnt.
Phase 3: Frying to Golden Perfection
- Heat avocado oil in a heavy bottomed skillet over medium high heat until it reaches 350°F (175°C).
- Carefully lay the chicken in the oil and fry until golden brown and sizzling, ensuring the internal temperature reaches 165°F. Note: Don't overcrowd the pan or the temperature will drop.
Phase 4: Assembling the Masterpiece
- Prepare the signature sauce by mixing Greek yogurt, Dijon mustard, honey, lemon juice, and a pinch of salt.
- Assemble the sandwiches by placing the fried chicken on toasted whole wheat buns, topping with the signature sauce, dill pickles, and torn romaine lettuce.
Chef's Tip: For an even more intense crunch, try freezing your butter for 10 minutes before using it to toast your buns. It creates a more distinct, buttery crust on the bread.
Solving Common Cooking Mishaps

Even for those of us who live in the kitchen, things can go sideways. Usually, it's a small tweak in temperature or technique that fixes it.
Why Your Breading Sloughs Off
This usually happens because there was too much moisture on the chicken or you didn't press the flour in firmly enough. If the flour doesn't "grip" the meat, it just slides off in the oil.
Avoiding the Oil Soak
If your Crispy Chicken Sandwich feels greasy, your oil was likely too cold when the chicken went in. Instead of searing immediately, the chicken just sits there and absorbs the oil like a sponge.
Preventing the Raw Center
This occurs when the heat is too high. The outside looks golden brown, but the inside is still undercooked. Pounding the meat to a uniform thickness is the best way to prevent this.
| Problem | Root Cause | Solution |
|---|---|---|
| Breading peeling | Poor adhesion | Press flour firmly into the meat |
| Greasy texture | Oil temp too low | Use a thermometer to hit 350°F |
| Burnt outside/Raw inside | Heat too high | Pound chicken to even thickness |
Common Mistakes Checklist:
- ✓ Did you pound the chicken to an even thickness?
- ✓ Is the oil actually at 350°F before adding the meat?
- ✓ Did you shake off the excess flour to avoid burnt bits?
- ✓ Did you let the chicken rest for 2-3 minutes before assembling?
- ✓ Did you toast the buns to prevent the sauce from making them soggy?
Swap Your Ingredients Here
I know not everyone has every single spice or preference for whole wheat. You can definitely tweak this Crispy Chicken Sandwich without ruining the soul of the dish.
| Original Ingredient | Substitute | Why It Works |
|---|---|---|
| low-fat buttermilk | Plain yogurt + lemon juice | Similar acidity and thickness. Note: Slightly tangier |
| Whole wheat buns | Brioche or Sourdough | Adds a buttery or tangy flavor. Note: Brioche is much softer |
| Avocado Oil | Peanut or Canola Oil | High smoke points. Note: Peanut oil adds a subtle nuttiness |
| Greek Yogurt | Mayonnaise | Higher fat content. Note: Much richer, less tangy sauce |
| Romaine Lettuce | Coleslaw mix | Adds a crunchier, vinegar forward profile |
If you're craving something even crispier, you might want to try my Fried Chicken Skins recipe as a side snack while you wait for the sandwiches to finish.
Between the substitutions and the main method, remember that the balance is what matters. If you use a very rich bun like brioche, lean more heavily on the lemon juice in your sauce to keep things bright.
Adjusting Your Batch Size
Making a few sandwiches is easy, but if you're feeding a crowd, you have to change your approach. You can't just multiply everything by four and hope for the best.
Scaling Down (1-2 Sandwiches): Use a smaller skillet to keep the oil depth consistent. Reduce the frying time by about 20%, as smaller pieces of chicken often cook faster. When it comes to the sauce, beat one egg or use a small ramekin to mix the yogurt and honey so you don't waste ingredients.
Scaling Up (8+ Sandwiches): The biggest mistake people make is overcrowding the pan. Work in batches. If you put too much chicken in at once, the oil temperature will crash, and you'll lose that shatteringly crisp exterior.
Also, don't multiply the salt and cayenne by the full amount - start at 1.5x and taste the brine. Spices can become overpowering in larger volumes.
For those who prefer a completely different cooking method, you might look into my Crockpot Chicken and Stuffing for a hands off approach, though it won't give you this specific crunch.
Debunking Common Kitchen Myths
There are a lot of "rules" about frying that are actually just misconceptions. Let's clear a few of them up so you can cook with confidence.
Myth: Searing the chicken "seals in" the juices. This is a classic misconception. Searing doesn't create a waterproof seal. The juiciness of this Crispy Chicken Sandwich comes from the buttermilk brine and not overcooking the meat. The crust is there for flavor and texture, not to act as a lid.
Myth: You must use a deep fryer for a crispy result. Not true. A heavy skillet with about an inch of oil is more than enough. As long as the chicken is partially submerged and the oil is at the right temperature, you'll get that same shattering crunch without needing a massive piece of equipment.
Myth: All frying oil is the same. Definitely not. Using extra virgin olive oil for this recipe would be a disaster because it has a low smoke point. It would burn and turn bitter long before your chicken reached 165°F. Always use a high smoke point oil like avocado or peanut oil.
Storage Guidelines
If you have leftovers, you've got to be careful. Fried food is notoriously fickle once it cools down.
Fridge Storage: Store the cooked chicken in an airtight container for up to 3 days. Keep the sauce and the buns separate. If you store the assembled Crispy Chicken Sandwich in the fridge, the bun will turn into a sponge and the crust will lose its magic.
Freezing: You can freeze the cooked chicken for up to 2 months. Wrap each piece tightly in parchment paper and then place them in a freezer bag. When you're ready to eat, don't microwave them - that's a one way ticket to Soggyland.
Reheating for Maximum Crunch: The only way to bring back the shatter is with dry heat. Use an oven or an air fryer at 375°F for about 5-8 minutes. This draws out the moisture and re crisps the breading.
Zero Waste Tips: Don't throw away that leftover buttermilk! Use it as a base for fluffy pancakes or as a marinade for some roasted vegetables. If you have leftover romaine or pickles, toss them into a quick side salad with a bit of the signature sauce as a dressing.
Serving Your Final Plate
Presentation is part of the experience. I love serving this Crispy Chicken Sandwich on a wooden board with a side of sweet potato fries or a simple slaw. The contrast of the golden chicken against the green lettuce and bright orange carrots makes the meal feel special.
When you assemble, remember to toast your buns. A cold bun is the enemy of a great sandwich. A quick sear in a pan with a bit of butter makes the bread sturdy enough to hold the weight of the chicken and the moisture of the sauce.
Finally, serve it immediately. The window between "shatteringly crisp" and "soft" is shorter than you think. Get it on the table, gather your favorite people, and enjoy the comfort of a meal made with a little bit of patience and a lot of soul.
This isn't just a recipe; it's a way to slow down and enjoy the moment together.
High in Sodium
1100 mg 1,100 mg of sodium per serving (48% 48% of daily value)
The American Heart Association recommends a daily sodium limit of no more than 2,300 mg (and ideally 1,500 mg for most adults).
Tips to Reduce Sodium
-
Minimize Added Salt-30%
Replace the 1.5 teaspoons of salt with a salt free seasoning blend or omit half of the salt in the flour and buttermilk.
-
Swap the Pickles-20%
Replace processed dill pickles with fresh cucumber slices marinated in apple cider vinegar and fresh dill.
-
Low-Sodium Condiments-15%
Use a low-sodium Dijon mustard or increase the lemon juice to maintain the tangy flavor profile.
-
Choose Low-Sodium Buns-10%
Opt for low-sodium whole wheat buns or use large romaine lettuce leaves as wraps.
-
DIY Buttermilk-10%
Create a homemade version by mixing low-fat milk with lemon juice or vinegar to avoid the sodium in store-bought buttermilk.
-
Boost Natural Aromatics
Increase the paprika, cayenne, and black pepper to add depth and heat without needing extra salt.
Recipe FAQs
What to put in a crispy chicken sandwich?
Toasted whole wheat buns, fried chicken, signature sauce, dill pickles, and romaine lettuce. This combination balances the richness of the fried chicken with fresh crunch and acidity.
What is the trick to getting crispy chicken?
Mix cornstarch into the all-purpose flour. This reduces gluten development and creates a lighter, crunchier exterior when fried at 350°F.
How do I ensure the chicken stays tender and juicy?
Marinate the chicken in buttermilk for 30 minutes to 4 hours. The lactic acid breaks down proteins to tenderize the meat before it hits the oil.
How to make a good crisp sandwich?
Pound the chicken to an even thickness before brining and breading. Ensure the oil reaches 350°F and fry until the internal temperature hits 165°F.
Can I store the fully assembled sandwich in the fridge?
No, keep the components separate. Storing them together causes the bun to absorb moisture and the breading to lose its crispness.
Is it true I must use a deep fryer for a professional crust?
No, this is a common misconception. A heavy bottomed skillet with avocado oil provides enough depth and heat for a perfect golden brown finish.
What can I serve as a dipping sauce for the chicken?
Use the signature Greek yogurt sauce or a creamy alternative. If you enjoyed mastering the flavor balance here, see how the same creamy profile works in this homemade copycat sauce.
Crispy Chicken Sandwich