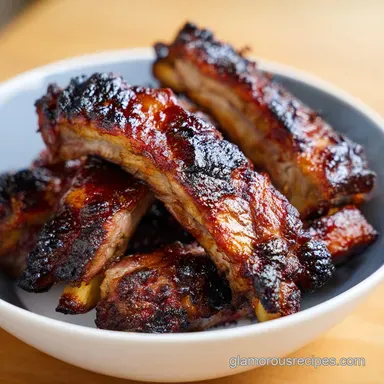
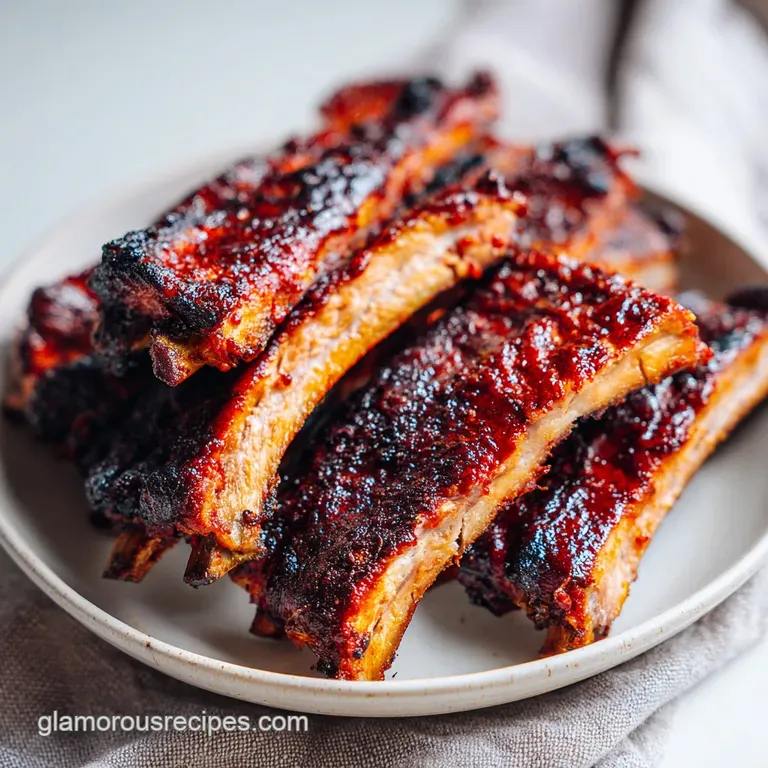
Bbq Ribs in the Oven: Fall-Off-The-Bone
- Time: 15 min active + 190 min baking = Total 3 hours 40 mins
- Flavor/Texture Hook: Sticky, caramelized glaze with a velvety, tender interior
- Perfect for: Sunday family dinners or impressing guests without owning a grill
Ever get that smell of slow cooking pork and brown sugar drifting through the house and just feel... home? It's that heavy, sweet, slightly smoky aroma that tells you something special is happening. I remember the first time I tried this for my family.
I was so nervous about the ribs being tough that I over wrapped them in so much foil it looked like a silver burrito.
But when I finally peeled back that foil, the smell was just incredible, like a professional smokehouse had moved into my kitchen. The meat was pulling away from the bone just right, and that first bite was pure soul comfort. It's the kind of meal that makes everyone stop talking and just eat.
If you've been intimidated by ribs, trust me on this. You don't need a fancy backyard setup to get that deep, rich flavor. We're going to focus on a few simple tricks to make sure your bbq ribs in the oven come out tender and juicy every single time. Let's get into it.
Best BBQ Ribs in the Oven
The Secret to Tender Meat
- Collagen Melt
- Long, slow heat turns tough connective tissue into a silky gel, which is what gives you that "fall off-the bone" feel.
- Steam Chamber
- Wrapping the meat in double foil traps all the juices, essentially braising the ribs in their own fat and seasoning.
- Sugar Caramelization
- The final over high heat blast turns the BBQ sauce into a sticky, tacky glaze that clings to the meat.
- Acidity Balance
- Adding vinegar to the glaze cuts through the heavy fat of the pork, brightening the overall taste.
| Method | Total Time | Texture | Best For |
|---|---|---|---|
| Oven (Foil) | 3 hours 40 mins | Velvety & Sticky | Effortless tenderness |
| Stovetop/Sear | 2 hours | Firmer & Charred | Quick, small portions |
| Traditional Smoker | 6 hours | Smoky & Barky | Weekend projects |
I've found that the oven is actually more reliable than a grill for beginners. You don't have to worry about flare ups or wind changing your temperature. It's all about control. According to the experts at Serious Eats, maintaining a steady low temperature is the only way to ensure the internal fats render properly without drying out the exterior.
Essential Ingredient Deep Dive
| Ingredient | Science Role | Pro Secret |
|---|---|---|
| Brown Sugar | Moisture/Browning | Use dark brown sugar for a deeper, molasses like flavor |
| Smoked Paprika | Flavor Profile | Look for "Pimentón" for a more authentic, wood fired taste |
| Apple Cider Vinegar | Tenderness | Brush a little extra on the meat before wrapping in foil |
| Heavy Duty Foil | Heat Retention | Double wrap to prevent steam leaks, which cause dry ribs |
Now, let's talk about the gear. You don't need a professional kitchen, but a few things make this way easier. A large baking sheet is a must, and I highly recommend using heavy duty foil.
The thin stuff tends to rip when you're tightening the seal, and a leak in your "steam chamber" is the fastest way to end up with rubbery meat.
The Building Blocks
For the meat, I'm using St. Louis style ribs because they have a more consistent shape and a great balance of fat. If you can't find those, baby back ribs work too, though they're a bit leaner and cook slightly faster.
- 1 rack (3.25 lbs) St. Louis style pork ribs Why this? Balanced fat content for maximum juiciness
- 1/4 cup (50g) brown sugar Why this? Creates the sticky crust
- 1 tbsp (7g) smoked paprika Why this? Adds a faux smoky flavor
- 1 tbsp (8g) garlic powder Why this? Deep, savory base
- 1 tsp (5g) onion powder Why this? Adds aromatic sweetness
- 1 tsp (6g) salt Why this? Essential for seasoning depth
- 1/2 tsp (2g) black pepper Why this? Subtle heat and bite
- 1/4 tsp (1g) cayenne pepper Why this? Tiny kick to wake up the palate
- 1 cup (240ml) BBQ sauce Why this? The primary flavor glaze
- 1 tbsp (15ml) apple cider vinegar Why this? Cuts through the richness
- 1 tbsp (15ml) honey Why this? Adds a glossy, professional shine
| Original Ingredient | Substitute | Why It Works |
|---|---|---|
| Brown Sugar | Maple Syrup | Similar sweetness. Note: Makes the rub wetter, less "crusty" |
| Smoked Paprika | Regular Paprika + Cumin | Adds earthiness. Note: Lacks the charred wood flavor |
| Apple Cider Vinegar | White Wine Vinegar | Similar acidity. Note: Slightly sharper, less fruity |
| Honey | Agave Nectar | Similar viscosity. Note: More neutral sweetness |
Right then, before we start, make sure your ribs are at room temperature. If you throw ice cold meat into a 275°F oven, the outside will cook way faster than the inside, and you'll lose that uniform tenderness we're after.
From Prep to Plate
Prepping the Meat
- Pat the ribs completely dry with paper towels. Note: Dry meat browns better
- Use a butter knife to lift the thin, silvery membrane from the back of the ribs, grip it with a paper towel, and peel it away entirely. Note: This membrane blocks flavor and can be chewy
Applying the Dry Rub
- Combine brown sugar, smoked paprika, garlic powder, onion powder, salt, black pepper, and cayenne pepper in a small bowl.
- Coat both sides of the ribs generously, massaging the rub into the meat.
- Allow the ribs to sit at room temperature for 15 minutes to allow the seasoning to penetrate.
Executing the Low and Slow Bake
- Preheat oven to 275°F (135°C). Place ribs on a baking sheet and wrap them tightly in a double layer of heavy duty aluminum foil to create a steam chamber.
- Bake for 2.5 to 3 hours until the meat has pulled back from the ends of the bones by approximately 1/4 inch. Note: This is the visual cue that the collagen has melted
Finishing with the Glaze
- Carefully open the foil and increase oven temperature to 400°F (200°C) or activate the broiler.
- Whisk together BBQ sauce, apple cider vinegar, and honey. Brush the glaze over the top of the ribs.
- Return the ribs to the oven uncovered for 5 to 10 minutes until the sauce is bubbling and caramelized.
Chef's Note: For a really deep flavor, I like to add a tiny pinch of instant espresso powder to my dry rub. It doesn't make the ribs taste like coffee, but it adds a dark, savory complexity that mimics long term smoking.
Common Mistakes & Troubleshooting

One of the biggest frustrations I've seen with bbq ribs in the oven is when the meat is either too tough or the sauce burns before the meat is done. Usually, it's a temperature or wrapping issue. If your ribs aren't pulling away from the bone, they simply need more time.
Don't be afraid to give them another 30 minutes in the foil.
| Issue | Solution |
|---|---|
| Why Your Ribs Are Tough | If the meat is rubbery, the collagen hasn't broken down yet. This usually happens if the oven temperature was too high (which tightens the muscle fibers) or if you didn't wrap them tightly enough, let |
| Why Your Glaze Burnt | Sugar burns quickly. If you put the glaze on too early or leave them under the broiler for too long, you'll get a bitter, blackened crust instead of a sticky glaze. Watch them like a hawk during the f |
| Why Ribs Are Dry | This happens when the foil seal is broken or the ribs are overcooked. While "low and slow" is the rule, even low heat can eventually dry out the meat if it goes way past the 3 hour mark. |
Common Mistakes Checklist
- ✓ Did you remove the silvery membrane? (Crucial for texture)
- ✓ Is the foil seal airtight? (Prevents drying out)
- ✓ Did you wait for the "bone pull back" cue? (Ensures tenderness)
- ✓ Is the oven truly at 275°F? (Too high = tough meat)
- ✓ Did you dry the meat before rubbing? (Better adhesion)
Adjusting the Batch Size
If you're just cooking for two, you can easily halve this recipe. Use a smaller baking sheet so the ribs stay bundled together, which helps maintain the steam. I'd reduce the total bake time by about 20%, but still look for that 1/4 inch bone pull back.
For a big party, I recommend doing 2-3 racks. However, don't just triple the spices. I usually scale the salt and cayenne to about 1.5x rather than 3x to avoid over seasoning. Work in batches if your oven is small; crowding the oven too much can drop the temperature and increase the cook time.
If you're doubling the recipe in a large professional oven, you can keep the temp at 275°F, but make sure there's at least an inch of space between the foil packets for air to circulate.
Storage and Waste Reduction
Once you've enjoyed the feast, you might have some leftovers. Store the ribs in an airtight container in the fridge for up to 4 days. To reheat, don't use the microwave it makes the pork rubbery.
Instead, wrap them in foil with a splash of water or apple juice and warm them in the oven at 300°F for about 15-20 minutes.
For freezing, wrap the cooked ribs tightly in plastic wrap and then foil. They'll stay good for about 3 months. Thaw them in the fridge overnight before reheating.
Zero Waste Tip: Never throw away the rib bones! After the meal, toss those bones into a pot with some onion, carrot, and celery to make a rich pork stock. It's velvety and makes a killer base for a potato soup or a hearty stew.
What to Serve This With
Since these ribs are so rich and sticky, you need sides that provide a fresh or acidic contrast to cleanse the palate. I love serving these with a crisp coleslaw or some grilled corn on the cob.
For a drink that cuts through the fattiness of the pork, a chilled Authentic Thai Iced Tea Recipe is a surprising but brilliant pairing. The creamy sweetness and strong tea notes balance the smoky BBQ flavors perfectly.
If you want something more traditional, a side of homemade garlic knots is the way to go. You can use an Italian Pizza Dough Recipe to make soft, buttery rolls that are perfect for soaking up any leftover glaze on the plate. A simple potato salad with a mustard based dressing also works wonders here.
Right then, you're all set to make some incredible bbq ribs in the oven. Just remember: be patient with the low heat, get that foil seal tight, and don't walk away from the oven during the final glaze. Your house is about to smell like a BBQ paradise!
High in Sodium
1111 mg 1111 mg of sodium per serving (48% 48% of daily value)
The American Heart Association recommends a daily limit of no more than 2,300 mg of sodium to maintain heart health.
Tips to Reduce Sodium
-
Reduce Added Salt-25%
Omit or reduce the 1 tsp of salt in the dry rub; the BBQ sauce already provides significant sodium.
-
Swap the BBQ Sauce-20%
Replace the standard BBQ sauce with a low-sodium version or make a homemade glaze using the honey and vinegar.
-
Boost the Acidity-10%
Increase the amount of apple cider vinegar to add a bright, tangy flavor that compensates for less salt.
-
Enhance with Spices
Add extra smoked paprika or a pinch of chipotle powder to increase the smoky profile without adding sodium.
Recipe FAQs
Should I bake ribs at 275 or 300?
Stick with 275°F. This lower temperature ensures the collagen breaks down slowly, preventing the muscle fibers from tightening and keeping the meat tender.
How long should you cook barbecue ribs in the oven?
Bake for 2.5 to 3 hours. You will know they are ready when the meat has pulled back from the ends of the bones by approximately 1/4 inch.
Do you put ribs in the oven with or without foil?
Wrap them tightly in a double layer of heavy duty foil. This creates a steam chamber that prevents the pork from drying out during the long cook time.
Can diabetics eat country style pork ribs?
Yes, but in moderation. Because the glaze contains honey and brown sugar, similar to the sweet profiles in our pecan candy, keep an eye on portion sizes.
How to remove the membrane from the ribs?
Lift the thin, silvery membrane with a butter knife. Grip the edge firmly with a paper towel and peel it away entirely from the back of the rack.
Is it true that using a microwave is the best way to reheat ribs?
No, this is a common misconception. Microwaves often make the pork rubbery; instead, wrap leftovers in foil and warm them in the oven at 300°F for 15-20 minutes.
How to tell when the ribs are fully cooked?
Check for the meat to pull back 1/4 inch from the bone ends. If the meat hasn't receded yet, leave them in the foil for another 30 minutes.
Bbq Ribs In The Oven