Perfect Valentine Cake Pops Recipe
- Time: Active 45 minutes, Passive 1 hours 30 mins, Total 2 hours 15 mins
- Flavor/Texture Hook: A shatter crisp pink shell giving way to fudgy, sea salt-flecked chocolate.
- Perfect for: Galentine’s parties, romantic gifting, or high end dessert tables.
- The Secret to Creating Perfect Valentine cake pops
- Precision Control For Best Results
- Strategic Component Analysis
- Essential Elements and Substitutes
- Professional Tools for Success
- Executing the Artisan Method
- Solving Common Pastry Hurdles
- Adapting for Any Occasion
- Myths About Cake Pops
- Storage and Freshness Guide
- Artisan Color Balance Strategy
- Recipe FAQs
- 📝 Recipe Card
The Secret to Creating Perfect Valentine cake pops
The first time I tried making these, it was a total disaster. I remember the sound of a heavy chocolate ball sliding down a lollipop stick and hitting the counter with a dull thud. My kitchen was covered in pink streaks, and the cake centers were so greasy they wouldn't hold their shape.
I almost gave up on the idea of homemade treats altogether. But then, I realized that pastry is less about luck and more about the magic of temperature and ratios.
When you finally get that first successful dip, the feeling is pure artisan joy. You lift the stick, the excess coating falls away in a silky ribbon, and you're left with a flawless, glass like sphere.
It’s that contrast between the snap of the cooled candy and the rich, moist crumb inside that makes these so addictive. We aren't just making snacks here, we are crafting tiny pieces of edible art that look like they came from a high end boutique.
Today, I’m sharing everything I’ve learned about the physics of the "dip" and the chemistry of the binder. We are going to avoid those oily centers and cracking shells forever. Trust me, once you master the chill to dip ratio, you’ll be making these for every occasion.
Let's get into the precision that makes these treats stand out from the crowd.
Precision Control For Best Results
Moisture Equilibrium: Using whole milk instead of water increases the protein content, creating a tighter crumb structure that doesn't crumble under the weight of the coating.
Thermal Stability: Adding refined coconut oil to the candy melts lowers the melting point slightly, allowing for a thinner, more fluid coating that won't crack as it shrinks during cooling.
Binding Friction: The cream cheese frosting acts as a high fat adhesive, which, when chilled, creates a dense matrix that prevents the stick from wobbling or tearing through the cake.
Crystal Structure: Fast cooling in the fridge helps the fats in the chocolate and frosting set into a solid state, ensuring the pops retain their spherical shape during the warm dipping process.
| Method | Total Time | Texture | Visual Result |
|---|---|---|---|
| Fast Method | 1 hours 15 mins | Slightly softer | Matte finish |
| Classic Method | 2 hours 15 mins | Fudgy and dense | High gloss shine |
| Artisan Method | 4 hours | Truffle like | Mirror smooth shell |
Taking the extra time for the classic method ensures that the cake has enough time to hydrate and the fats have time to stabilize. If you rush the cooling process, you risk the dreaded "leakage" where the cake oils seep through the shell. It's all about patience and precision in the pastry kitchen.
Strategic Component Analysis
| Ingredient | Science Role | Pro Secret |
|---|---|---|
| Whole Milk | Hydration & Protein | Use room temp milk to ensure the cake batter emulsifies perfectly. |
| Melted Butter | Lipid Richness | Melted butter provides a tender "melt in-mouth" feel that oil can't match. |
| Sea Salt | Flavor Contrast | A touch of salt cuts through the intense sugar of the pink coating. |
| Coconut Oil | Viscosity Control | Refined oil ensures the coating flows like silk without adding coconut flavor. |
Selecting the right ingredients is the first step toward a professional result. For instance, the choice of whole milk over water isn't just about flavor, it’s about the structural integrity of the cake itself. A sturdier cake is much easier to roll into those iconic, perfectly round spheres we're aiming for.
Essential Elements and Substitutes
To create these 24 servings, you’ll need to gather your components with care. We are aiming for a luxurious chocolate base that can stand up to the sweetness of the pink exterior.
- 15.25 oz chocolate cake mix: The structural foundation. Why this? Provides consistent rise and reliable crumb texture for rolling.
- Substitute: Any flavor mix, but ensure it's the standard 15.25 oz weight.
- 1 cup whole milk: For a rich, creamy crumb. Why this? The fat content adds a velvety mouthfeel compared to water.
- Substitute: Oat milk (full fat) for a dairy-free cake base.
- 0.5 cup unsalted butter, melted: The primary fat source. Why this? Butter solidifies when chilled, helping the cake balls stay firm.
- Substitute: Neutral oil, but note the pops will be slightly softer.
- 3 large eggs: The binding agent. Why this? Eggs provide the necessary structure to prevent the cake from falling apart.
- Substitute: Commercial egg replacer if needed for dietary restrictions.
- 0.33 cup cream cheese frosting: The artisan binder. Why this? Its tanginess balances the sugar and its thickness holds the crumbs together.
- Substitute: Vanilla buttercream, though it will be sweeter.
- 0.5 tsp sea salt: The flavor balancer. Why this? Vital for highlighting the chocolate notes amid the sweetness.
- Substitute: Table salt, but reduce by half.
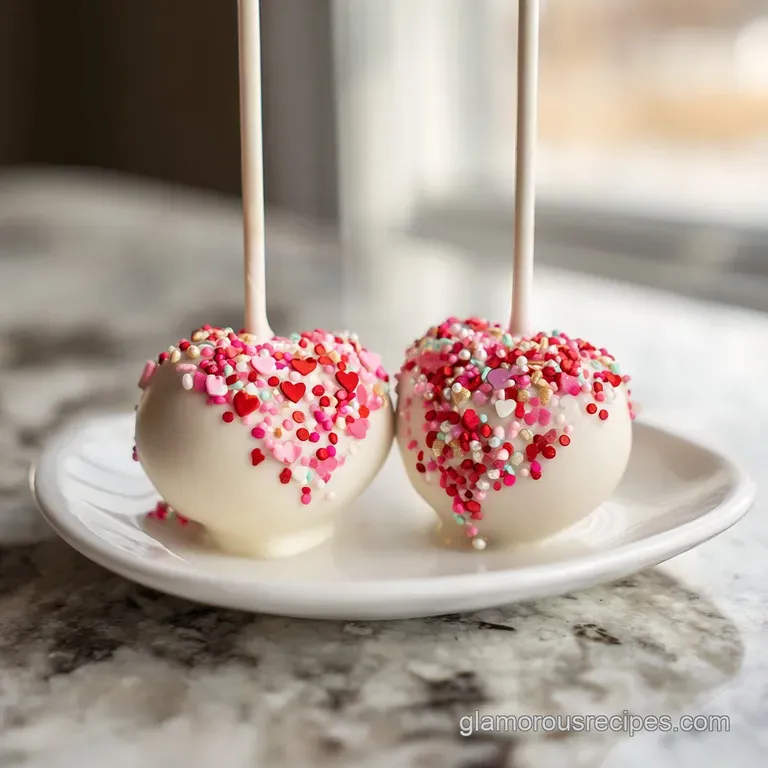
- 16 oz pink candy melts: The festive shell. Why this? Specifically formulated to set hard and smooth at room temperature.
- Substitute: White chocolate with oil based food coloring.
- 2 tsp refined coconut oil: The thinning agent. Why this? Creates a professional, thin shell that shatters beautifully.
- Substitute: Vegetable shortening (like Crisco).
- 1 tbsp Valentine themed sprinkles: The visual finish. Why this? Adds texture and festive charm to the final product.
- Substitute: Crushed freeze dried strawberries for a natural pop of color.
Professional Tools for Success
Precision requires the right equipment. You don't need a professional bakery setup, but a few specific items will make your life much easier. A stand mixer, like a KitchenAid, is brilliant for crumbling the cake into a fine, uniform sand, which is the secret to a smooth interior.
You’ll also need a 1 tablespoon cookie scoop to ensure every single pop is exactly the same size. Consistency is what separates home cooked snacks from boutique treats. For the dipping phase, a deep, narrow microwave safe silicone cup is better than a wide bowl because it allows you to submerge the entire pop in one vertical motion.
Finally, a styrofoam block or a dedicated cake pop stand is essential for letting them dry without developing a "flat head."
Executing the Artisan Method
Baking the Structural Foundation
Preheat your oven to 350°F (180°C) and grease a 9x13 inch baking pan. In a large bowl, whisk together the 15.25 oz chocolate cake mix, 1 cup whole milk, 0.5 cup melted butter, and 3 large eggs until the batter is glossy and thick.
Pour into the pan and bake for 30 minutes. Note: Don't overbake; we want a moist interior for easy rolling later.
Achieving the Perfect Crumb
Once the cake is completely cool, remove any browned edges with a knife. Crumble the cake into a large bowl using your hands or a mixer until it looks like fine, dark sand. Add the 0.33 cup cream cheese frosting and 0.5 tsp sea salt.
Note: Mix slowly; you want the frosting fully incorporated without making the dough greasy.
Forming the Shapes
Use your cookie scoop to portion out the dough, then roll each piece between your palms until a smooth, crack free sphere forms. You should have 24 balls. Place them on a parchment lined tray and chill in the fridge for at least 45 minutes.
Note: Chilling is non negotiable for the stick to hold later.
Securing the Sticks
Melt a tiny handful of the 16 oz pink candy melts in the microwave. Dip the tip of each lollipop stick into the melted candy, then insert it about halfway into a chilled cake ball. Note: This acts as a "glue" to prevent the pop from sliding off during dipping.
Dipping for Glass Like Finish
In a deep cup, melt the remaining pink candy melts with 2 tsp coconut oil in 30 second bursts until it flows like warm honey. Dip each chilled cake pop straight down into the coating, then pull it straight up. Note: Don't stir the pop in the chocolate; just one clean motion.
Applying the Accents
While the coating is still wet, gently shake off the excess and immediately add the 1 tbsp Valentine themed sprinkles. Place the sticks into your stand until the shell is hard and matte. This usually takes about 15 minutes at room temperature.
Solving Common Pastry Hurdles
Why Your Shell Cracks
Cracking usually happens because of a temperature war. If your cake balls are freezing cold and your candy coating is very hot, the cake will expand as it warms up, shattering the shell.
The key is to let the chilled balls sit on the counter for 5 minutes before dipping, and ensuring your coating isn't boiling hot.
Prevent the Dreaded Slide
If your pops are falling off the stick, your binder ratio might be off, or the balls are too heavy. Ensure you aren't adding more than the 0.33 cup frosting. Also, never skip the step of "gluing" the stick into the ball with a bit of melted candy before the final dip.
| Problem | Root Cause | Solution |
|---|---|---|
| Oily Shell | Too much coconut oil | Add more candy melts to thicken the mixture. |
| Streaky Coating | Moisture in the chocolate | Ensure all tools are bone dry; avoid water contact. |
| Lumpy Surface | Cake crumbs in coating | Dip each pop once and don't re dip the same pop. |
The "sweat" you might see on the shell after refrigeration is just condensation. If this happens, don't wipe it; let it evaporate naturally at room temperature. For another beautiful treat that uses similar precision, you might enjoy my Valentines Day Cupcakes recipe.
Common Mistakes Checklist
- ✓ Always remove the browned "crust" of the cake for a smoother interior texture.
- ✓ Never use "low-fat" frosting; the water content will make the cake balls mushy.
- ✓ Tap your wrist, not the stick, to remove excess chocolate (prevents the ball from falling off).
- ✓ Ensure the cake is 100% cool before crumbling to avoid gummy results.
- ✓ Use a deep, narrow vessel for dipping to minimize air bubbles and maximize coverage.
Adapting for Any Occasion
If you need to scale this recipe down for an intimate date night, it’s quite simple. You can bake the full cake, use half for 12 pops, and freeze the other half of the baked cake for later. Just remember to reduce the frosting and coating ingredients by exactly half.
When scaling up for a large party, work in batches of 24 to keep the candy coating from hardening in the bowl.
If you are looking for a completely different vibe, these work wonderfully with a red velvet base. For more ideas on quick romantic treats, check out my Valentine's Sweets recipe.
Swapping for Dietary Needs
If you want to make these gluten-free, simply swap the cake mix for a certified GF version. The ratio of frosting usually stays the same because GF cakes can be a bit more absorbent.
For a dairy-free version, use a vegan cake mix, vegan butter, and dairy-free chocolate chips mixed with a little extra coconut oil for the coating.
Myths About Cake Pops
Many people think you need to freeze the cake balls before dipping. This is actually a mistake! Freezing makes them too cold, which almost guarantees your shell will crack within ten minutes of dipping. A firm chill in the refrigerator is all you need for structural integrity.
Another common misconception is that you need to use "candy grade" expensive chocolate. While high-quality chocolate tastes better, candy melts are engineered for this specific task because they contain stabilizers that help them set firmly at room temperature.
If you use pure chocolate, you would need to temper it perfectly, which is a whole different level of pastry science.
Storage and Freshness Guide
Storage: These are best kept in an airtight container in the refrigerator for up to 5 days. The cool temperature keeps the cream cheese frosting stable and the shell crisp.
If you are serving them at a party, they can sit out at room temperature for about 4 hours, but keep them out of direct sunlight or the pink shells will lose their luster.
Zero Waste: Don't throw away those browned cake edges you trimmed off! I like to toast them in the oven until they are crunchy and use them as a "soil" for chocolate mousse or as a topping for yogurt. If you have leftover pink coating, drizzle it over popcorn for a festive snack. You can even incorporate leftover crumbs into a Valentine's Day Brunch recipe by folding them into pancake batter for "cake batter" flapjacks.
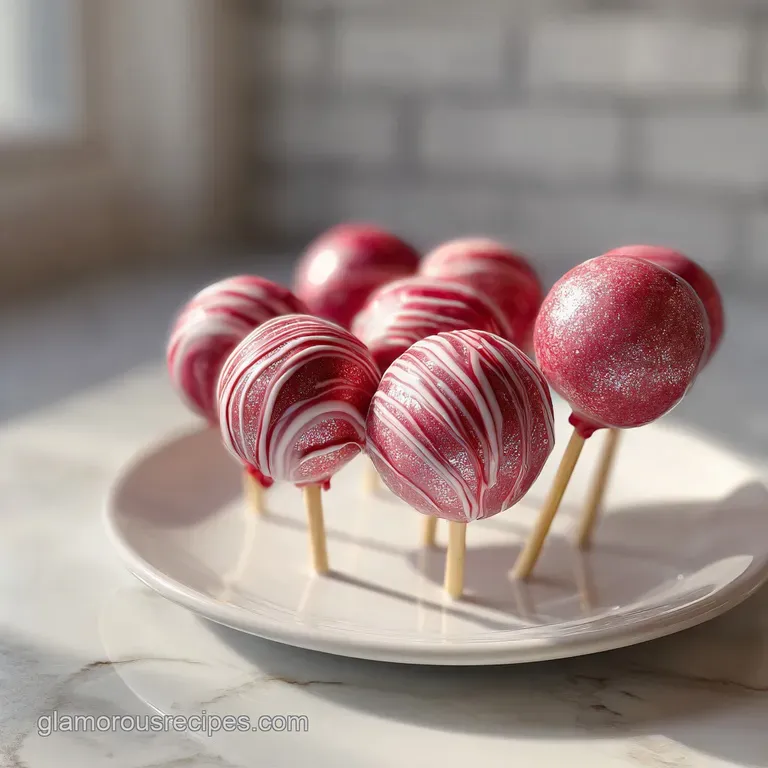
Artisan Color Balance Strategy
To make these look like they came from a professional pastry shop, focus on a three color accent strategy. We start with the Soft Pink base from our candy melts. This provides the primary romantic hue.
Once the shell is set, I add a Vivid White drizzle. Simply melt some white chocolate, put it in a piping bag with a tiny hole, and flick your wrist back and forth over the pops. The contrast of the white against the pink creates immediate visual depth.
The final touch is the Metallic Gold or Deep Ruby accent. You can use edible gold leaf or a sprinkle of deep red sanding sugar. Adding this third color especially something with a different texture or sheen gives the pops a high end, artisan finish.
Always add your sprinkles or sugar while the drizzle is still slightly tacky so they adhere perfectly without falling off. Keep the decorations focused on the top third of the pop to maintain an elegant, balanced look.

Recipe FAQs
Can I use melted butter instead of cream cheese frosting as the binder?
No, stick with the frosting. Melted butter alone will not create the necessary dense matrix to hold the cake crumbs together firmly, leading to easily crumbling or sliding pops.
How to achieve a smooth, crack free coating after dipping?
Temper the temperature difference. Let your chilled cake balls sit out for five minutes before dipping them into the thinned coating to prevent rapid expansion and shell cracking.
Is it necessary to chill the cake balls for over 45 minutes?
Yes, firm chilling is essential. A solid, cold interior ensures the cake ball doesn't compress or tear through the lollipop stick when you push it in or during the dipping process.
How to melt pink candy melts without seizing or scorching them?
Melt at 50% power in 20-second intervals. Stir thoroughly between each short burst; high heat compromises the stabilizers in the melts, causing them to seize into a hard clump.
How to ensure the lollipop stick stays securely embedded in the cake pop?
Glue the stick tip first. Dip the tip of the stick into a small amount of melted candy, insert it halfway into the chilled ball, let it set for two minutes, then proceed with the full dip.
Can I use water instead of milk when baking the cake mix for cake pops?
No, use whole milk or a high fat substitute. Water results in a drier, more crumbly structure, whereas milk’s protein and fat content create the denser, velvety texture needed for rolling and dipping, similar to the binder control in our Heart Cookies in recipe.
What is the trick to making the coating thin enough to look professional?
Incorporate refined coconut oil. Adding about 2 teaspoons of refined coconut oil thins the candy melts significantly, allowing excess coating to drip off easily, resulting in a mirror smooth shell that dries quickly.
Perfect Valentine Cake Pops
Ingredients:
Instructions:
Nutrition Facts:
| Calories | 227 kcal |
|---|---|
| Protein | 1.9 g |
| Fat | 16.9 g |
| Carbs | 27.8 g |
| Fiber | 0.6 g |
| Sugar | 20.4 g |
| Sodium | 178 mg |
