Layered Chocolate Mousse Brownie
- Time: Active 45 minutes, Passive 4 hours 5 mins, Total 4 hours 50 mins
- Flavor/Texture Hook: A velvety chocolate cloud atop a dense, fudgy crumb
- Perfect for: An elegant Valentine's Day finale or a sophisticated dinner party
- Essential Specs and Yield Details
- Selecting Quality Artisan Ingredients
- Tools for Professional Pastry Precision
- Step-by-Step Artisanal Assembly
- Refining Technique and Avoiding Errors
- Flavor Variations and Ingredient Swaps
- Maintenance and Strategic Waste Reduction
- Sophisticated Pairing and Serving Ideas
- Kitchen Myths Debunked
- Recipe FAQs
- 📝 Recipe Card
The first time I attempted a Layered Chocolate Mousse Brownie, it was a total disaster. I was trying to impress a date, and instead of a sophisticated dessert, I served what looked like a chocolate landslide. The mousse hadn't set, the brownie was as hard as a brick, and the whole thing was a puddle of disappointment.
But that failure taught me everything I needed to know about the science of temperature and the necessity of patience in pastry. Indulge in a decadent Layered Chocolate Mousse Brownie, the perfect dessert for your Valentine's Day celebration.
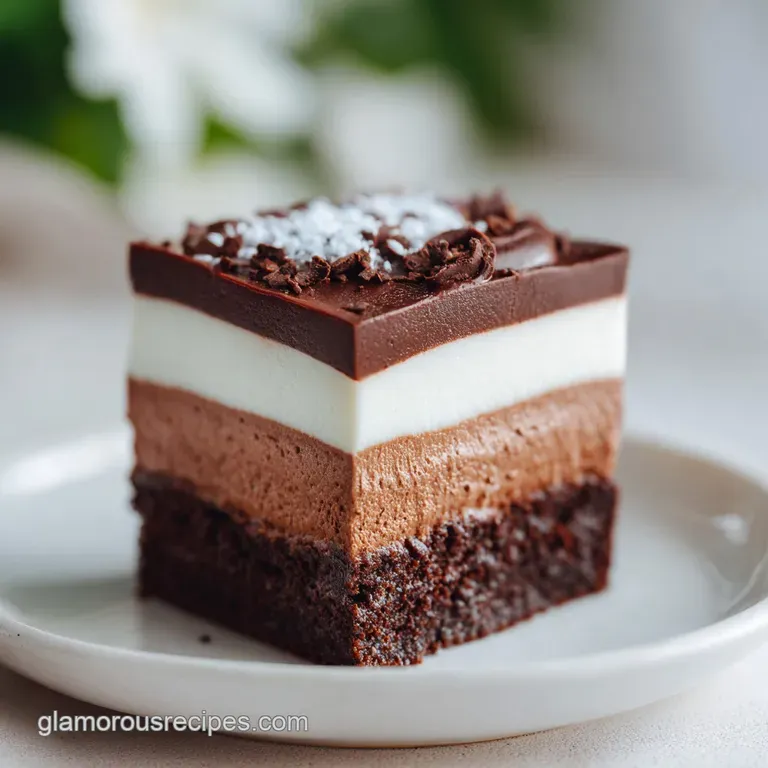
Now, when I pull this out of the fridge, the visual impact is stunning. The layers are sharp, the colors transition from a deep midnight brown to a lighter cocoa tan, and the texture is pure artisan magic. It’s the kind of dish that makes people stop talking the moment the fork hits the plate.
You'll hear the soft "shatter" of the ganache topping followed by the silent "give" of the mousse. This isn't just a sugar hit; it’s a study in chocolate textures that we’ve refined through dozens of trials.
Essential Specs and Yield Details
Building a dessert like this requires a roadmap. We aren't just baking; we are constructing a structural dessert that needs to hold its shape while remaining soft enough to melt on the tongue. If you're short on time, you might be tempted to skip the chilling phases, but that is where the magic happens.
Let's look at how the classic method compares to a rushed version so you can see why the wait is worth it.
The Architecture of the Mousse Cloud Fat globules in the heavy cream form a structural network that traps air bubbles, while the cocoa solids provide a backbone that prevents the foam from collapsing.
The addition of melted chocolate stabilizes this matrix as it cools, turning a liquid foam into a sliceable solid.
| Method | Time | Texture | Best For |
|---|---|---|---|
| Fast (No chill) | 45 minutes | Soft and messy | Last minute cravings |
| Classic (This Recipe) | 4 hours 50 mins | Sharp, defined layers | Impressing a date |
Precision is the hallmark of a great pastry chef. To ensure your Chocolate Mousse Brownie turns out exactly like the photos, keep these three checkpoints in mind. First, your oven must be at exactly 350°F (180°C) before the brownie goes in.
Second, the brownie needs exactly 25 minutes to achieve that fudgy center. Third, the final assembly must chill for at least 4 hours to allow the proteins and fats to bond.
Selecting Quality Artisan Ingredients
The soul of this Mousse Brownie for Valentines Dessert Idea lies in the quality of your chocolate. Since we are using quite a bit of it, don't settle for the cheap stuff that’s loaded with vegetable oils and fillers. Look for real cocoa butter.
For the brownie base, Dutch process cocoa is non negotiable because its lower acidity produces a darker, mellower flavor that pairs beautifully with the sweet mousse.
| Component | Science Role | Pro Secret |
|---|---|---|
| Dutch process Cocoa | Lowers acidity, darkens color | Sift twice to avoid bitter clumps |
| Heavy Cream | Provides fat for aeration | Use 36% fat or higher for stability |
| Espresso Powder | Enhances cocoa aromatics | Does not add coffee flavor at this dose |
| Semi sweet Chips | Provides structural stability | Use 60% cacao for the best balance |
When gathering your items, remember that the heavy cream is doing double duty here. You’ll need a total of 1 1/2 cups, but you’ll be dividing it. The first part gets whipped for the mousse, while the rest is used for the ganache. It's similar to the temperature control I talk about in my Chocolate Covered Strawberries recipe, where the fat content determines the final snap.
- 1/2 cup (115g) unsalted butter, melted Why this? Provides moisture and fat for a tender crumb
- 1 cup (200g) granulated white sugar
- 2 large eggs, room temperature Why this? Emulsifies better when not cold
- 1 tsp (5ml) pure vanilla extract
- 1/3 cup (35g) Dutch process cocoa powder
- 1/2 cup (65g) all purpose flour
- 1/4 tsp salt
- 1 1/2 cups (360ml) heavy whipping cream, divided
- 1 cup (170g) semi sweet chocolate chips (60% cacao)
- 2 tbsp (15g) powdered sugar Why this? Stabilizes the whipped cream structure
- 1/2 tsp espresso powder
- 1/2 cup (85g) dark chocolate, finely chopped
- 1/4 cup (60ml) heavy cream
- 1/4 tsp flaky sea salt
Tools for Professional Pastry Precision
You don't need a professional bakery to pull this off, but a few specific tools will make your life significantly easier. An 8x8 inch square baking pan is the standard here. If you use a larger pan, your brownie will be too thin; if you use a smaller one, it won't cook through in the center.
I always recommend lining the pan with parchment paper, leaving an overhang on the sides. This "sling" allows you to lift the entire dessert out once it's set, which is the only way to get those clean, professional cuts.
A stand mixer or a powerful hand mixer is also vital for the Mousse Brownie. Whipping cream by hand is a workout you don't need, and the mixer allows you to achieve the stiff peaks required for a stable Mousse Brownie for Valentines Dessert Idea.
Also, keep a sharp chef's knife and a tall glass of hot water nearby for the final slicing. Dipping the knife in hot water and wiping it dry between every single cut is the secret to those "velvety" smooth edges you see in pastry shop windows.
step-by-step Artisanal Assembly
Creating the Brownie Foundation
Preheat your oven to 350°F (180°C). Whisk the melted butter and granulated sugar in a large bowl until the mixture looks grainy and pale. Add the room temperature eggs and vanilla, beating vigorously.
The eggs are the binder here, and they need to be fully incorporated to create that signature crackly top. Sift in the Dutch process cocoa, all purpose flour, and salt. Fold gently until no streaks of white remain. Pour this into your lined pan and bake for 25 minutes.
It should be set at the edges but slightly wobbly in the center.
Developing the Chocolate Mousse
While the brownie cools completely (and I mean completely!), melt your 1 cup of chocolate chips. You can do this in a microwave in 30 second bursts or over a double boiler. Once melted, stir in the espresso powder and let it cool to lukewarm.
In a chilled bowl, whip 1 1/4 cups of the heavy cream with the powdered sugar until stiff peaks form. Note: If the cream is too warm, it won't hold air. Gently fold a third of the whipped cream into the melted chocolate to lighten it, then fold in the rest.
Spread this over the cooled brownie layer until the surface is glassy and level.
The Final Ganache Polish
To finish this Layered Chocolate Mousse Brownie for Valentines Dessert Idea, we need a glossy top. Heat the remaining 1/4 cup of heavy cream until it just begins to simmer. Pour it over the finely chopped dark chocolate and let it sit for 2 minutes.
Stir slowly from the center outward until a dark, silky emulsion forms. Pour this over the chilled mousse layer, tilting the pan to cover it evenly. Sprinkle the flaky sea salt over the top while it’s still wet to ensure it sticks.
| Original Ingredient | Substitute | Why It Works |
|---|---|---|
| Dutch process Cocoa | Natural Cocoa Powder | More acidic flavor, slightly lighter color |
| Powdered Sugar | Granulated Sugar | Works, but mousse may be slightly grainier |
| Espresso Powder | Instant Coffee | Provides similar depth but less "clean" flavor |
Refining Technique and Avoiding Errors
The biggest pitfall with a Layered Chocolate Mousse Brownie is rushing the cooling process. If the brownie is even slightly warm when you add the mousse, the fat in the cream will melt, and you'll end up with a muddy mess. Patience is your best friend in the kitchen. Another common mistake is over mixing the mousse.
You want to fold, not stir. Folding preserves the tiny air bubbles we worked so hard to create.
Achieving Defined Layers
To get those sharp lines, your mousse needs to be stiff. If it feels soft, chill it for 30 minutes before spreading it onto the brownie. When you finally add the ganache, make sure it’s not hot. It should be just barely warm to the touch.
If it’s too hot, it will melt the top layer of the mousse, destroying the visual separation.
Managing Mousse Stability
If your mousse looks like it’s breaking or turning grainy, it usually means the chocolate was too cold when you added the cream, causing it to seize. You can sometimes fix this by adding a teaspoon of warm cream and whisking gently, but it’s better to avoid it by ensuring the chocolate is lukewarm not cold, not hot before folding.
| Problem | Root Cause | Solution |
|---|---|---|
| Grainy Mousse | Chocolate too cold when folding | Keep chocolate lukewarm (95°F) |
| Cracked Brownie | Overbaked or cooled too fast | Reduce bake time by 2 mins next time |
| Runny Ganache | Incorrect cream to chocolate ratio | Add more chopped chocolate and re melt |
Common Mistakes Checklist
- ✓ Ensure the brownie is stone cold before adding the mousse layer.
- ✓ Sift the cocoa and flour to prevent dry pockets in the fudgy base.
- ✓ Use a chilled metal bowl for whipping the heavy cream for better volume.
- ✓ Wipe your knife with a hot, damp cloth between every single cut.
- ✓ Don't skip the espresso powder; it’s the secret to "artisan" depth.
Flavor Variations and Ingredient Swaps
If you want to change things up, this Chocolate Mousse Brownie for Valentines Dessert Idea is very forgiving. You can easily swap the semi sweet chips in the mousse for white chocolate chips to create a high contrast black and white look.
Just keep in mind that white chocolate is much sweeter and contains no cocoa solids, so it will be softer. You might need to add an extra tablespoon of powdered sugar to help it stay firm.
If you're looking for something even faster, you might enjoy my Mug Brownie recipe, which hits those same cocoa notes in a fraction of the time. But for a special occasion, sticking to the classic layered method is the way to go.
- For the Raspberry Lover: Fold 1/4 cup of seedless raspberry jam into the mousse for a fruity tang.
- For the Nut Enthusiast: Add 1/2 cup of toasted, crushed hazelnuts to the brownie batter for a "shatter" of texture.
- For the gluten-free Guest: Substitute the all purpose flour with a 1 to-1 gluten-free baking blend. The brownie will be slightly denser but still delicious.
Maintenance and Strategic Waste Reduction
This dessert keeps remarkably well because the fat content in the cream and butter acts as a preservative. You can store the Layered Chocolate Mousse Brownie in the fridge for up to 4 days.
Just make sure it’s in an airtight container, or it will start to absorb the smells of the fridge nobody wants a chocolate brownie that tastes like leftover onions.
If you have scraps from trimming the edges to make them straight (my favorite part!), don't throw them away. Those "ugly" pieces are gold. Crumble them up and use them as a topping for vanilla bean ice cream, or fold them into a batch of chocolate chip cookies for a "brownie stuffed" surprise.
You can also freeze the individual slices for up to 3 months. Wrap them tightly in plastic wrap and then foil. To eat, let them thaw in the fridge for 2 hours.
Sophisticated Pairing and Serving Ideas
To truly lean into the "artisan" feel of this Layered Chocolate Mousse Brownie for Valentines Dessert Idea, your garnish strategy is key. We want to focus on color balance. Here are three color accents to use:
- Vibrant Red: Use freeze dried raspberry dust. Sift it over half of the brownie just before serving. The red against the dark chocolate is stunning.
- Lustrous Gold: Apply a small piece of edible gold leaf to one corner of each slice. It screams luxury and precision.
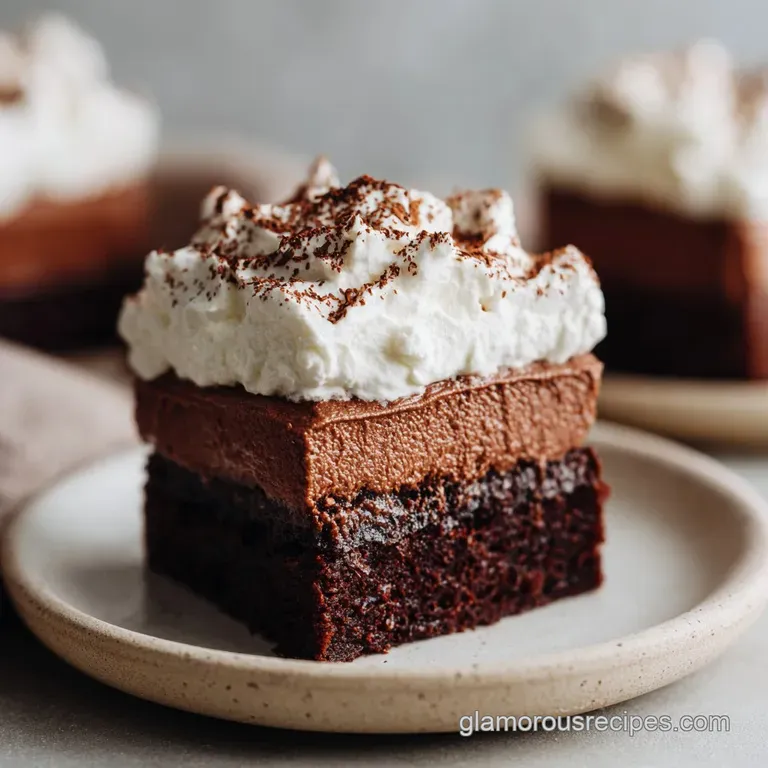
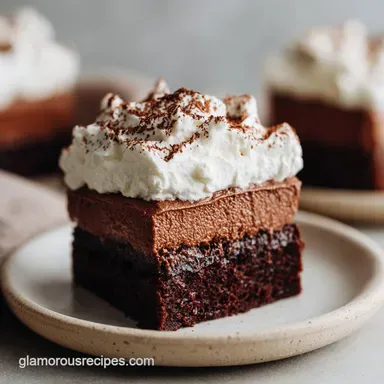
- Pure White: A single, perfectly placed dollop of unsweetened whipped cream or a dusting of powdered sugar over a heart shaped stencil.
For pairings, I highly recommend a tart fruit element to cut through the richness. A simple coulis made from fresh blackberries or a few sprigs of red currants works wonders. If you're serving this for Valentine's Day, a glass of cold milk is classic, but a glass of ruby port or a dark roasted espresso will highlight the bitter notes in the Dutch cocoa. It's the same principle of balance I use for my Valentine's Day Brunch recipe, where we balance sweet custards with tart fruits.
If you want X, do Y: If you want a deeper chocolate punch, use 72% cacao for the ganache layer. If you want a lighter texture, fold the cream into the chocolate mixture more gently. If you want a salty sweet contrast, double the flaky sea salt on the top garnish.
Kitchen Myths Debunked
Many people believe that you must use room temperature butter for brownies, but that’s actually a myth. Using melted butter, as we do here, creates a denser, more "fudgy" texture because it doesn't trap as much air as creamed butter does.
For this recipe, density is our friend because it provides the structural support needed for the heavy mousse layer.
Another common misconception is that "Dutch process" and "Natural" cocoa are interchangeable. They are not. Natural cocoa is acidic and reacts with baking soda to help things rise. Dutch process has been treated with an alkalizing agent to neutralize that acid.
In this recipe, we aren't using a leavening agent like baking soda, so we rely on the Dutch process for its intense dark color and smooth flavor profile. Using natural cocoa here would result in a lighter, more acidic brownie that might clash with the sweet mousse.

Recipe FAQs
Can I skip the chilling time and serve this immediately?
No, serving immediately will result in structural failure. The mousse relies on being completely chilled for the fats and proteins to set, turning a liquid foam into a sliceable solid layer.
How to achieve perfectly clean, sharp cuts on the finished dessert?
Dip a sharp chef's knife in hot water and wipe it dry between every slice. This process melts the chocolate just enough to slice cleanly through the layers without dragging the mousse upwards.
Is it true that I can substitute natural cocoa powder for Dutch process?
No, this substitution is not recommended for this recipe. Dutch process cocoa provides a lower acidity and darker color that balances the sweetness of the mousse layer perfectly.
How to prepare the pan so the entire layered dessert lifts out cleanly?
Line the 8x8 inch pan with parchment paper, creating an overhang on two opposite sides. This parchment "sling" allows you to grip the edges and lift the entire structure out before slicing.
What is the secret to preventing the chocolate mousse from turning grainy?
Ensure the melted chocolate is only lukewarm not hot before folding in the whipped cream. If the chocolate is too cool, it will seize, causing the emulsion to break and the texture to become grainy.
Can I make this ahead of time for a party?
Yes, assembly can be completed up to 24 hours in advance. Store the fully assembled and chilled dessert in an airtight container to maintain freshness and prevent odor absorption from the refrigerator.
How do I ensure the heavy cream whips to stiff peaks for the mousse?
Chill your mixing bowl and whisk attachments thoroughly before whipping the cream. Cold fat globules stabilize faster; mastering this technique is key to stable foams, much like stabilizing the glaze on our Chocolate Covered Strawberries recipe.
Mousse Brownie Dessert Layers
Ingredients:
Instructions:
Nutrition Facts:
| Calories | 405 kcal |
|---|---|
| Protein | 4.1 g |
| Fat | 28.9 g |
| Carbs | 36.1 g |
| Fiber | 2.1 g |
| Sugar | 29.2 g |
| Sodium | 58 mg |
