Sugar Cookie Icing Recipe for Hardening
- Time: Active 10 minutes, Passive 24 hours, Total 24 hours 10 mins
- Flavor/Texture Hook: Velvety smooth with a crisp, candy like shatter
- Perfect for: Holiday gift boxes, detailed decorating, and beginner friendly baking
- Master sugar cookie icing recipe for hardening
- Essential Recipe Specifications
- Component Analysis and Science
- Necessary Equipment for Decorating
- Mixing and Application Method
- Fixing Common Icing Mistakes
- Creative Variations and Flavors
- Scaling for Large Batches
- Storing and Preserving Cookies
- Best Serving and Gifting
- Recipe FAQs
- 📝 Recipe Card
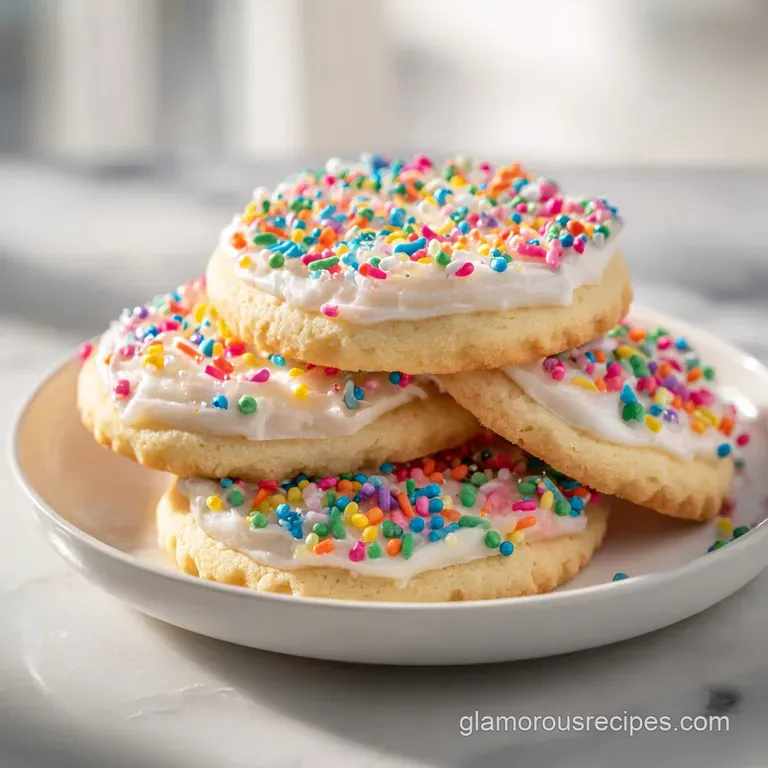
Master sugar cookie icing recipe for hardening
There is nothing quite like the sharp, sweet aroma of almond extract hitting a bowl of snowy confectioners' sugar on a Sunday afternoon. I remember my first real attempt at decorating; I had these beautiful star shaped cookies, but I used a basic milk and sugar glaze.
By the time I tried to stack them for a neighbor's gift basket, the icing was still tacky, and they ended up a sticky, blurred mess. It was heartbreaking, but it taught me that "sugar cookie icing" isn't just about sweetness it is about chemistry.
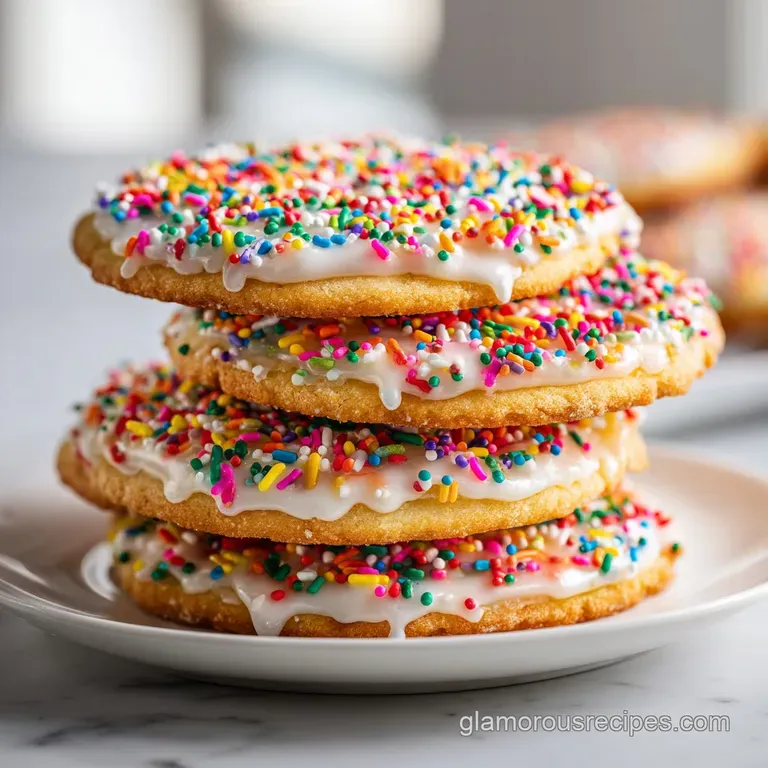
We are going for that specific, professional look where the icing looks like glass and feels like a thin shell of candy. This isn't the soft buttercream your grandma might put on a loaf cake. This is the stuff that survives being mailed in a box to your cousin three states away.
It is reliable, it is shiny, and honestly, it is way easier to handle than traditional royal icing because we aren't messing around with meringue powder or egg safety.
Trust me, once you see that first batch dry to a perfect, matte free sheen, you will never go back to the runny stuff. We are going to walk through exactly how to get that "10 second consistency" that decorators rave about.
You don't need a pastry degree, just a heavy bottomed bowl and a little bit of patience while the air does its magic. Let's crack on and get these cookies looking like they came from a high end bakery.
Essential Recipe Specifications
Before we start sifting, let's look at the logistics of this batch. This recipe is designed to cover about 24 standard sized cookies if you are doing a mix of outlining and flooding. If you are just doing a thin drizzle, you'll have plenty left over.
| Method | Prep Time | Setting Time | Texture |
|---|---|---|---|
| Traditional Flood | 10 minutes | 24 hours | Smooth, flat, glass like shell |
| Simple Dip | 5 minutes | 12 hours | Thin, translucent, sugary coating |
| Detailed Piping | 15 minutes | 24 hours | Defined ridges and crisp edges |
Choosing your method depends entirely on how much time you have. If you are in a rush, the dip method is faster, but for that iconic "bakery" look, the flood method is the way to go. Just remember that the humidity in your kitchen will affect the drying time more than anything else.
Component Analysis and Science
The magic of this recipe lies in how the ingredients interact to create a stable structure. We aren't just making something sweet; we are creating a film that needs to transition from a liquid to a solid without cracking or losing its luster.
- Glucose Interference: The corn syrup acts as a "doctoring agent," preventing the sucrose in the powdered sugar from forming large, gritty crystals.
- Evaporative Curing: As the water in the milk evaporates, the sugar molecules draw closer together, forming a tight, hardened lattice.
- Surface Tension: The specific viscosity allows the icing to "self level," meaning it fills in its own gaps to create a perfectly flat surface before it sets.
| Ingredient | Science Role | Pro Secret |
|---|---|---|
| Confectioners' Sugar | Bulk and Structure | Sift it twice to remove every single microscopic clump. |
| Light Corn Syrup | Shine and Flexibility | This prevents the icing from becoming brittle or chalky. |
| Whole Milk | Solvent and Fat | Use room temp milk to help the sugar dissolve faster. |
If you happen to run out of the store-bought stuff, you can actually make a quick Icing Sugar Without recipe at home by blitzing granulated sugar with a touch of cornstarch. It works in a pinch and keeps the texture from getting grainy.
Necessary Equipment for Decorating
You don't need a mountain of gadgets, but a few specific tools make the process much less stressful. I used to use sandwich bags with the corners snipped off, but I quickly learned that proper piping bags give you way more control over the flow.
You'll definitely want a fine mesh sifter. If you skip this, a tiny lump of sugar will inevitably clog your piping tip at the worst possible moment. A set of small bowls for color mixing is also vital.
I prefer glass or stainless steel because plastic bowls can sometimes hold onto oils from previous meals, and oil is the absolute enemy of a good icing set.
Finally,, grab some toothpicks or a scribe tool. These are essential for popping the tiny air bubbles that rise to the surface of your "flood" icing. If you leave them, they'll turn into little craters once the icing dries. It’s those small details that separate a hobbyist from a pro.
Mixing and Application Method
The secret to a great sugar cookie icing recipe for hardening is the consistency. You are looking for a "10 second" rule: when you drop a spoonful of icing back into the bowl, it should take exactly 10 seconds to disappear completely into the surface.
1. The Sift and Whisk Phase
Start by sifting your 4 cups of confectioners' sugar into a large glass bowl. Don't be tempted to skip this! Add the 3.5 tbsp of whole milk, 3 tbsp of light corn syrup, and your extracts (1 tsp vanilla and 0.5 tsp almond). Add that pinch of sea salt it cuts through the sugar and makes the flavor more complex.
Stir it slowly with a spatula rather than a whisk to avoid incorporating too much air.
2. Achieving the Snap Consistency
If the icing feels too thick, add more milk 1/4 teaspoon at a time. If it is too runny, add a tablespoon of sugar. Once it hits that 10 second mark, you are ready to pipe. I always suggest having your Sugar Cookies recipe baked and completely cooled before you even start the icing. If the cookies are even slightly warm, the icing will melt and run right off the edges.
3. The Coloring and Flood Process
Divide the icing into smaller bowls and add your gel food coloring. Gel is much better than liquid because it doesn't change the consistency of your hard work. Pipe an outline around the edge of the cookie first, let it sit for two minutes, and then "flood" the center.
Use a toothpick to swirl the icing into the corners and pop any bubbles.
Chef's Tip: Freeze your piping bags for 5 minutes if the icing feels too warm from your hands; it helps maintain a steady flow.
Fixing Common Icing Mistakes
Even with a solid plan, things can go a bit sideways. The most common heartbreak is waking up to find your icing is still tacky to the touch. This usually happens because the room was too humid or the icing had a bit too much liquid.
Tacky or Soft Icing
If your icing stays sticky after 12 hours, try placing the cookies near a gentle fan or a dehumidifier. The airflow helps carry away the moisture that is trapped in the sugar matrix.
Never put them in the fridge to dry; the moisture in a refrigerator will actually soften the icing further and potentially cause the colors to bleed.
Dull and Matte Finish
A dull finish usually means the icing dried too slowly or the corn syrup was omitted. Corn syrup is the key to that mirror like shine. If you forgot it, there isn't much you can do for the current batch, but for the next one, ensure you are using the full 3 tablespoons.
| Problem | Root Cause | Solution |
|---|---|---|
| Color Bleeding | Too much liquid or humidity | Use gel colors and dry cookies near a fan. |
| Pitting/Craters | Trapped air bubbles | Tap the bowl on the counter; pop bubbles with a scribe. |
| Cracking Icing | Too much sugar/too brittle | Increase corn syrup slightly for more flexibility. |
Common Mistakes Checklist ✓ Sift the sugar twice to ensure a velvety, lump free flow. ✓ Ensure cookies are 100% cold before applying the first drop of icing. ✓ Use gel food coloring to avoid thinning out the icing's structure.
✓ Keep the icing covered with a damp paper towel when not in use. ✓ Let the cookies dry in a single layer, never stacked, for the first 24 hours.
Creative Variations and Flavors
While the vanilla almond combo is sacred in my house, you can easily tweak this to match the season. For a bright, summer cookie, swap the almond extract for fresh lemon juice and a bit of zest. Just be sure to strain the juice so no pulp clogs your piping tips.
For a deeper, winter flavor, try replacing the vanilla with maple extract or adding a tiny drop of peppermint. If you are feeling adventurous, you can even use cocoa powder to make a chocolate version, though you'll need to increase the milk slightly because cocoa powder is very drying.
The Natural Dye Palette
If you want to avoid artificial dyes, you can use concentrated fruit powders like freeze dried strawberry or matcha. These add a beautiful, earthy color and a subtle flavor boost. Just remember that powders can thicken the icing, so keep that extra tablespoon of milk handy to adjust the flow.
Scaling for Large Batches
If you are prepping for a big bake sale or a wedding, you can easily double this recipe. However, sugar chemistry doesn't always scale linearly.
When doubling, I suggest only using 1.5 times the amount of extracts initially. You can always add more, but extracts can become overpowering in large volumes. For the liquids, start with a bit less than double and add more milk only as needed.
It is much easier to thin out a large batch than it is to thicken it back up once you've gone too far.
| Servings | Sugar | Milk | Corn Syrup |
|---|---|---|---|
| 12 Cookies | 2 cups | 1.75 tbsp | 1.5 tbsp |
| 24 Cookies | 4 cups | 3.5 tbsp | 3 tbsp |
| 48 Cookies | 8 cups | 7 tbsp | 6 tbsp |
If you are working with a huge amount of icing, keep it in a bowl covered with a damp cloth. The surface will crust over in minutes if exposed to air, and those crusty bits will ruin your smooth finish.
Storing and Preserving Cookies
Once your cookies have undergone their 24 hour drying period, they are surprisingly hearty. You can stack them in airtight containers with a piece of parchment paper between the layers. They will stay fresh at room temperature for about a week, though the cookie itself will eventually start to soften.
For longer storage, these cookies actually freeze beautifully. Place them in a single layer in a freezer bag and squeeze out as much air as possible. When you are ready to serve, let them thaw completely inside the bag at room temperature.
This prevents condensation from forming directly on the icing, which can cause spotting or dullness.
Regarding zero waste, if you have leftover icing, don't throw it out! Pipe little "royal icing drops" onto parchment paper and let them harden. These make great homemade sprinkles for future cupcakes or even a Brown Sugar Latte Recipe garnish.
Best Serving and Gifting
When it comes to serving, these cookies are the star of the show. Because the icing hardens so well, they are perfect for individual wrapping in cellophane bags with a pretty ribbon. They make incredible wedding favors or "thank you" gifts for teachers.
I love serving these on a simple white ceramic platter to let the colors pop. If you've used the almond extract, they pair beautifully with a cup of Earl Grey tea or a cold glass of milk. There is something so nostalgic about that first "crack" of the icing and the soft, buttery cookie underneath.
Right then, you've got the science, the tips, and the method. Don't fear the sugar! Start with a small batch, get a feel for that 10 second consistency, and you'll be the person everyone asks to bring the dessert tray to every single party. Happy decorating!

Recipe FAQs
Does this icing require raw egg whites to harden properly?
No, this recipe avoids raw egg whites entirely. It relies on the chemical structure created by corn syrup and powdered sugar to cure into a hard, candy like shell.
How can I make the icing set faster if my kitchen is humid?
Move the cookies near a gentle fan or a dehumidifier. Airflow is crucial for speeding up evaporation, which is the actual setting process; never use the refrigerator.
What consistency is ideal for flooding the cookies so they set flat?
Aim for the "10 second rule" consistency. When you lift a spoonful and drop it back into the bowl, the surface indentation should disappear completely within ten seconds.
Is it true that leaving air bubbles will cause the hardened icing to crack?
Yes, trapped air bubbles create weak spots that can lead to pitting or cracking. Always gently tap the cookie sheet on the counter and use a toothpick to pop visible bubbles immediately after flooding.
How can I achieve a glossy, shiny finish instead of a dull, matte top?
Ensure you use the specified amount of light corn syrup. The corn syrup acts as a doctoring agent, preventing large sugar crystals from forming and promoting a mirror like, professional sheen.
What is the key technique that ensures the icing won't be brittle when bitten?
Mastering the balance of sugar to corn syrup prevents brittleness. If you enjoyed controlling texture stability here, see how the same principle of adding flexibility works when making a [Butter Pecan Pound recipe] glaze.
How long must the iced cookies sit before they are safe to stack or ship?
Allow a minimum of 24 hours of passive drying time before stacking. For best results and a hard "snap," ensure they are completely dry, as humidity significantly slows this curing process.
Hardening Sugar Cookie Icing
Ingredients:
Instructions:
Nutrition Facts:
| Calories | 87 kcal |
|---|---|
| Protein | 0.1 g |
| Fat | 0.1 g |
| Carbs | 22.0 g |
| Fiber | 0 g |
| Sugar | 20.2 g |
| Sodium | 7.1 mg |
