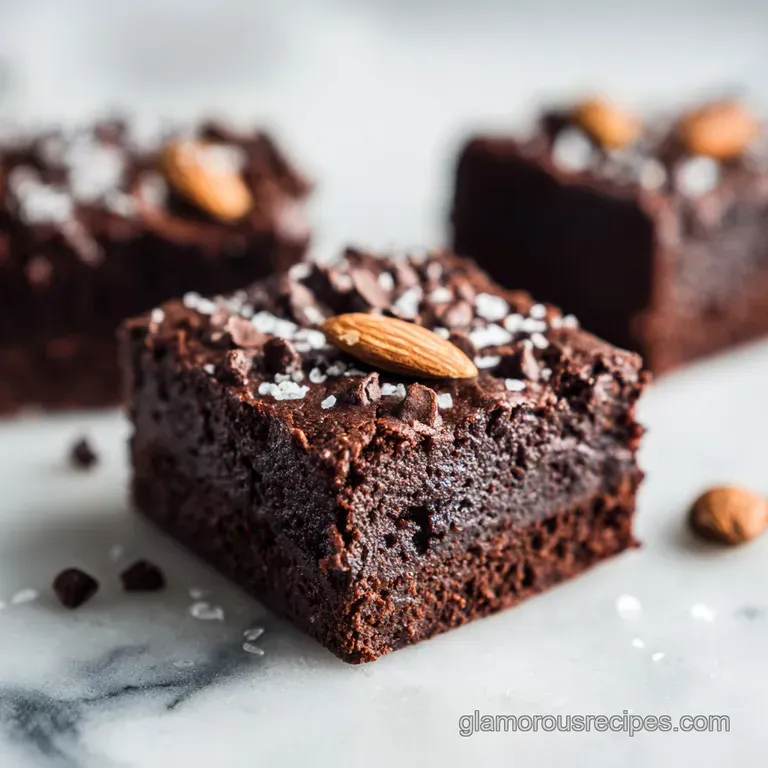
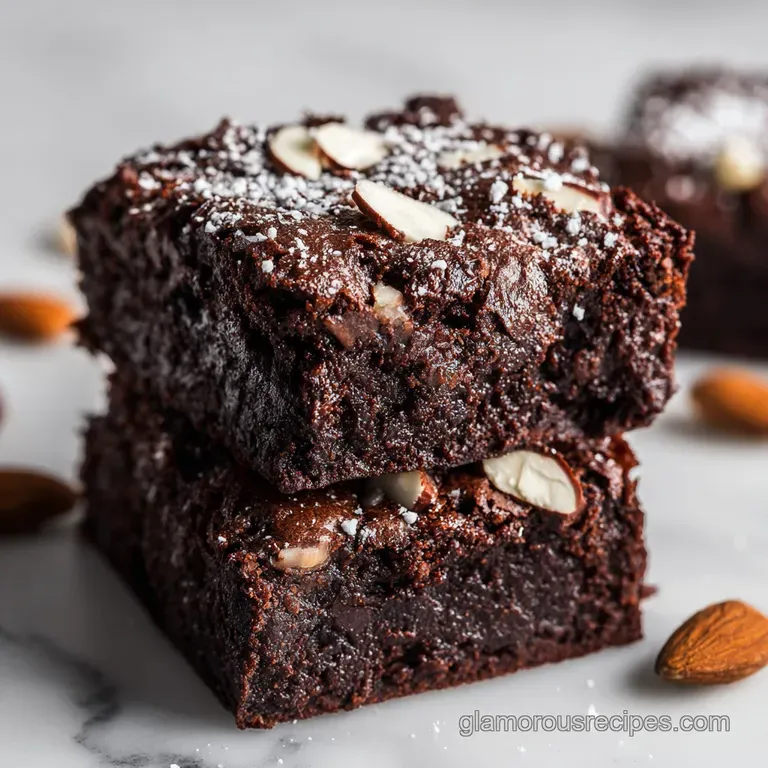
Fudgy Almond Flour Keto Brownies
- Time: Active 10 minutes, Passive 20 minutes, Total 30 minutes
- Flavor/Texture Hook: Deeply fudgy with a delicate, paper thin shattered crust
- Perfect for: Elegant dinner parties or sophisticated low carb meal prepping
- Perfect Fudgy Artisan Keto Brownies
- Texture Success and Scientific Basis
- Essential Components for Precision
- Necessary Pastry Tools and Gear
- Executing Precise Artisan Techniques
- Solving Common Baking Flaws
- Sophisticated Flavor Variation Ideas
- Preserving the Pastry Magic
- Elegant Serving and Pairing
- Recipe FAQs
- 📝 Recipe Card
Perfect Fudgy Artisan Keto Brownies
The history of the brownie is a quintessential American tale, tracing back to the Palmer House Hotel in Chicago during the 1893 World’s Columbian Exposition. Bertha Palmer requested a dessert that was smaller than a piece of cake but retained its richness, something that could be tucked into a boxed lunch for ladies attending the fair.
While the original version was laden with molasses and flour, the spirit of that artisan request remains the same today: a pursuit of the ultimate chocolate indulgence that defies standard cake logic.
In our modern kitchens, the challenge shifts toward recreating that heritage texture without the structural support of traditional sugars or grains. For those of us devoted to the craft of pastry, the transition to low carb baking is not about compromise; it is about mastering the unique behavior of alternative fats and fibers.
There is a certain magic that happens when high-quality grass fed butter meets the fine grain of almond flour, creating a velvety mouthfeel that rivals any traditional bakery offering.
When we talk about the soul of this dish, we are discussing the balance of cocoa solids and moisture. This is not a casual snack but a refined confection designed for those who appreciate the technique behind the taste.
By focusing on the precision of the bake and the quality of the cocoa, we can produce Keto Brownies that stand on their own merits, regardless of dietary labels. It is a testament to how far our understanding of ingredient interaction has come.
Texture Success and Scientific Basis
The structural integrity of these squares relies on several specific interactions that occur during the brief period they spend in the heat. Unlike traditional cakes that lean on gluten development, these rely on protein coagulation and fat suspension.
- Fat Emulsification: Whisking the butter and sweetener for the full 2 minutes creates a stable base that holds the eggs in suspension, preventing the fats from separating during the bake.
- Starch Free Binding: Almond flour provides bulk without the elastic stretch of gluten, allowing the cocoa solids to dominate the structural profile for a more intense chocolate experience.
- Surface Aeration: The vigorous introduction of air into the egg mixture is what creates the characteristic thin, brittle layer on the surface that shatters beautifully upon slicing.
- Maillard Interaction: Even without traditional sugar, the combination of amino acids in the eggs and the erythritol or allulose allows for a subtle browning that deepens the flavor profile.
| Thickness | Internal Temp | Rest Time | Visual Cue |
|---|---|---|---|
| 2 cm | 180°F (82°C) | 60 minutes | Center slightly jiggles when shaken |
| 2.5 cm | 185°F (85°C) | 90 minutes | Edges firm, center soft to touch |
| 3 cm | 190°F (88°C) | 120 minutes | Slight pull away from pan edges |
Understanding the thermal mass of your baking vessel is vital. A glass pan retains heat longer than a metal one, which can continue the cooking process well after the brownies have been removed from the oven. For those who appreciate a creamy contrast, my cheesecake brownie swirl follows a similar artisan approach where temperature control is the primary driver of success.
Essential Components for Precision
Selecting ingredients for Keto Brownies requires a discerning eye for quality, as each element must perform multiple roles. Since we lack the masking power of heavy sugar, the nuances of your butter and cocoa will be front and center.
| Ingredient | Science Role | Pro Secret |
|---|---|---|
| Grass fed Butter | Lipid foundation | Use European style for higher fat content |
| Dutch process Cocoa | Structural dry mass | Sift twice to ensure zero clumping |
| Super fine Almond Flour | Crumb architect | Store in the freezer to prevent rancidity |
| Monk Fruit Sweetener | Crystal formation | Grind to a fine powder for smoother melt |
- 115g Grass fed butter (melted): Provides the velvety fat base. Why this? Higher fat to water ratio ensures a fudgier result than standard butter. (Substitute: Virgin coconut oil for a dairy-free profile).
- 130g Granulated Monk Fruit: Adds sweetness and helps create the top crust. Why this? It mimics the crystalline structure of sugar better than liquid drops. (Substitute: Allulose for a softer, more pliable texture).
- 2 Large eggs (room temp): The primary binder and leavening agent. Why this? Room temperature eggs emulsify faster without chilling the melted butter. (Substitute: 1/2 cup carbonated water for a lighter, though less stable, crumb).
- 35g Dutch process cocoa powder: Delivers the deep chocolate essence. Why this? Alkalized cocoa reacts better with the fats for a darker color. (Substitute: Raw cacao powder for more antioxidants and a fruitier note).
- 50g Super fine almond flour: Gives the brownie its body. Why this? Extra fine grind prevents a gritty, "nutty" mouthfeel in the finished pastry. (Substitute: Sunflower seed flour for a nut free alternative).
- 1 tsp Pure vanilla extract: Enhances the chocolate notes. (Substitute: Almond extract for a cherry like undertone).
- 1/4 tsp Pink Himalayan salt: Balances the sweetener's cooling effect. (Substitute: Flaky sea salt for a topical crunch).
- 1/2 tsp Espresso powder: Intensifies the cocoa without adding coffee flavor. (Substitute: Very finely ground dark roast coffee).
- 60g sugar-free chocolate chips: Provides pockets of molten richness. (Substitute: Chopped 90% cacao bar for a more artisan aesthetic).
Necessary Pastry Tools and Gear
The precision of your execution is often dictated by the tools at your disposal. While many believe baking is about the oven, the preparation phase requires specific hardware to ensure the batter is perfectly homogenized before it ever meets the heat.
A high-quality 8x8 inch (20x20 cm) metal baking pan is the gold standard for this recipe. Metal conducts heat more evenly than ceramic, preventing the common issue where the edges are overcooked while the center remains raw.
On top of that,, the use of parchment paper is non negotiable for an artisan finish; it allows you to lift the entire block of brownies out of the pan, ensuring clean, sharp edges that look as though they came from a professional pastry shop.
I also recommend a fine mesh sieve for the dry ingredients. Almond flour and cocoa powder are notorious for harboring small clumps of moisture that can ruin the texture of a flourless bake.
By sifting these directly into the wet mixture, you ensure that every particle is coated in fat, leading to a much more consistent and refined crumb. A silicone spatula is your best friend here, allowing for the gentle folding technique that incorporates the dry mass without deflating the air we worked so hard to whisk into the eggs.
Executing Precise Artisan Techniques
- Preheat your oven to 180°C (350°F) and prepare the pan with parchment paper. Note: Creating a parchment "sling" makes removal effortless later.
- Whisk the 115g melted butter and 130g monk fruit sweetener in a glass bowl for 2 minutes until the mixture looks glossy and integrated.
- Incorporate the room temperature eggs one at a time, whisking vigorously after each addition until the batter turns a pale, creamy tan.
- Stir in the 1 tsp vanilla extract gently.
- Sift the 50g almond flour, 35g cocoa powder, salt, and espresso powder over the bowl until no large clumps remain visible.
- Use a silicone spatula to fold the dry ingredients into the wet mixture until just a few streaks of flour remain.
- Gently fold in the 60g chocolate chips. Note: Over mixing at this stage will lead to a tough, rubbery texture.
- Pour the batter into the pan and smooth the surface.
- Bake for 18 to 22 minutes until the edges are set but the center remains slightly soft.
- Remove from the oven and allow to cool in the pan for at least 60 minutes until the structure has fully set.
| Method | Time | Texture | Best For |
|---|---|---|---|
| Standard Oven | 20 minutes | Fudgy with crackly top | Classic presentation |
| Convection Oven | 16 minutes | Evenly firm throughout | Bulk meal prep |
| Stovetop (Water bath) | 45 minutes | Silky, custard like | Ultra rich dessert |
Solving Common Baking Flaws
Baking without gluten and sugar is a delicate dance of moisture management. If your result isn't what you envisioned, it usually comes down to a minor timing or temperature error.
Dry and Crumbly Texture
This is almost always a result of over baking. Because these brownies don't have gluten to hold them together, they rely on the fats and eggs. If the moisture is baked out, the almond flour will lose its cohesion.
Gritty Mouthfeel in Batter
If you notice a sand like texture, your sweetener didn't dissolve or your almond flour was too coarse. Ensure you whisk the butter and sweetener long enough to start the dissolution process before adding the cold ingredients.
Lack of Crackly Top
The shiny, shattered top is a result of the sweetener and egg proteins forming a thin meringue like layer. If you skip the vigorous whisking of the eggs, this layer won't form.
| Problem | Root Cause | Solution |
|---|---|---|
| Greasy surface | Butter was too hot | Let butter cool to room temp before whisking |
| Sunken center | Underbaked or opened oven | Keep door closed; use a toothpick test |
| Bitter aftertaste | Poor quality cocoa | Switch to a Dutch process or alkalized brand |
Common Mistakes Checklist
- ✓ Always use room temperature eggs to prevent the butter from seizing and clumping.
- ✓ Sift your cocoa powder twice to avoid bitter "bombs" in the finished brownie.
- ✓ Resisted the urge to cut the brownies while warm; they need the cooling period to firm up.
- ✓ Measure your almond flour by weight (grams) rather than volume for absolute precision.
- ✓ Ensure your oven is fully preheated for at least 15 minutes before the pan goes in.
Sophisticated Flavor Variation Ideas
Scaling this recipe requires a thoughtful approach to the ratios. If you are preparing a large batch for an event, do not simply double every ingredient. The salt and spices should be scaled at 1.5x to avoid overwhelming the delicate chocolate profile.
When doubling, use two separate 8x8 inch pans rather than one large 9x13 inch pan, as the depth change will drastically alter the cooking time and the ratio of "edge pieces" to "center pieces."
For those looking to adjust the flavor profile, consider the "If you want X, do Y" approach: If you want a deeper, more bitter profile, increase the espresso powder to 1 tsp and use 100% cacao chips. If you want a cakey texture, add 1/2 tsp of baking powder and an extra 15g of almond flour.
If you want a "salted caramel" vibe, swirl in 2 tablespoons of sugar-free caramel sauce before baking.
Preserving the Pastry Magic
The beauty of these brownies is that they actually improve after a night in the refrigerator. The fats stabilize, and the flavors of the cocoa and vanilla meld into a more cohesive experience. Store them in an airtight container for up to 5 days in the fridge.
For the best sensory experience, let them sit at room temperature for 15 minutes before serving to soften the butter content.
To freeze, wrap individual squares in parchment paper and then foil. They will maintain their artisan quality for up to 3 months. When you're ready for a treat, thaw them in the refrigerator overnight. For zero waste, any crumbs or broken pieces from the edges can be toasted and used as a sophisticated topping for low carb vanilla ice cream or folded into a chocolate mousse. If you find yourself craving salt after all this chocolate, these savory keto snacks are a fantastic counterpoint to have on hand in your pantry.
Elegant Serving and Pairing
Presentation transforms a simple bake into a culinary event. Depending on the occasion, you can choose a plating style that matches the mood of your gathering.
| Level | Description | Pro Tip |
|---|---|---|
| Simple | Rustic squares on a wooden board | Sift a tiny amount of cocoa on the board first |
| Polished | Stacked with a sprig of fresh mint | Use a hot knife for perfectly clean slices |
| Restaurant | Ganache drizzle and gold leaf | Add three raspberries for a pop of color |
The classic pairing for a deep chocolate brownie is, of course, a glass of cold almond milk or a hot cup of black coffee. However, for a truly elevated experience, serve a room temperature square with a dollop of unsweetened mascarpone cheese whipped with a touch of vanilla bean.
The fattiness of the cheese cuts through the intensity of the Dutch cocoa, creating a balanced dessert that feels incredibly indulgent without the sugar crash.
Debunking Kitchen Myths
A common misconception is that "sugar-free" means "guilt free" in terms of quantity. While these are low in carbohydrates, they are incredibly dense in nutrients and fats. Treat them like a fine truffle small portions are more than enough to satisfy.
Another myth is that you can substitute coconut flour 1:1 for almond flour. This will result in a dry, sandy brick. Coconut flour is far more absorbent and requires a completely different liquid to dry ratio.
Finally, many believe that "darker cocoa is always better." While dark cocoa is rich, over alkalization can lead to a soapy taste; balance is always the goal in artisan baking.

Recipe FAQs
Is it true I must bake these at 400°F to get a crusty top?
No, this is a common misconception. You must maintain an oven temperature of 350°F (175°C) to ensure the fats don't break, which preserves the emulsion and leads to a perfect texture.
How to achieve the signature crackly top?
Whisk the melted butter and monk fruit sweetener for at least 2 minutes. Adding the eggs one at a time and whisking vigorously until the mixture appears pale is the specific method that builds the structure for that delicate, shattered crust.
How to know when the brownies are done baking?
Remove them from the oven at 18 22 minutes while the center still looks slightly underdone. The residual heat will finish the cooking process as they cool, ensuring the final result remains fudgy rather than dry.
Can I substitute the almond flour with coconut flour?
No, the moisture absorption rates are completely different. If you enjoyed mastering the fat-to-fiber ratio in this recipe, keep in mind that almond flour provides the specific density required for these brownies.
Why is my batter looking grainy before baking?
You likely haven't whisked the sweetener into the butter long enough. Keep whisking until the mixture becomes smooth and pale to ensure the sweetener fully integrates into the fat.
How to store these brownies for the best texture?
Keep them in an airtight container at room temperature for up to three days. They firm up as they sit, developing a deeper, more truffle like consistency that mimics high end chocolate confections.
Should I cut the brownies while they are still warm?
No, always let the brownies cool completely in the pan first. Slicing them too early will cause the structure to crumble since they require time to set properly during the cooling phase.
Fudgy Almond Flour Keto Brownies

Ingredients:
Instructions:
Nutrition Facts:
| Calories | 97 calories |
|---|---|
| Protein | 2.0 g |
| Fat | 9.4 g |
| Carbs | 3.9 g |
| Fiber | 2.1 g |
| Sugar | 0.2 g |
| Sodium | 42 mg |
