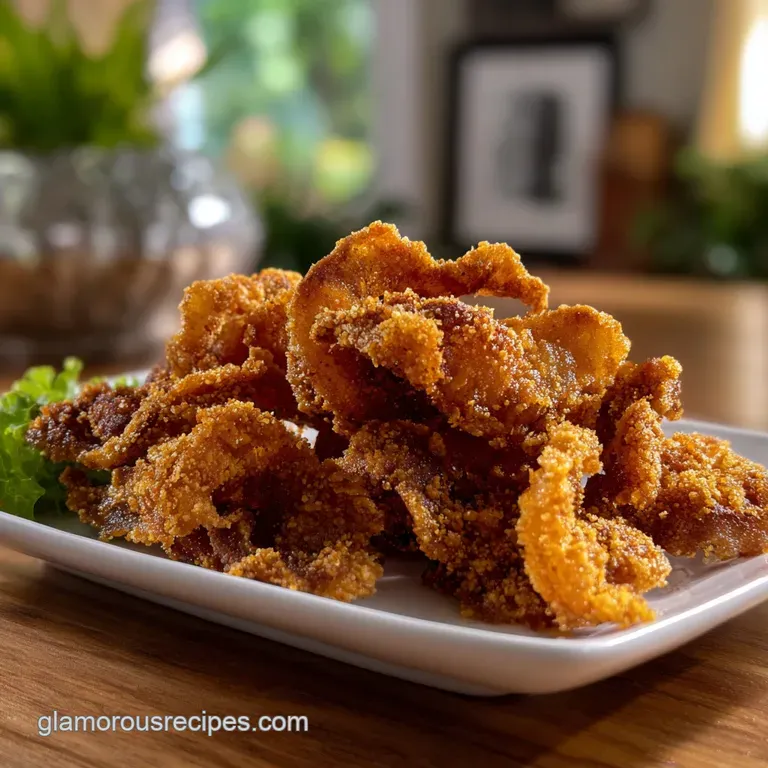
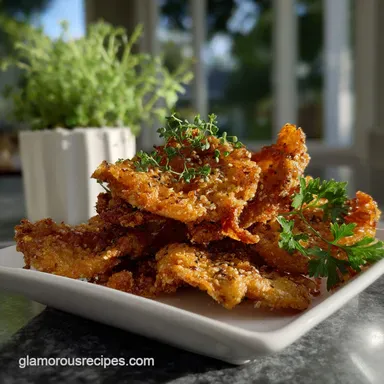
Fried Chicken Skins: Glass-Like Crunch
- Time: Active 15 minutes, Passive 20 minutes, Total 35 minutes
- Flavor/Texture Hook: A glass like shatter that dissolves into a salty, savory melt.
- Perfect for: High protein snacking, keto friendly appetizers, or a decadent topping for salads and soups.
- Understanding the Secret Rendering Process
- Essential Stats for Results
- Component Breakdown for Maximum Flavor
- Tools Required for Golden Crunch
- Mastering the Frying Method
- Avoiding Sogginess and Common Errors
- Exploring Creative Flavor Profile Swaps
- How to Keep Them Fresh
- Stunning Ways to Serve Guests
- Fried Chicken Skins FAQs
- 📝 Recipe Card
Understanding the Secret Rendering Process
The magic behind this fried chicken skins recipe lies in how we manipulate the proteins and fats within the skin itself. Most people think high heat is the answer to crispiness, but with skin, high heat just sears the outside while leaving the rubbery fat trapped underneath.
We want to avoid that "chewy" middle at all costs.
Subcutaneous Fat Rendering: Gentle, consistent heat liquifies the fat layers between the skin cells, allowing them to escape and effectively "confit" the skin in its own oil.
Protein Dehydration: As the water content evaporates, the remaining collagen and elastin fibers tighten and harden into a rigid, brittle lattice that provides the signature crunch.
Even Heat Distribution with Weighted Pressing
To get that uniform golden color, you cannot let the skins curl up. When they curl, they trap steam, and steam is the enemy of the shatter. I always use a second heavy pan or a preheated weight to keep them flat against the cooking surface.
This ensures every square inch of the skin is in direct contact with the heat, resulting in a consistent texture from edge to edge.
| Thickness | Internal Temp | Rest Time | Visual Cue |
|---|---|---|---|
| Paper Thin | N/A (Visual) | 3 minutes | Deep golden amber with no visible white fat bubbles |
| 1/8 inch (Thick) | N/A (Visual) | 5 minutes | Uniformly rigid with a matte, non greasy finish |
| Overlapped | N/A (Visual) | 4 minutes | Edges look like stained glass when held to light |
If you are looking for a different way to enjoy poultry, this technique is actually very similar to the one I use for the skin in my Fried Turkey Breast Recipe. The goal is always the same: maximize the surface area and minimize the moisture.
- If you want a lighter, airy crunch, do a quick over high heat finish after the slow render.
- If you want a rich, bacon like snap, keep the temperature strictly low and go for a longer duration.
- If you want to use these as "chips" for dipping, ensure you press them extra flat during the first 10 minutes of cooking.
Essential Stats for Results
Getting the numbers right is the difference between a soggy mess and a snack that stays crispy for hours. We are working with 1 lb chicken skins, freshly removed from thighs or breasts.
Thigh skins are generally preferred because they have a higher fat content, which leads to a more flavorful render, though breast skins work beautifully if you want a cleaner, thinner result.
The prep time of 15 minutes is mostly spent cleaning and drying the skins. Do not rush this part. If the skins are wet when they hit the pan, they will steam rather than fry, and you will lose that "shatter" factor.
The cook time of 20 minutes is a guideline; your eyes and ears will be the real timer. Listen for the sizzle to slow down that is the sound of the water leaving the building.
When it comes to the seasonings, we are using 1 tsp fine sea salt, 1/2 tsp smoked paprika, 1/4 tsp garlic powder, 1/4 tsp cayenne pepper, and 1/2 tsp freshly cracked black pepper. This blend provides a deep, smoky warmth with just a tiny kick of heat at the end.
It is a classic profile that reminds me of the best Sunday dinners, where the seasoning on the bird was just as important as the meat itself.
Component Breakdown for Maximum Flavor
Every ingredient in this recipe serves a structural or chemical purpose. We aren't just adding flavor; we are managing moisture and enhancing the Maillard reaction. Using fine sea salt is critical because it dissolves quickly into the remaining moisture of the skin, seasoning it deeply rather than just sitting on the surface.
| Ingredient | Science Role | Pro Secret |
|---|---|---|
| Chicken Skins | Lipid Source | Use room temperature skins to prevent the pan temperature from dropping too fast. |
| Fine Sea Salt | Hygroscopic Agent | Draws out the last bits of surface moisture to ensure a faster, more even crisp. |
| Smoked Paprika | Sugar Content | The natural sugars in the pepper help accelerate browning for a rich, mahogany color. |
| Cayenne Pepper | Capsaicin Kick | Adds a subtle "back of the throat" heat that cuts through the richness of the rendered fat. |
The Foundation
- 1 lb chicken skins Why this? The high collagen content provides the structural base for the crunch.
- 1 tsp fine sea salt Why this? Acts as both a seasoning and a powerful dehydrator.
The Signature Seasoning Blend
- 1/2 tsp smoked paprika Why this? Provides a deep, earthy color and a hint of wood smoke aroma.
- 1/4 tsp garlic powder Why this? Adds an umami backbone that complements the savory chicken fat.
- 1/4 tsp cayenne pepper Why this? A tiny amount provides a bright contrast to the heavy fats.
- 1/2 tsp freshly cracked black pepper Why this? The coarse oils in fresh pepper offer a floral, sharp bite.
If you don't have smoked paprika, you can use regular paprika, though you will lose that campfire depth. For the salt, if you only have kosher salt, use 1.5 teaspoons as the grains are larger and less dense. This seasoning strategy is a simplified version of the bold flavors you'll find in my Buffalo Chicken Dip recipe, where we balance fat with a hit of spice.
Tools Required for Golden Crunch
You do not need a deep fryer for this. In fact, I prefer a heavy bottomed skillet, like a cast iron pan such as a Lodge. The thermal mass of cast iron ensures that once the pan is hot, it stays hot, even when you add the cold skins. You will also need a second pan of a slightly smaller diameter or a heavy bacon press.
This is the "secret weapon" that prevents the skins from curling into little tubes.
Parchment paper is another essential. I like to sandwich the skins between two layers of parchment before pressing. This prevents the skins from sticking to the top pan and makes cleanup a breeze. Finally, a wire cooling rack is non negotiable.
If you put hot, fried chicken skins directly onto a paper towel, the bottom side will trap steam and turn soft. A rack allows air to circulate around the entire piece, locking in the crunch.
Mastering the Frying Method

- Clean the skins. Remove any large chunks of meat or excessive globes of yellow fat. Note: Excessive fat will take too long to render and might cause the skins to become greasy.
- Dry thoroughly. Pat each skin between paper towels until they feel tacky and no longer slippery.
- Season the surface. Toss the skins in a bowl with the sea salt, smoked paprika, garlic powder, cayenne, and black pepper.
- Arrange the pan. Place the skins in a cold skillet in a single layer, ensuring they do not overlap.
- Add the weight. Cover the skins with a piece of parchment paper and place a second heavy skillet on top.
- Start the heat. Turn the burner to medium low and listen for the first signs of a sizzle.
- Render slowly. Cook for 10 minutes, then check the progress. The fat should be bubbling gently.
- Flip for evenness. Use tongs to flip the skins over, replace the parchment and weight, and cook for another 8 to 10 minutes.
- Observe the color. Cook until the skins are a deep, uniform amber and look translucent like stained glass.
- Drain and set. Transfer immediately to a wire rack. Note: They will continue to crisp up as they cool for the first 3 minutes.
Chef's Tip: If you find the skins are browning too fast on the edges but stay pale in the middle, your heat is too high. Drop it down and let the fat do the work. It should look like a gentle simmer, not a violent boil.
Avoiding Sogginess and Common Errors
The biggest heartbreak in the kitchen is a batch of homemade fried chicken skins that goes limp ten minutes after cooking. This usually happens because of "carryover moisture." Even when the skin looks dry, there might be tiny pockets of water trapped in the fibers.
The wire rack is your best friend here, but so is the "press." If the skin is pressed flat, there are no pockets for steam to hide.
Another issue is the "bitter burn." Because of the smoked paprika and garlic powder, if the heat gets too high (above 375°F), these spices will scorch and turn the whole batch acrid. Keep your heat moderate.
It is better to take five extra minutes at a lower temp than to ruin the batch in sixty seconds of high heat.
Why Your Chicken Skins Are Chewy
| Problem | Root Cause | Solution |
|---|---|---|
| Rubbery texture | Incomplete fat rendering | Increase cook time at a lower temperature to melt all subcutaneous fat. |
| Greasy mouthfeel | Poor drainage | Always cool on a wire rack, never directly on a flat plate or paper towel. |
| Bitter aftertaste | Spices scorched | Add the seasoning blend halfway through cooking or lower the flame. |
One mistake I once made was trying to crowd the pan. I thought I could save time by overlapping the skins, but they just stuck together in a pale, soggy clump. It was a mess. Now, I always work in batches. It takes longer, but the results are actually edible.
Common Mistakes Checklist: ✓ Did you pat the skins dry? Surface moisture equals steam. ✓ Is the heat low enough? You want a "whispering" sizzle, not a scream. ✓ Are you using a weight? Flat skins are crispy skins. ✓ Is there a wire rack ready?
Airflow is essential for the final set. ✓ Did you trim the meat? Any leftover meat will stay soft and make the skin around it chewy.
Exploring Creative Flavor Profile Swaps
Once you master the basic easy fried chicken skins recipe, you can start playing with the aromatics. The beauty of chicken skin is that it is a blank canvas for salt and spice. If you are doing a Whole 30 month, you can omit the sugar based spices and just stick to salt and pepper, much like the seasoning on my Whole 30 Roasted Chicken.
| Original Ingredient | Substitute | Why It Works |
|---|---|---|
| Smoked Paprika | Chipotle Powder | Adds a more intense, earthy heat. Note: Very spicy, use half the amount. |
| Garlic Powder | Onion Powder | Provides a sweeter, more mellow savory note without the sharp garlic bite. |
| Cayenne Pepper | Chinese Five Spice | Changes the profile to a warm, aromatic, and slightly sweet Asian inspired snack. |
For a "Ranch" version, toss the hot skins in a mixture of dried dill, chives, and buttermilk powder immediately after they come out of the pan. The residual heat will help the powder stick to the tiny amount of oil left on the surface.
If you want something truly decadent, a drizzle of hot honey right before serving creates a "sweet and salty" explosion that is hard to beat.
How to Keep Them Fresh
Fried chicken skins are best enjoyed within an hour of cooking, but life happens. If you have leftovers, the fridge is your only option. Place them in an airtight container lined with a dry paper towel. They will stay safe to eat for up to 3 days.
However, they will lose their "shatter" in the cold, humid environment of a refrigerator.
To reheat, avoid the microwave at all costs it will turn them into rubber bands. Instead, pop them back into a 350°F oven or an air fryer for 2 to 3 minutes. This will re render any solidified fat and bring back that crunch. You can also freeze them!
Lay them flat on a baking sheet to freeze individually, then toss them into a freezer bag for up to 2 months.
Zero Waste Tip: Do not throw away the fat left in the pan! That is liquid gold, also known as schmaltz. Filter it through a coffee filter and keep it in a jar in the fridge. Use it to roast potatoes or sauté onions for your next Crockpot Chicken and Stuffing recipe. It adds an incredible depth of flavor that butter or vegetable oil just can't match.
Stunning Ways to Serve Guests
While these are incredible on their own as a snack, they also function as a gourmet garnish. I love to crumble them over a velvety potato leek soup or a Caesar salad instead of croutons. It adds a layer of texture that is much more interesting than toasted bread.
If you are serving them as an appetizer, treat them like chips. Place them in a silver bowl or a rustic wooden basket lined with parchment.
For a true Southern inspired spread, serve these alongside some pickled red onions or a sharp vinegar based slaw. The acidity of the pickles cuts through the richness of the fried chicken skins perfectly. You could even use them as a "scoop" for a thick dip, like a spicy pimento cheese or a cool avocado mousse.
If you're feeling really adventurous, try using them as a taco topping. The crunch of the skin against the soft tortilla and the juicy meat of my Shredded Chicken Recipes creates a contrast that is absolutely world class. No matter how you serve them, just make sure you have enough. In my experience, these disappear faster than the main course every single time.
The secret is to keep it simple and let the texture speak for itself. You have spent the time rendering and pressing to achieve that specific sound and feel let that be the star of the show.
Whether it is a casual snack during the game or a refined topping for a Sunday dinner, these skins are a testament to the fact that the "scraps" are often the most valuable part of the kitchen.

Fried Chicken Skins FAQs
What are fried chicken skins called?
They are often called chicken cracklings or chicharrones. While chicharrones typically refer to fried pork rinds, the term is also commonly used for crispy fried chicken skins due to their similar texture and snackability.
Is it okay to eat fried chicken skin?
Yes, in moderation, they are perfectly fine to eat. Fried chicken skins are a high fat, high protein snack that can be enjoyed as an appetizer or a crunchy topping. If you enjoyed mastering the technique of rendering fat here, see how the same principle of fat management applies to achieve a perfect crisp in our Greek Tortellini Salad with Chicken and Artichokes.
How to pan fry chicken skins?
Start by patting the cleaned chicken skins thoroughly dry. Season them with salt and your desired spices, then arrange them in a single layer in a cold, heavy bottomed skillet.
Place a piece of parchment paper over the skins, top with a second heavy skillet or weight, and cook over medium low heat, flipping halfway through, until deeply golden and translucent.
How to do crispy chicken skins?
Ensure the skins are completely dry before cooking. Slow, even rendering at a medium low temperature is key to melting the fat and dehydrating the skin. Pressing them flat with a weight throughout most of the cooking process is crucial to prevent curling and ensure uniform crispiness.
Can I use breast chicken skins instead of thigh skins?
Yes, you can, but they will be thinner and crispier. Thigh skins are generally preferred because their higher fat content leads to a richer, more satisfying render. Breast skins are leaner and can sometimes be a bit tougher if not cooked carefully.
Why are my fried chicken skins chewy and not crispy?
This is usually due to incomplete fat rendering and trapped moisture. Make sure you are cooking them slowly at a moderate temperature for long enough to fully melt the fat. Always drain them on a wire rack, not paper towels, to allow air circulation and prevent steam from softening them.
How do I store leftover fried chicken skins?
Store them in an airtight container at room temperature or in the refrigerator for up to 3 days. For best results and to regain crispness after refrigeration, reheat them in a 350°F oven or an air fryer for a few minutes. If you enjoyed the crunch here, you might also like the texture contrast in our Weeknight Recipes: Speedy Sheet Pan Harissa Chicken.
Fried Chicken Skins
Ingredients:
Instructions:
Nutrition Facts:
| Calories | 296 calories |
|---|---|
| Protein | 15 g |
| Fat | 26 g |
| Carbs | 0.6 g |
| Fiber | 0.2 g |
| Sugar | 0.1 g |
| Sodium | 592 mg |
