Ezekiel Bread Recipe
- Time: Active 30 minutes, Passive 45 minutes, Total 1 hour 15 mins
- Flavor/Texture Hook: Toasted, nutty notes with a dense, shatter-crisp crust
- Perfect for: Health-conscious meal prep or a sacred family breakfast
- The Science of Why it Works
- Essential Baking Measurements and Yields
- Flour and Grain Component Analysis
- Necessary Tools for Artisan Loaves
- Step by Step Dough Construction
- Fixing Common Texture Baking Issues
- Flavor Enhancements and Ingredient Swaps
- The Mathematics of Multiplication
- Baking Folklore Debunked
- Storage Tips and Repurposing Scraps
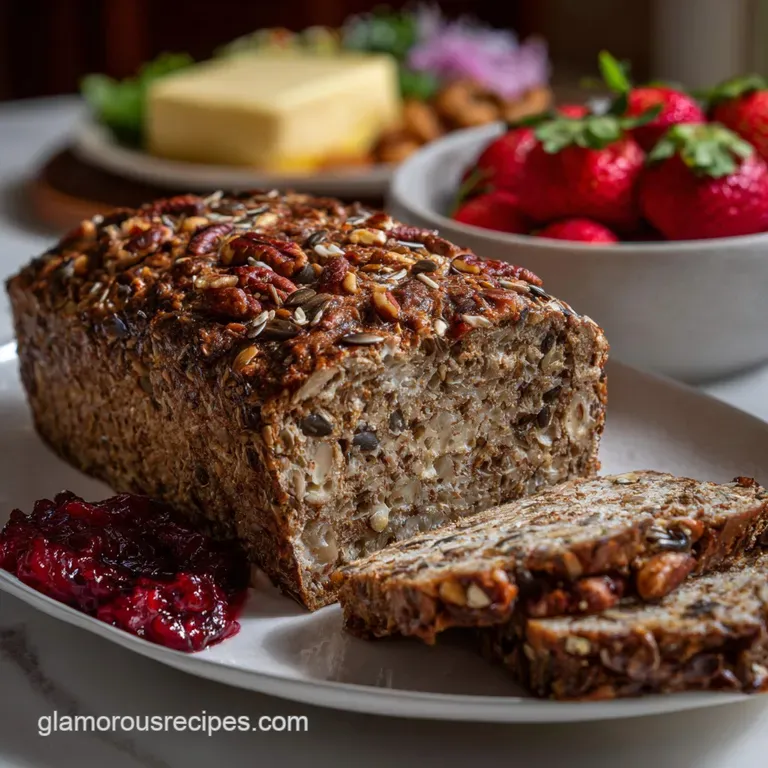
- Slicing and Serving Your Loaf
- Solving Dense or Flat Bread
- Common Questions
- 📝 Recipe Card
There is a specific, intoxicating perfume that fills a home when real bread is in the oven. It is not just the sweet, beer like scent of yeast waking up, but the deep, toasted aroma of grains like millet and barley.
I remember the first time I tried this ezekiel bread recipe, I was skeptical about putting beans in my dough, but the result was a slice of comfort that felt both ancient and deeply nourishing.
Have you ever noticed how store-bought health breads often feel like cardboard? We are fixing that today. This isn't just a loaf, it is a connection to a simpler time when we treated our ingredients with a bit more respect.
This particular ezekiel bread recipe is the kind of bread that demands a thick swipe of salty butter and a quiet moment before the house wakes up.
We are going to use a blend of hard red wheat, spelt, and even some lentils to create a texture that is sturdy yet forgiving. The smell alone, as it transitions from raw dough to a golden brown masterpiece, is enough to make anyone a believer in the magic of home baking.
Trust me on this, once you smell those grains roasting together, you will never go back to the plastic wrapped stuff. Understanding the process behind this ezekiel bread recipe makes all the difference.
The Science of Why it Works
- Amino Acid Synergy: Combining legumes like lentils and kidney beans with cereal grains creates a complete protein through a process called protein complementation. This ensures your body gets all essential building blocks in one slice.
- Enzymatic Breakdown: The warm water environment at 110°F triggers amylase activity, which converts complex starches into simpler sugars for the yeast to consume. This creates a more complex flavor profile than quick rise breads. This is essential for a successful ezekiel bread recipe.
- Maillard Reaction: The honey and protein rich flour undergo a chemical reaction under high heat, producing the distinct brown color and nutty "roasted" aromas we love.
- Gluten Network: Hard red wheat and spelt provide the structural matrix through protein denaturation, trapping carbon dioxide bubbles to prevent a heavy, sunken loaf.
Unlike standard white bread, which relies solely on refined wheat, this multi grain approach provides a slower glucose release due to the varied fiber structures of millet and barley. The results from this ezekiel bread recipe speak for themselves.
Essential Baking Measurements and Yields
When we talk about traditional baking, precision is a sign of respect for the craft. I always tell my friends that a scale is your best friend in the kitchen, but if you are using cups, make sure you are fluffing the flour first.
This ezekiel bread recipe is designed to be substantial, giving you 14 thick, hearty servings that will last through a week of morning toasts.
| Specification | Metric/Detail |
|---|---|
| Yield | 14 slices |
| Bake Temp | 350°F (175°C) |
| Loaf Size | 9x5 inch |
| Internal Temp | 190°F to 200°F |
Chef's Tip: Freeze your dry lentils and beans for 15 minutes before grinding them in a high speed blender; the cold prevents the friction heat from "pre-cooking" the starches, resulting in a much lighter flour for your ezekiel bread recipe.
Flour and Grain Component Analysis
Understanding what goes into your bowl is half the battle. Each grain in this ezekiel bread recipe has a specific job to do, much like the ingredients in a Traditional New Year recipe work together for luck and flavor.
| Ingredient | Chemical/Physical Role (Science) | The Pro Secret (Why This Matters) |
|---|---|---|
| Hard Red Wheat | High glutenin and gliadin content | Provides the "skeleton" of the loaf so it doesn't crumble |
| Spelt Flour | Water soluble gluten structure | Adds a delicate sweetness and makes the crumb more tender |
| Active Dry Yeast | Biological leavening agent | Ferments sugars into CO2, creating the airy rise |
| Honey | Hygroscopic humectant | Pulls moisture from the air to keep the bread soft for days |
The Grain and Legume Base
- 2.5 cups (320g) hard red wheat flourWhy this? High protein content (13 15%) is vital for a strong, airy rise in heavy breads.
- 1.5 cups (190g) spelt flourWhy this? This ancient grain provides a lighter, nuttier flavor than modern wheat.
- 0.5 cup (90g) hulled barley (Ground into flour)
- 0.5 cup (100g) millet (Ground into flour)
- 0.25 cup (50g) dry green lentils (Ground into flour)
- 2 tbsp (25g) dry great northern beans (Ground into flour)
- 2 tbsp (25g) dry red kidney beans (Ground into flour)
The Activators
- 2 cups (475ml) warm water, 110°F
- 0.25 cup (85g) honey or maple syrup
- 0.25 cup (60ml) olive oil
- 1 tbsp (10g) active dry yeast
- 1.5 tsp (9g) fine sea salt
Necessary Tools for Artisan Loaves
You don't need a professional bakery to get these results, but a few specific items make the journey smoother. Honestly, don't even bother with a flimsy tin; a heavy duty pan is key for success with this dense ezekiel bread recipe.
- KitchenAid Stand Mixer: Using the dough hook saves your wrists and ensures even distribution of the legumes.
- Vitamix or High Speed Blender: Essential for turning those dry beans and grains into a fine, silky flour.
- Lodge Cast Iron Loaf Pan: The heat retention of cast iron gives you a crust that shatters beautifully when bitten.
- Digital Thermometer: The only way to truly know your bread is cooked through without cutting into it.
step-by-step Dough Construction
Let's get our hands dirty. This process is rhythmic and calming, perfect for a slow afternoon. Following these steps ensures a perfect result every time you attempt the ezekiel bread recipe.
- Grind the barley, millet, lentils, and both types of beans in a high speed blender until they reach a fine, powdery consistency.
- Whisk the ground legume flour with the hard red wheat and spelt flour in a large bowl until the color is a uniform, sandy beige.
- Combine the warm water, honey, olive oil, and yeast in the bowl of your KitchenAid mixer. Note: Water at 110°F is the "Goldilocks" zone warm enough to wake yeast, but not hot enough to kill it.
- Wait10 minutes until the mixture develops a thick, frothy head that smells like sweet fermenting apples.
- Add the salt and half of the flour mixture to the liquids, mixing on low speed until a thick slurry forms.
- Incorporate the remaining flour slowly, one cup at a time, until the dough begins to pull away from the sides of the bowl.
- Knead with the dough hook for 8 minutes until the surface is smooth, slightly tacky, and springs back immediately when poked. This kneading is crucial for a good ezekiel bread recipe.
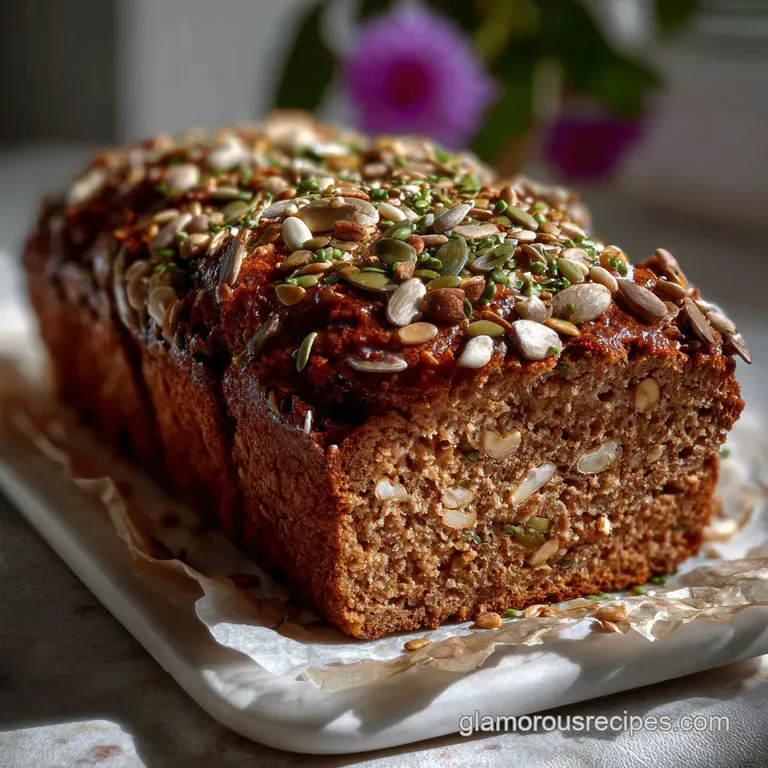
- Transfer the dough into a greased Lodge loaf pan, smoothing the top with damp fingers to prevent a jagged crust.
- Rise in a warm, draft free spot for 45 minutes until the dough has domed about 1 inch above the rim of the pan.
- Bake at 350°F for 45 minutes until the top is deep mahogany brown and the loaf sounds hollow when tapped on the bottom.
Fixing Common Texture Baking Issues
Sometimes the kitchen gods aren't smiling. But usually, it's just a matter of physics and hydration. If you've ever struggled with a dough that feels like a Fufu Recipe — dense and starchy you might need to adjust your liquids in this ezekiel bread recipe.
Why Your Bread Is Gummy
If the center feels damp or sticky even after cooling, the starch gelatinization wasn't completed. This often happens if the oven temp is too high, browning the outside before the inside can set. Another culprit is cutting the bread while it's still steaming; that steam is actually still "cooking" the crumb!
| Problem | Root Cause | The Fix | Pro Protocol |
|---|---|---|---|
| Sunken Top | Over proofing | Watch the clock; stop rise when 1 inch above pan | Use a finger poke test; it should rise slowly |
| Crumbly Slices | Not enough kneading | Knead until gluten "windowpane" is achieved | Add 1 tsp of vital wheat gluten next time |
| Rock Hard Crust | Low oven humidity | Place a pan of water on the bottom rack | Brush the hot crust with butter immediately |
Flavor Enhancements and Ingredient Swaps
I love the classic version, but sometimes I want a little "extra" for a special Sunday brunch. You can swap some elements without ruining the chemistry of the ezekiel bread recipe.
| Original Ingredient | Substitute | Why It Works |
|---|---|---|
| Honey | Molasses | Adds a deep, smoky sweetness. Note: Crumb will be much darker |
| Olive Oil | Melted Coconut Oil | Same fat ratio. Note: Adds a very faint tropical aroma |
| Spelt Flour | Oat Flour | High fiber and moisture. Note: Resulting loaf will be denser |
- If you want a sweeter loaf
- Increase honey by 2 tbsp and add 1 cup of raisins during the final kneading.
- If you want a savory crust
- Brush the top with egg wash and sprinkle with "Everything Bagel" seasoning before baking.
- If you want a softer crumb
- Replace half of the water with warm whole milk to add tenderizing fats. Many bakers find this improves the texture of the final ezekiel bread recipe.
The Mathematics of Multiplication
Scaling this bread requires a bit of care because those grains absorb water differently as volume increases. Making a double batch of the ezekiel bread recipe is a common next step for serious bakers.
- Scaling Up (2x): Do not double the yeast exactly; use 1.75x to prevent the dough from rising too fast and collapsing. Drop the oven temp by 25°F to ensure the centers cook without burning the outsides.
- Scaling Down (1/2): This is easy just use a smaller 6 inch pan and check for doneness 10 minutes earlier.
- The Evaporation Paradox: When making 4 loaves at once, you might find you need 5% less water because the mass of dough retains moisture more efficiently when preparing a large ezekiel bread recipe.
Baking Folklore Debunked
Myth: You must sprout the grains yourself for it to be "real" Ezekiel bread. Truth: While sprouting increases bio-availability, using a variety of whole grain and legume flours still provides the complete protein and fiber benefits.
The synergy is in the ingredients themselves, not just the germination. This is the foundation of a successful ezekiel bread recipe.
Myth: The dough shouldn't be sticky. Truth: This is a high hydration dough. A little stickiness is your friend! If you add too much flour trying to make it "clean," you'll end up with a brick instead of a loaf.
Achieving the right texture in this ezekiel bread recipe takes practice.
Storage Tips and Repurposing Scraps
This bread is a treasure, so don't let a single crumb go to waste. Because it has no preservatives, it won't sit on the counter forever like a grocery store loaf. A perfectly made loaf of this ezekiel bread recipe deserves careful storage.
Storage: Keep in an airtight bag at room temperature for up to 3 days. For longer life, slice the loaf and freeze with parchment paper between slices for up to 3 months. To reheat, just pop a frozen slice straight into the toaster.
- Zero Waste
- Don't toss those slightly stale end pieces!
- Transform
- Pulse them in a blender to make the most incredible, protein packed breadcrumbs. They add a nutty crunch to a Homemade Red Pepper recipe glaze on chicken or fish.
- Science
- Stale bread isn't actually "dry"; the starch molecules have just re-crystallized (retrogradation). A quick toast or a few seconds in the microwave "melts" those crystals back into a soft state.
Slicing and Serving Your Loaf
The hardest part of this ezekiel bread recipe is waiting for it to cool. I know the smell is driving you crazy, but you have to wait at least 30 minutes. If you cut it too soon, the internal steam escapes, and the remaining bread will dry out instantly.
Learning patience is part of mastering this ezekiel bread recipe.
When you're ready, use a long, serrated bread knife. Use a gentle sawing motion rather than pressing down; you want to preserve that beautiful, airy crumb you worked so hard for. I love serving this alongside a big Sunday dinner it's the perfect vessel for mopping up gravy or spreading with a bit of local honey.
It’s more than just food; it’s a way to slow down and appreciate the simple, sacred act of breaking bread together. This ezekiel bread recipe truly makes any meal better.
Solving Dense or Flat Bread
If your loaf looks more like a pancake than a dome, don't panic. We’ve all been there. Usually, it’s a matter of the "bloom." If your yeast didn't look like a bubbling cauldron of foam after 10 minutes, it was likely expired or the water was too hot.
Understanding yeast vitality is key to troubleshooting your ezekiel bread recipe.
Another trick I've learned over the years is the "oven spring" boost. If you find your bread isn't rising much in the pan, try preheating a baking stone or a heavy cookie sheet in the oven and placing your loaf pan directly on top of it.
That immediate hit of heat from the bottom can force those gas bubbles to expand rapidly before the crust sets, giving you that beautiful, high domed profile. Happy baking! Try another batch of this ezekiel bread recipe soon.

Common Questions
What grains are mandatory for an authentic recipe?
Hard red wheat, spelt, barley, millet, lentils, and kidney beans. These specific combinations ensure the amino acid profile is complete for a fully nutritious slice. Omitting the legumes drastically changes the protein structure.
What is the correct water temperature for activating the yeast?
Exactly 110°F. Temperatures above this denature the yeast enzymes, preventing the necessary CO2 production for lift. If you mastered the temperature control in our Frozen Margarita: The 6-Minute Classic Recipe for a Perfect Summer Slush, apply that same precision here.
Why is my loaf dense and gummy in the middle?
The internal structure did not fully set during baking. Cutting the loaf while it is still steaming prevents the final starch gelatinization, trapping moisture inside. This is similar to how a sauce needs time off the heat to fully thicken.
- Ensure internal temp reaches 190°F
- Allow at least 30 minutes cooling time
- Avoid over proofing the dough before baking
Is it better to use fresh ground or pre-milled legume flour?
Fresh ground provides superior texture. Pre-milled legume flours often contain starches that have already begun to break down due to heat friction during processing. If you enjoyed mastering the delicate blending process in our VintageGrandma Recipes: Proper Golden Syrup Treacle Tart Classic, apply that same principle of ingredient control here.
Can I substitute all the honey with another sweetener?
Substitute molasses for a darker, smokier loaf. Honey acts as a humectant, drawing moisture to keep the bread soft days after baking. Molasses is less effective at this, resulting in a slightly firmer crumb structure.
Myth: You must knead this bread for at least 15 minutes.
Myth: You must knead this bread for at least 15 minutes. Reality: Kneading time is dictated by dough feel, not the clock; aim for a smooth, tacky dough (around 8-10 minutes on low speed), ensuring gluten development for structure.
Myth: This bread is gluten-free because it contains beans.
Myth: This bread is gluten-free because it contains beans. Reality: It contains significant gluten from the hard red wheat and spelt; the beans only complement the protein profile.
Ezekiel Bread Recipe
Ingredients:
Instructions:
Nutrition Facts:
| Calories | 253 kcal |
|---|---|
| Protein | 8.5 g |
| Fat | 5.3 g |
| Carbs | 45.1 g |
| Fiber | 7.2 g |
| Sugar | 5.4 g |
| Sodium | 251 mg |
