Easy Smashed Roasted Brussels Sprouts
- Time: Active 10 minutes, Passive 35 minutes, Total 45 minutes
- Flavor/Texture Hook: Shatter crisp edges with a velvety, balsamic glazed heart
- Perfect for: Stress free holiday sides or healthy weeknight dinner upgrades
- Mastering the Best Easy Smashed Roasted Brussels Sprouts Recipe
- Key Specs for Crunchy Success
- Essential Components for Savory Flavor
- Necessary Tools for Easy Prepping
- Executing the Smashed Sprout Process
- Solving Common Texture Problems Fast
- Smart Ways to Adapt Flavor
- Myths Regarding Sprout Preparation
- Handling Leftovers and Food Waste
- Ideal Pairings for Any Meal
- Recipe FAQs
- 📝 Recipe Card
Mastering the Best Easy Smashed Roasted Brussels Sprouts Recipe
The smell of sulfur that pungent, overcooked cabbage aroma used to be the absolute death knell of my family dinners. I clearly remember staring at a pile of boiled, greyish globes on my childhood plate, wondering why anyone would choose to eat something that looked like it had simply given up on life.
The texture was even worse: a rubbery, wet center that released a lukewarm puddle onto the plate with every fork prick. It was the quintessential vegetable failure, a soggy mess that gave sprouts a bad reputation for decades.
But everything changed the day I realized that the "mush factor" wasn't the fault of the sprout; it was a failure of physics. We were trapping moisture inside those tight little leaves instead of letting it escape. To get that restaurant quality crunch, we have to break the structure.
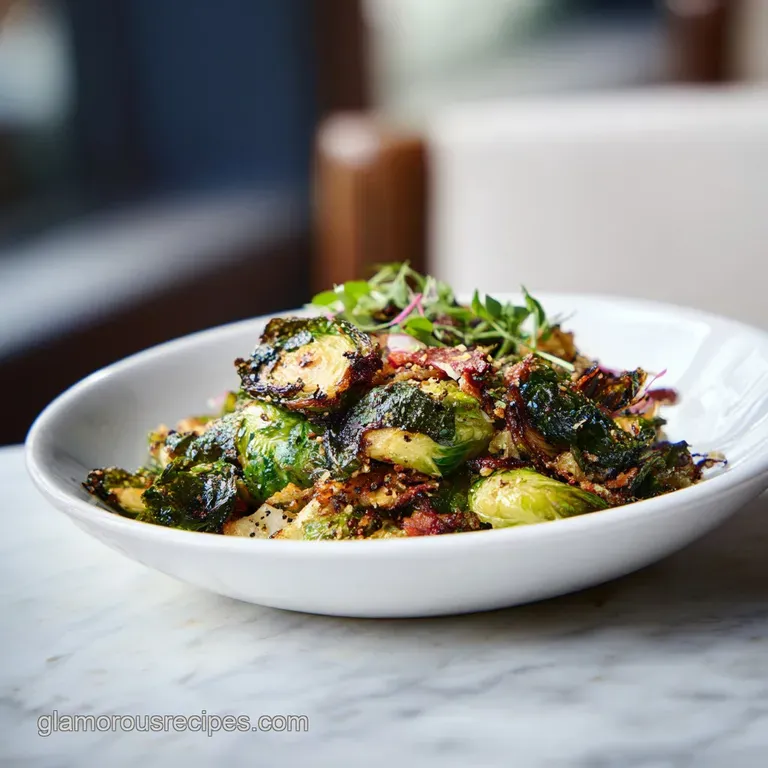
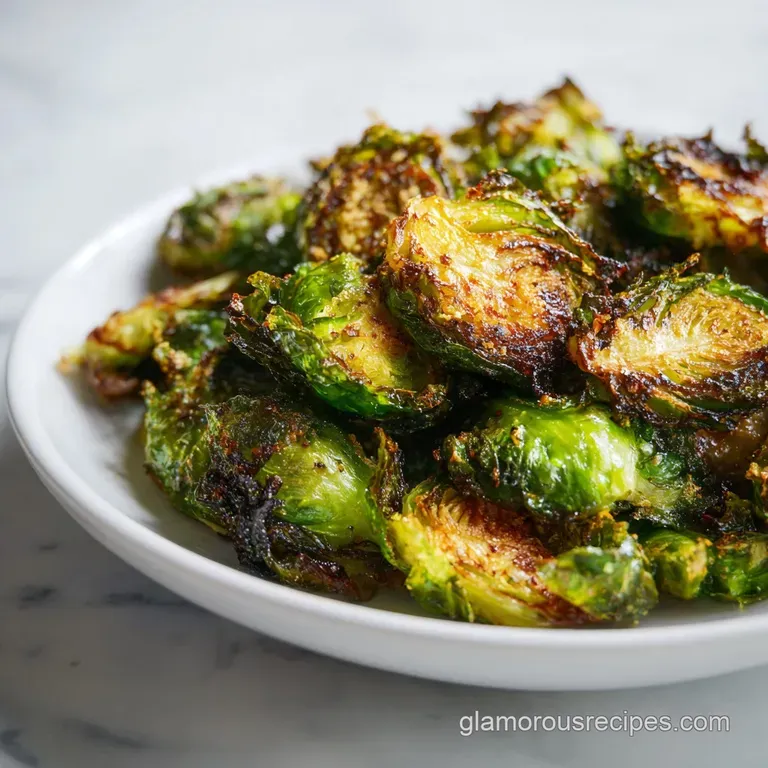
That is where this easy smashed roasted brussels sprouts recipe comes in. By smashing them flat, we expose the internal layers to direct heat, turning what used to be a soggy ball into a crispy, mahogany colored disk of pure flavor.
When you pull these out of the oven, the sizzle on the baking sheet is music to any home cook's ears. The edges are so thin they practically shatter like parchment paper, while the centers remain tender and buttery. This isn't just another side dish; it is a total redemption story for a vegetable that deserves better.
We are using high heat, smart moisture management, and a few budget friendly pantry staples to create something that honestly tastes like it should cost twenty dollars at a high end steakhouse.
Key Specs for Crunchy Success
The magic of this dish lies in the transition from steam to dry heat. Most people fail because they try to roast raw sprouts from the start, which often results in burnt outsides and raw, bitter insides.
Our method uses a quick par boil to soften the cellular structure, making them pliable enough to flatten without falling apart. This two step process is the secret to achieving that coveted textural contrast.
- Surface Area Maximization: Flattening the sprout to 1/2 inch thick increases the contact point with the oiled pan by nearly 400%, creating more space for browning.
- Starch Gelatinization: The initial 7 to 9 minutes of boiling begins to break down the tough starches, ensuring the interior is velvety once the oven finish is complete.
- Evaporative Cooling Prevention: Letting the sprouts steam dry for 2 minutes after boiling removes surface water, allowing the oil to actually stick and fry the leaves rather than just steaming them further.
- Thermal Conductivity: Using a preheated oven at 425°F (220°C) ensures that the moisture inside the sprout evaporates rapidly, leaving behind a concentrated, sweet flavor.
| Method | Time | Texture | Best For |
|---|---|---|---|
| Oven Roasting | 35 minutes | Shatter crisp edges, soft middle | Feeding a crowd, hands off cooking |
| Stovetop Searing | 15 minutes | Deeply charred, firmer bite | Small batches, extra smoky flavor |
| Air Fryer | 12 minutes | Uniformly crunchy, less oil | Speed, individual servings |
While the oven method takes 35 minutes of actual cook time, it is the most reliable way to ensure a consistent result across a large batch. The stovetop method is great if you are only cooking for one, but it requires much more attention to prevent the garlic powder from scorching in the pan. If you find yourself in a rush, this side pairs perfectly with a Roasted Chicken Vegetable Dinner because both can utilize the over high heat environment of the oven simultaneously.
Essential Components for Savory Flavor
Choosing the right ingredients is about more than just following a list; it is about understanding how each element contributes to the final crunch and zing. Since we are aiming for a budget smart approach, we focus on high impact items like smoked paprika and aged balsamic which provide a "gourmet" feel without the gourmet price tag.
Freshness matters most for the sprouts themselves look for tight, bright green heads without yellowing leaves.
| Ingredient | Science Role | Pro Secret |
|---|---|---|
| Brussels Sprouts | Structural base | Smaller sprouts are naturally sweeter and have less bitter glucosinolates. |
| Extra Virgin Olive Oil | Heat conductor | Use a high-quality oil; it’s what creates the "fried" texture on the pan. |
| Parmesan Cheese | Umami & Crust | The proteins in the cheese create a lacy, crisp "frico" when hitting the hot pan. |
| Balsamic Glaze | Acidic Balance | Adding this at the very end prevents the sugars from burning in the over high heat oven. |
Beyond the basics, the salt choice is vital. We use Kosher salt for the boiling water because its coarse grains dissolve effectively to season the sprout from the inside out. For the finishing touch, sea salt provides a sharp, clean hit of salinity that cuts through the richness of the olive oil and cheese.
Necessary Tools for Easy Prepping
You don't need a kitchen full of gadgets to pull off this easy smashed roasted brussels sprouts recipe, but a few specific items make the process much smoother. The most important tool is actually a heavy bottomed glass or a mason jar.
This serves as your "smasher." You want something with a completely flat bottom so that the sprout flattens evenly rather than tilting to one side and creating an uneven cook.
- 1.5 lbs fresh Brussels sprouts: Trim the woody ends and remove any loose, tattered outer leaves. Why this? Trimming ensures the oil reaches the core of the sprout for even crisping.
- 3 tbsp Extra virgin olive oil: This is your primary fat source for roasting. Why this? It provides a fruity depth and high enough smoke point for 425°F.
- 1/4 cup Freshly grated Parmesan cheese: Don't use the stuff in the green shaker can. Why this? Freshly grated melts into the crevices for a better crust.
- 2 tbsp Aged balsamic glaze: Look for a thick, syrupy consistency. Why this? It clings to the sprouts instead of running off the sides.
- 1 tsp Garlic powder & 1/2 tsp Smoked paprika: Our primary aromatics. Why these? Powdered spices distribute more evenly than fresh garlic, which might burn.
- 1 tbsp Kosher salt (for water): Vital for internal seasoning.
- 1/2 tsp Sea salt & 1/4 tsp Cracked black pepper: Finishing seasonings.
- 4 Lemon wedges: For a bright, acidic finish.
If you don't have balsamic glaze on hand, you can make a quick substitute by simmering 1/2 cup of regular balsamic vinegar with a teaspoon of honey until it reduces by half. It will provide that same punchy sweetness for a fraction of the cost of store-bought glazes.
Executing the Smashed Sprout Process
- Bring a large pot of water salted with Kosher salt to a rolling boil. Wait for the big bubbles before adding the sprouts.
- Add the trimmed sprouts and cook for 7 to 9 minutes until they are easily pierced with a fork but not falling apart.
- Drain the sprouts immediately and let them sit in the colander to steam dry for 2 minutes. Note: This step is crucial; moisture is the enemy of the crunch.
- Preheat your oven to 425°F (220°C) and grease a large rimmed baking sheet with a tiny bit of oil.
- Arrange the sprouts on the sheet and use the bottom of a heavy glass to press down on each one until it is 1/2 inch thick. Aim for a uniform thickness across the whole tray.
- Drizzle with the 3 tbsp of olive oil, garlic powder, smoked paprika, sea salt, and black pepper.
- Toss them gently with your hands to coat the bottoms, then re arrange them so they aren't touching.
- Roast for 20 to 25 minutes in total. Flip them with a metal spatula at the 15 minute mark to ensure both sides get that mahogany color.
- Remove from the oven when they look dark and crispy around the edges.
- Immediately sprinkle with the Parmesan and drizzle with the balsamic glaze while the pan is still sizzling. Serve with lemon wedges for an extra pop of brightness.
When flipping, don't worry if a few leaves fall off. Those little stray leaves actually become the crispiest, most sought after bits on the tray I call them "chef's treats." If you're looking for another crispy side to round out a meal, my Oven Fried Potatoes use a similar over high heat logic to get a great crust.
Solving Common Texture Problems Fast
Even with a straightforward recipe, things can go sideways if the moisture levels aren't controlled. The most common complaint I hear is that the sprouts didn't "shatter" like promised. Usually, this comes down to overcrowding the pan.
If the sprouts are too close together, the steam escaping from one sprout gets trapped by its neighbor, leading to a soggy texture rather than a crisp one.
Why Your Sprouts Are Soggy
If your sprouts come out limp, it's almost always a sign that they were still too wet when they hit the oil. That 2 minute steam dry period in the colander isn't just a suggestion; it is a mandatory part of the process.
If you are in a humid kitchen, you might even want to pat them dry with a clean kitchen towel before smashing. Also, check your oven temperature. Many home ovens run cold, so using an oven thermometer to ensure you're actually at 425°F (220°C) can make a world of difference.
| Problem | Root Cause | Solution |
|---|---|---|
| Bitter Taste | Overcooked in water | Reduce boil time to exactly 7 minutes for smaller sprouts. |
| Sprouts Fall Apart | Smashed too thin | Keep them at 1/2 inch thickness; don't pulverize them. |
| Burnt Garlic | Added too early | Ensure garlic powder is mixed with oil to insulate it from direct heat. |
Common Mistakes Checklist
- ✓ Pat the sprouts completely dry after boiling to ensure the oil can adhere properly.
- ✓ Space the sprouts at least 1 inch apart on the baking sheet to allow for airflow.
- ✓ Use a metal spatula for flipping; plastic ones are often too thick and will tear the delicate smashed edges.
- ✓ Don't skip the lemon wedges at the end; the acid balances the heavy charred flavors.
Smart Ways to Adapt Flavor
This easy smashed roasted brussels sprouts recipe is a fantastic canvas for different flavor profiles. While the balsamic and Parmesan combo is a classic, you can easily pivot based on what you have in your pantry.
If you want to lean into a more Mediterranean vibe, swap the smoked paprika for dried oregano and finish with crumbled feta instead of Parmesan.
- Smashed Brussels Sprouts with Bacon: Add 4 slices of chopped, thick cut bacon to the baking sheet during the last 10 minutes of roasting. The rendered fat will further crisp the sprouts.
- Air Fryer Smashed Brussels Sprouts: Follow the boiling and smashing steps, then air fry at 400°F for 10 to 12 minutes, shaking the basket halfway through.
- Spicy Maple Variation: Replace the balsamic glaze with a mix of 1 tbsp maple syrup and 1/2 tsp chili flakes for a sweet heat finish.
If you are scaling this recipe up for a holiday party, keep in mind that you'll likely need two baking sheets. Do not try to cram 3 lbs of sprouts onto one tray. The moisture release will be so great that you'll end up with steamed cabbage.
When using two trays, rotate them between the top and bottom racks halfway through the roasting time to ensure even browning.
| If you want... | Do this... |
|---|---|
| Extra Crunch | Increase the oven temp to 450°F for the final 5 minutes. |
| Vegan Version | Swap Parmesan for nutritional yeast or a toasted breadcrumb topping. |
| Bolder Flavor | Add a teaspoon of Dijon mustard to the olive oil before drizzling. |
Myths Regarding Sprout Preparation
One of the most persistent myths in the kitchen is that boiling vegetables "leeches out all the nutrients and flavor." While it's true that over boiling for 20 minutes will leave you with bland mush, a quick 7 to 9 minute par boil actually helps to "set" the green color and season the vegetable deeply.
It removes the bitter edge that many people associate with sprouts, making the final roasted product much more palatable.
Another common misconception is that you need a specialized "smashing tool." I have seen people buy expensive cast iron presses just for this dish. Honestly, don't even bother. A heavy mason jar or the bottom of a sturdy coffee mug works perfectly fine.
The goal isn't to exert massive pressure; it's to gently displace the layers so they can catch the heat.
Handling Leftovers and Food Waste
Leftover smashed sprouts are a rare occurrence in my house, but they do happen. To store them, place them in an airtight container in the fridge for up to 3 days. They will lose their crunch as they sit, but the flavor actually deepens. To reheat, avoid the microwave at all costs it will turn them into rubber.
Instead, pop them back into a 400°F oven or a dry skillet for 5 minutes until they sizzle again.
For zero waste, don't throw away the little leaves that fall off during the trimming or smashing process. Toss them in the same oil and spices and roast them right alongside the whole sprouts. They turn into "sprout chips" that are arguably the best part of the whole tray.
If you have extra stalks or woody ends, you can actually save those in a bag in the freezer to add to a vegetable stock later for a deep, brassica earthiness.
Ideal Pairings for Any Meal
These crispy little disks are incredibly versatile. Because they have a balance of salt, acid (from the lemon and balsamic), and umami (from the Parmesan), they can stand up to heavy meats or provide a punchy side to a light grain bowl. I love serving them alongside a hearty steak or even a simple roasted chicken.
If you are planning a full vegetarian spread, these go beautifully with a creamy mushroom pasta or a Fresh Green Bean Casserole. The contrast between the creamy sauce of a casserole and the sharp crunch of the smashed sprouts creates a really sophisticated mouthfeel. Whether it is a Tuesday night or a Thanksgiving feast, this method ensures your greens are the star of the show rather than the neglected pile on the edge of the plate. Trust me, even the sprout skeptics in your life will be reaching for seconds once they taste that mahogany colored crunch.

Recipe FAQs
What is the secret ingredient for the best roasted brussels sprouts?
Aged balsamic glaze is the secret. It provides the necessary acidity to cut through the richness of the olive oil and caramelization, balancing the natural earthiness of the sprouts.
How to make smashed brussels sprouts?
Press down on each boiled sprout using the bottom of a heavy glass or mason jar until it is approximately 1/2 inch thick. Arrange them on the sheet in a single layer to ensure uniform roasting and maximum crispness.
What makes Brussels sprouts smashable?
Par-boiling them in salted water for 7 9 minutes softens the internal structure just enough to allow them to be flattened without crumbling apart. If you mastered the technique of sensory doneness here, you will recognize this perfect fork tender stage immediately.
Are brussels sprouts good for diabetics?
Yes, they are an excellent choice. They are low in calories and carbohydrates while being high in fiber, which helps maintain stable blood sugar levels when included as part of a balanced diet.
How to get the edges crispy?
Roast at a high temperature of 425°F (220°C). Ensure you steam dry the sprouts for 2 minutes after boiling to remove excess surface moisture, which prevents steaming and allows the edges to turn mahogany colored and crispy.
Can I prepare these in advance?
Yes, you can par-boil and smash them up to 24 hours in advance. Keep them in the refrigerator and simply perform the roasting step immediately before you are ready to serve.
Is it necessary to use a metal spatula for flipping?
Yes, a thin metal spatula is essential for success. It allows you to scrape under the caramelized edges without tearing the sprout, ensuring you keep the beautiful crispy crust intact during the 15-minute flip.
Easy Smashed Roasted Brussels Sprouts
Ingredients:
Instructions:
Nutrition Facts:
| Calories | 210 kcal |
|---|---|
| Protein | 7.6 g |
| Fat | 12.4 g |
| Carbs | 21.2 g |
| Fiber | 6.5 g |
| Sugar | 8.8 g |
| Sodium | 408 mg |
