The Grand Duchess: a Classic Lambeth Style Celebration Cake
- The Grand Duchess of Cakes: A Classic Lambeth Style Celebration Cake
- Decoding the Grandeur: What is the Lambeth Method?
- Essential Ingredients for Your Lambeth Style Cake Components
- The Structural Science Behind a Perfect Lambeth Foundation
- Mastering the Lambeth Style Cake: Preparation and Assembly Steps
- Storage and Preservation Guide for Decorated Celebration Cakes
- Recipe FAQs
- 📝 Recipe Card
The Grand Duchess of Cakes: A Classic Lambeth Style Celebration Cake
When you see a Lambeth style cake, your jaw just drops, right? It looks like spun sugar architecture, pristine and impossibly grand, demanding everyone stop scrolling immediately. That crisp, sweet aroma of vanilla and rock hard icing means pure, vintage celebration, a true edible sculpture.
Look, this isn't a 30 minute weeknight dessert, let’s be real. But compared to paying hundreds of dollars for a specialist cake artist to do this intricate work, tackling this yourself is a huge personal victory and a budget win.
The visual payoff is maximum drama for ingredients that are actually quite simple: butter, sugar, and the magic of meringue powder.
I’ve made every mistake from saggy swags to colors that bled all over a pristine white base coat. But I’ve finally nailed the secrets to stable cake structure and flawless Royal Icing over piping. Trust me, the patience is worth it. Let's crack on and create something truly magnificent.
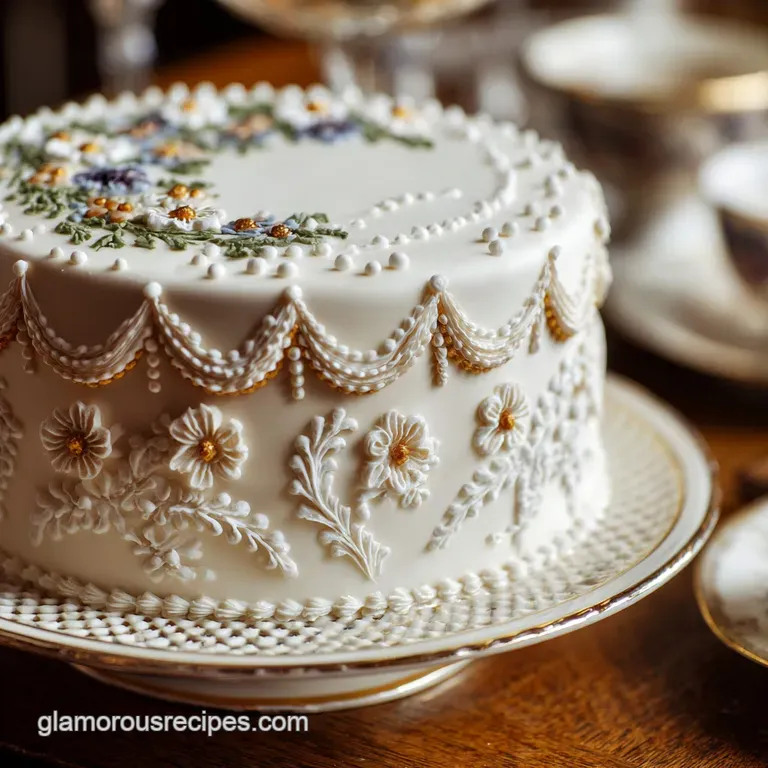
Decoding the Grandeur: What is the Lambeth Method?
The Lambeth method is essentially the art of structured, dimensional over piping using Royal Icing. Think of it as edible lace or intricate filigree work created entirely with piping tips and steady hands.
The whole point is to layer decorative elements swags, scrolls, shells, and drop lines one on top of the other, creating a luxurious, three dimensional effect. It’s fussy, yes, but oh, so rewarding.
The History of Ornate Over Piping and Vintage Style
This technique exploded in popularity in England during the Victorian and Edwardian eras, named after Joseph Lambeth who formalized the process in his 1930s teaching guides. These cakes were the absolute standard for royal weddings, baptisms, and other major celebrations.
They reflected an era of maximalism, where "more is more" was the only accepted decorating rule. It’s pure, nostalgic elegance, demanding attention on any dessert table.
Why the Lambeth Style Cake Endures as a Showstopper
Modern cakes have been sleek and minimalist for a long time, but people are craving nostalgia and detail now. This cake style is a beautiful rejection of the modern naked cake; it’s all about frosting, drama, and artistry.
It’s an instant conversation starter that says, "I put effort into this," which is why everyone from Gen Z to grandmas is falling back in love with this ornate style.
Comparing Lambeth Style vs. Modern Buttercream Techniques
The biggest difference is the structure. Modern cakes usually rely on soft Swiss or Italian meringue buttercream, which is delicious but lacks the rigidity needed for stacked piping. The Lambeth style requires the extreme stability of Royal Icing.
The base cake is covered in a sturdy American buttercream, but all the delicate, weight bearing swags and borders must be done in Royal Icing so they dry hard as a rock.
Essential Ingredients for Your Lambeth Style Cake Components

The sponge layers need to be sturdy enough to hold the weight of all that icing. I use the reverse creaming method for my sponge (mixing butter into the dry ingredients first) because it results in a tender but structurally solid crumb.
For the decoration, Royal Icing made with meringue powder is non-negotiable for stability.
| Ingredient | Why it's Important | Substitution Idea |
|---|---|---|
| Vanilla Bean Paste | Deepens the flavour of the white cake. | Double the quantity of clear vanilla extract. |
| Meringue Powder | Provides stability, hygiene, and structure to Royal Icing. | Pasteurized liquid egg whites (adjusting water content). |
| Confectioners’ Sugar | Base for both fillings; must be sifted for a smooth icing. | Granulated sugar is not an option here, but cornstarch free powdered sugar works. |
| Unsalted Butter | Provides creamy richness to the sponge and buttercream. | High ratio vegetable shortening (for the buttercream only) for a whiter base and higher melt resistance. |
The Structural Science Behind a Perfect Lambeth Foundation
Stability is everything when you are stacking tiny edible architectural elements. If your cake layers slump, your delicate piping will crack or fall off the side, and that is heartbreak we want to avoid. Focus on the core building blocks.
Sourcing the Best Vanilla Bean Paste (or Extract) for Sponge
Use the good stuff! Vanilla bean paste adds those beautiful speckles and a deep, complex flavor that plain extract just can’t touch. Since the Lambeth method often uses white or pastel colors, clear vanilla extract is your friend for the buttercream and royal icing, preventing any unwanted yellowing.
Preparing the Three Core Elements: Cake, Buttercream, and Royal Icing
We are managing three separate recipes here, so stay organized. The cake must be baked and cooled; the American buttercream provides the smooth, white base layer; and the Royal Icing is the star it needs to be adjusted meticulously into three distinct consistencies (stiff, medium, and flow).
The Role of the American Buttercream Base Coat
We use American buttercream because it dries with a slight crust, providing a firm, non-slippery surface for the Royal Icing to adhere to. Make sure it's thick and perfectly smoothed; any imperfections in the base coat will be horribly highlighted by the piping.
Chill it until it's rock hard before you start piping.
Why Royal Icing is Essential for Edible Architecture
Royal Icing is the only medium that will dry completely solid, allowing the piped designs to hold their shape even when piped on top of another line of piping. Buttercream is too soft; it would just mush and blend the details. It is the glue and the mortar of this entire operation.
Mastering the Lambeth Style Cake: Preparation and Assembly Steps
My top advice: clear your schedule and your counters. Trying to rush intricate piping is a recipe for disaster. Work slowly, methodically, and always let things chill when the recipe asks you to.
Baking and Leveling the Vanilla Bean Sponge Layers
Use the reverse creaming method described in the recipe card to ensure a solid crumb structure. Once cooled, leveling is key; if your layers aren’t flat, your towering cake will lean, making piping almost impossible.
A serrated knife or a dedicated cake leveler works wonders for achieving perfectly uniform slices.
Crumb Coating and Chilling the Buttercream Base for Stability
The crumb coat is non-negotiable; it locks in every stray cake particle. Apply it thinly, chill for 30 minutes, then apply your final, thick coat. Use a sharp bench scraper against a rotating turntable to get those sides perfectly smooth and straight.
Chef's Note: The final coat of buttercream should be chilled in the refrigerator for at least one hour. When you press it gently with a clean finger, it should feel absolutely solid, like cool plastic. This stability is the secret to clean piping.
Preparing and Colouring the Royal Icing for Piping Work
Use gel colours, not liquid food coloring, which adds too much water and compromises the structure. Colour the icing when it is slightly stiff, then divide and adjust the consistency from there. I find soft pastels like dusty rose or sage green look particularly beautiful in the vintage Lambeth style.
Achieving the Perfect Royal Icing Consistency (The “10 Second Rule”)
This rule is a lifesaver, seriously. Take a small amount of icing and drag a knife through it. Count how long it takes for the line you drew to disappear back into the smooth surface.
- For Shells/Borders (Stiff): It should barely move at all.
- For Scrolls/Swags (Medium): The line should disappear after about 15 20 seconds.
- For Fine Filigree/Run-out (Writing): The line should smooth out completely in 8 10 seconds.
Maintaining Pressure and Flow for Continuous Shell Borders
Consistent pressure is everything in piping. Squeeze evenly and constantly from the top of the bag, not the tip. When piping shell borders, make sure your first shell is fully formed before easing the pressure, then gently dragging the tip back to start the next shell right where the last one ended.
Preventing Bleeding Colours and Clogged Piping Tips
Clogging usually happens when the icing is too stiff or you haven't sifted the sugar properly. If a tip clogs, stop immediately and clear it with a toothpick or a clean, damp cloth. To prevent colours from bleeding, ensure the cake's base layer of buttercream is not cold, but cool and dry.
Also, use gel colours sparingly and allow each coloured layer of Royal Icing to dry slightly before piping the next colour on top.
Storage and Preservation Guide for Decorated Celebration Cakes
This cake is robust, but the Royal Icing requires specific treatment. You can’t just shove it anywhere and expect perfection.
Short Term Storage: Keeping the Cake Fresh Before the Party
Store the decorated cake, uncovered, in a cool, low-humidity room or the refrigerator. Since the Royal Icing needs to stay dry and hard, wrapping it in plastic wrap is a big mistake; the condensation will melt the delicate work. If refrigerating, make sure there are no strong odors nearby, like cut onions.
It will hold beautifully for 3 to 4 days.
Freezing Techniques (and Why It’s Tricky with Royal Icing)
You can freeze the cake layers before decorating, and that is highly recommended for stability. But freezing a fully Royal Icing decorated cake is dicey. When thawing, humidity is the enemy.
If you must freeze the finished cake, wrap it tightly (carefully!) after the icing is completely dried, and thaw it very slowly inside the refrigerator overnight. Be warned, though: sometimes the Royal Icing develops tiny cracks during the transition.
Safe Transportation Methods for Ornate Designs
Choose a box much larger than your cake board. Place a non-slip mat (like a rubber shelf liner) underneath the cake board inside the box to prevent sliding. Keep the car cool blast the AC!
If the Lambeth piping is very tall and delicate, hold the box carefully on your lap instead of leaving it unsecured in the trunk.
Recommended Beverage Pairings (Tea, Sparkling Wine, or Coffee)
This cake is rich, so you need a beverage that cuts through the sweetness or complements the vanilla. A robust English Breakfast tea is traditional and perfect. Alternatively, a lightly sparkling, slightly acidic wine like Prosecco or a dry Rosé is fantastic.
The Correct Way to Slice a Tall, Layered Cake
Tall cakes are nightmares to slice neatly, right? Use a large, thin, sharp chef’s knife. Heat the knife under hot water, wipe it clean, and slice straight down. Wipe the knife after every single slice to prevent dragging buttercream and icing remnants across the clean slice.
You want vertical elegance, not a messy pile. Enjoy the grandeur you created!

Recipe FAQs
Why did my intricate Royal Icing details crack or chip after drying?
Cracking usually happens if the base coating of buttercream is too cold or if the humidity shifts rapidly during the drying process. Ensure the cake is at room temperature before applying the final, delicate Royal Icing details, and maintain a stable, dry environment (around 70°F) for proper curing.
My vanilla sponge came out dense, and not light and airy. What went wrong?
Density often occurs from overmixing the batter after the flour has been added, which develops too much gluten. Ensure you mix only until the flour is just incorporated, and always use room temperature ingredients to facilitate proper emulsion and aeration.
My American buttercream is too soft for piping the detailed shell borders. How can I increase its stability?
The key to stiff borders is the ratio of fat to sugar; gradually add a few extra tablespoons of sifted powdered sugar until the consistency holds a firm peak when lifted with a spatula. If your kitchen is warm, chilling the prepared buttercream in the refrigerator for 15 minutes before piping will also help it firm up.
Can this elaborate cake be adapted to be vegan or gluten-free?
Yes, but modifications are complex, particularly with the Royal Icing component. Use a high-quality gluten-free flour blend for the sponge, and substitute the traditional Royal Icing (which uses egg whites) with a meringue powder or commercial aquafaba based stiff icing mix.
How should I store the finished Lambeth cake, especially since it uses delicate Royal Icing?
The cake should ideally be stored in an airtight container at cool room temperature (65 70°F) for up to three days, as refrigeration can dull the bright colors and introduce condensation that ruins the icing structure.
If you must refrigerate, place the cake in a box first to protect the fragile piping and bring it back to temperature slowly before serving.
What specific tools are essential for achieving the traditional, multi layered Lambeth piping style?
Essential tools include high-quality star tips (especially Wilton 18 and 21) for shell borders and fine round tips (Wilton 1 and 2) for creating scrolls and intricate filigree work. A coupler system is highly recommended, allowing you to quickly change tips without emptying the piping bag.
Can I use a different flavored sponge, like chocolate or lemon, instead of vanilla?
Absolutely, provided the sponge is structurally sound enough to bear the weight of the icing layers; sturdy flavors like chocolate or almond work wonderfully. However, ensure the primary coat of buttercream remains light in color so the bright white Royal Icing provides a high contrast canvas for the intricate piping.
Classic Lambeth Style Celebration Cake

Ingredients:
Instructions:
Nutrition Facts:
| Calories | 515 kcal |
|---|---|
| Fat | 24 g |
| Fiber | 0 g |
