Chocolate Covered Strawberries
- Time: Active 20 minutes, Passive 30 minutes, Total 50 minutes
- Flavor/Texture Hook: A crisp, dark shell that shatters into a velvety molten center of sweet tart fruit
- Perfect for: Romantic anniversaries, elegant dinner parties, or a sophisticated Valentine's gift
- Mastering Elegant Artisan Chocolate Covered Strawberries
- The Elements of Confectionery Art
- Selecting the Finest Elements
- Tools for the Pastry Kitchen
- Guided Steps to Visual Perfection
- Solving Common Dipping Hurdles
- Creative Palette and Flavor Swaps
- Debunking Pastry Myths
- Storing Your Edible Jewels Safely
- Presentation Levels for Any Event
- Recipe FAQs
- 📝 Recipe Card
Imagine the sound of a thin, tempered chocolate shell as it begins to shatter against the soft, juicy interior of a perfectly ripe berry. That specific contrast is what separates a soggy, weeping mess from a true artisan treat.
I remember the first time I tried making these for a gallery opening; I washed the berries and dipped them immediately, only to watch the chocolate slide off in a puddle of greyish sludge. It was a disaster, but it taught me that in the world of pastry, patience is just as important as the quality of your cocoa.
We aren't just melting candy here; we are performing a small piece of culinary magic. It’s about transforming simple ingredients into something that looks like it belongs in a high end boutique window. Whether you're planning a full Valentine's Day Brunch recipe or just want a quiet night in, the technique is what carries the day.
Today, I’m walking you through the exact steps to ensure your chocolate stays snappy, your berries stay dry, and your presentation looks like a professional pastry chef handled the work. We'll look at the chemistry of the "snap" and how to troubleshoot the most common pitfalls that plague home cooks.
Trust me, once you see how easy it is to get that professional gloss, you'll never settle for the store-bought versions again.
Mastering Elegant Artisan Chocolate Covered Strawberries
Getting that professional finish isn't luck, it's a bit of physics. Most people think you just melt and dunk, but that leads to a dull, soft coating that melts the second your fingers touch it. We want a coating that feels like a polished gemstone.
The Science of Why it WorksCrystal Stabilization: Precise heating and cooling encourage the formation of Type V beta crystals in cocoa butter, which creates the signature "snap" and glossy finish.
Emulsification Support: Adding a tiny amount of refined coconut oil lowers the surface tension, allowing the chocolate to flow smoothly over the berry's curves without clumping.
Precision Checkpoints
- 1. Temperature
- Never let your dark chocolate exceed 115°F (46°C) during the initial melting phase to avoid scorching the delicate solids.
- 2. Drying Time
- Berries must air dry for at least 45 minutes after washing; even a microscopic drop of water will cause the chocolate to seize.
- 3. Cooling
- Set the dipped fruit in a room between 65°F and 68°F; a fridge that is too cold will cause condensation, ruining the mirror like shine.
The Elements of Confectionery Art
In the world of pastry, we don't just use ingredients; we select components that play specific roles in the final structure. The sugar to fat ratio in your chocolate determines how it sets, while the ripeness of the fruit dictates the shelf life of the final piece.
| Ingredient | Science Role | Pro Secret |
|---|---|---|
| Semi sweet Chocolate | Structural Base | Use bar chocolate over chips; chips contain stabilizers that prevent a smooth, fluid melt. |
| Refined Coconut Oil | Viscosity Modifier | This thins the chocolate just enough to create a delicate, professional thin shell rather than a thick hunk. |
| Fresh Strawberries | Moisture Source | Choose berries with the green "calyx" intact; it acts as a natural handle and keeps the juice sealed inside. |
Chocolate is a fickle partner in the kitchen. If you use a lower quality brand, you might find it stays thick and sluggish even when warm. If you find yourself with extra chocolate after this project, it’s the perfect excuse to whip up a Chocolate Chip Cookies recipe to use up those high-quality shards.
Selecting the Finest Elements
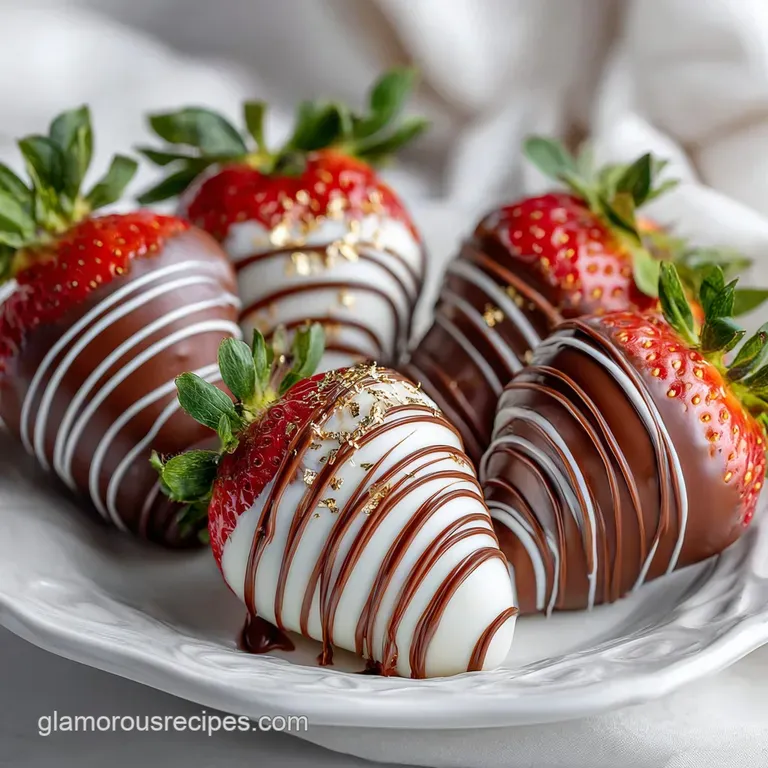
For this recipe, we are using 1 lb fresh strawberries, which is usually about 24 large berries. You’ll also need 10 oz high-quality semi sweet or dark chocolate, 1 tsp refined coconut oil for that silky flow, and 4 oz white chocolate for the decorative drizzle.
- 1 lb fresh strawberries: Look for firm, heart shaped fruit. Why this? Firmness ensures the berry doesn't collapse under the weight of the warm chocolate coating.
- 10 oz semi sweet chocolate: Use a brand like Guittard or Valrhona if you can find it. Why this? High cocoa butter content leads to a superior melt and a more complex, artisan flavor.
- 1 tsp refined coconut oil: Make sure it is refined so it doesn't add a coconut scent. Why this? It provides a beautiful sheen and helps the chocolate crack cleanly when bitten.
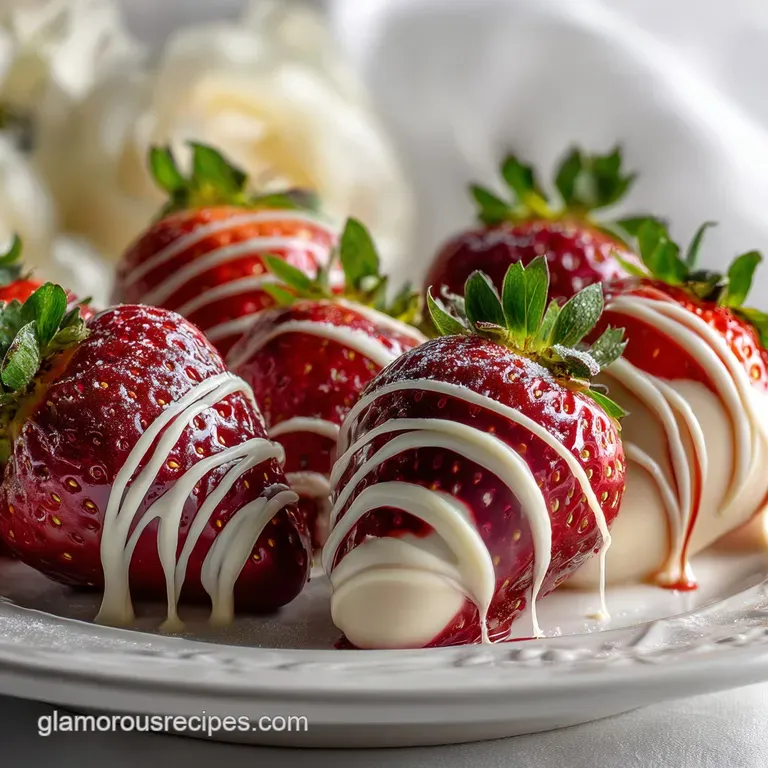
- 4 oz white chocolate: This is purely for the aesthetic contrast. Why this? The higher milk fat content in white chocolate creates a beautiful, creamy white visual "pop".
| Original Ingredient | Substitute | Why It Works |
|---|---|---|
| Semi sweet Chocolate | Milk Chocolate | Sweeter profile. Note: Lower melting point makes it softer at room temperature. |
| Refined Coconut Oil | Cocoa Butter | The "pure" way to thin chocolate. Note: More expensive and can be harder to find. |
| White Chocolate | Dark Chocolate Drizzle | Creates a subtle, monochrome look. Note: Best for a minimalist, modern aesthetic. |
When selecting your fruit, avoid the giant "mutant" berries that often have hollow centers. Those hollow spaces trap air and moisture, which can cause the berry to ferment faster once it’s sealed in its chocolate tomb. Small to medium heart shaped berries are the gold standard for elegance.
Tools for the Pastry Kitchen
You don't need a professional laboratory, but a few specific tools will make your life much easier. I used to try and melt chocolate in a thick ceramic bowl, but it held heat too long and ended up burning the bottom layer. Now, I stick to thin stainless steel.
- Double Boiler: This is non negotiable for gentle heat. You can make one by placing a metal bowl over a pot of simmering water.
- Parchment Paper: Essential for a clean release. Silpat mats also work, but parchment is easier for cleanup.
- Micro spatula: For stirring the chocolate without introducing too many air bubbles.
- Digital Thermometer: If you want to be truly precise about your tempering.
- Dipping Fork or Skewer: Though the green stems work well as handles, a fork helps for full submersion.
| Melting Method | Speed | Risk Level |
|---|---|---|
| Stovetop (Double Boiler) | Slower (10 mins) | Low; provides the most control over the temperature. |
| Microwave (Short Bursts) | Fast (3 mins) | High; chocolate can scorch in seconds if not stirred constantly. |
I personally prefer the stovetop method. It feels more like the artisan way, and the steam provides a gentle, consistent heat that a microwave just can't replicate. Just be careful steam is water, and water is the enemy of chocolate.
Guided Steps to Visual Perfection
Before we start, make sure your kitchen isn't a sauna. If you've been boiling pasta for three hours, the humidity will mess with the set. Turn on a fan or the AC to keep things crisp.
- Wash the fruit. Rinse the 1 lb of strawberries under cold water, keeping the stems on. Note: Water inside the stem area causes early spoilage.
- Dry completely. Pat each berry with a paper towel and let them sit on a wire rack for 30 minutes. Wait until bone dry.
- Prepare the chocolate. Finely chop 10 oz of semi sweet chocolate into uniform pieces. Note: Small pieces melt evenly and prevent hot spots.
- Melt gently. Place the chocolate and 1 tsp coconut oil in a glass bowl over simmering water. Stir until velvety and smooth.
- Cool slightly. Remove the bowl from the heat and let the temperature drop to about 90°F. Note: This prevents the chocolate from being too runny.
- The first dip. Hold a berry by the stem and submerge it into the chocolate at a 45 degree angle. Rotate until fully coated.
- Remove excess. Lift the berry and gently shake it, then tap your wrist to let the extra chocolate drip back into the bowl.
- Set the berry. Place it on parchment paper and drag it forward slightly. Note: This prevents a "foot" or pool of chocolate from forming at the base.
- White chocolate accent. Melt the 4 oz of white chocolate and use a fork to flick thin ribbons over the set berries. Move quickly for thin lines.
- Final set. Let the berries sit at room temperature for 30 minutes until the shell is matte and firm.
If you're looking for a quicker chocolate fix while these set, you should definitely check out my Mug Brownie recipe. It’s the perfect way to satisfy a craving while you wait for your artisan berries to reach that perfect snap.
Solving Common Dipping Hurdles
Even the pros have days where the chocolate just won't behave. Most issues boil down to temperature or moisture. If your chocolate looks dull or has white streaks, it’s likely "bloomed," which means the fat has separated. It's still edible, but it loses that artisan appeal.
Why Your Chocolate Seizes
This is the most heartbreaking moment in the kitchen. One second your chocolate is a silky river, and the next it’s a gritty, dry paste. This happens when a tiny amount of water (even steam) gets into the bowl.
The water acts as a glue for the sugar particles, pulling them out of the fat and clumping them together.
To Prevent the Dreaded Puddling
If your berries end up sitting in a wide pool of chocolate, you didn't let enough excess drip off before placing them on the parchment. Always use the "swipe" technique: after dipping, swipe the bottom of the berry against the edge of the bowl to clear the heaviest drips.
| Problem | Root Cause | Solution |
|---|---|---|
| Chocolate is thick/lumpy | Overheating | Stir in a few fresh chunks of un melted chocolate to lower the temp. |
| Coating slides off | Wet berries | Use a hair dryer on the "cool" setting to ensure skins are totally dry. |
| White streaks appear | Poor tempering | Keep the chocolate in a narrow temperature range (88°F-91°F) while dipping. |
Creative Palette and Flavor Swaps
Once you've mastered the basic chocolate covered strawberry, you can start playing with textures and layers. I love using crushed pistachios or freeze dried raspberry dust for a pop of color. It adds a sophisticated, artisan layer that makes them look like they cost five dollars a piece.
For a fun twist, try a "tuxedo" look by dipping half the berry in white chocolate first, letting it set, and then dipping the sides in dark chocolate. It’s a classic for weddings or formal events. If you want something even more decadent, you can pair these with some Chocolate Peanut Clusters recipe for a full confectionery spread.
- For a Vegan Friendly Romance: Use high-quality dairy-free dark chocolate and swap the white chocolate for a drizzle of melted almond butter mixed with a little maple syrup.
- Chocolate Strawberries for Him Valentines: Lean into darker, bitter chocolates (70% cocoa or higher) and top with a sprinkle of smoked sea salt or crushed bourbon soaked pecans.
- For a Full Valentines Chocolate Covered Strawberries Bouquet: Insert long bamboo skewers into the stem end before dipping. Once set, wrap the skewers in green floral tape and arrange them in a vase with fresh baby’s breath.
Debunking Pastry Myths
One of the biggest lies in the kitchen is that you must refrigerate chocolate covered strawberries immediately to make them set. In reality, the sudden cold can cause the chocolate to bloom and the berries to sweat. Room temperature setting is always superior for the finish.
Another myth is that adding butter makes the chocolate shinier. Butter contains water, which increases the risk of seizing. Refined coconut oil or pure cocoa butter are the only fats you should ever add to your melting bowl.
Also, don't believe the idea that you can't save seized chocolate; while you can't use it for dipping anymore, it makes a fantastic base for a ganache or a chocolate sauce if you stir in some warm heavy cream.
Storing Your Edible Jewels Safely
Strawberries are mostly water, and once you dip them, they start to release that moisture. This is why these are best eaten the day they are made. If you must store them, do not use an airtight container; the trapped moisture will turn the berries mushy and make the chocolate "sweat."
- Storage: Keep them in a cool, dry place in a cardboard box lined with paper towels. They will stay fresh for about 12 hours.
- Fridge: If it's a very hot day, you can put them in the fridge for up to 24 hours, but expect some condensation when you bring them back to room temperature.
- Freezer: Do not freeze these unless you plan on eating them as a frozen treat. Once thawed, the berry's cell structure collapses, and you'll be left with a watery mess.
- Zero Waste: If you have leftover melted chocolate, pour it onto a piece of parchment, sprinkle with nuts or dried fruit, and let it set for a quick chocolate bark.
Presentation Levels for Any Event
The way you serve these can change the entire mood of the dessert. For a casual night, a simple pile on a plate is fine, but if you're aiming for that artisan pastry shop look, you need to think about height and negative space.
Simple Home Presentation
Place the set berries in individual paper cupcake liners. It keeps the chocolate from touching other berries and makes them easy for guests to grab without getting finger smudges on the glossy coating.
Polished Dinner Party Style
Arrange the berries on a slate board or a white marble slab. Dust the board with a very fine coating of cocoa powder before placing the berries down. Add a few sprigs of fresh mint for a vibrant green contrast.
Modern Restaurant Plating
Use a squeeze bottle to create a "swipe" of chocolate across a large white plate. Place three berries of varying sizes along the swipe. Garnish with edible gold leaf and a few shards of the Deep Caramel Notes recipe crumbled nearby to add a crunchy element.
| Level | Component | Final Look |
|---|---|---|
| Simple | Cupcake liners | Neat and organized |
| Polished | Slate & Mint | Natural and rustic chic |
| Restaurant | Gold Leaf & Swipes | High end and artistic |
Whether you're making these for a grand Valentine's gesture or just to treat yourself after a long week, remember that the "magic" is in the details. Keep your berries dry, your heat gentle, and your hands steady. You're not just making a snack; you're creating a moment of pure, artisan indulgence.
Enjoy every single snap!

Recipe FAQs
Can I use frozen strawberries for chocolate covered strawberries?
No, stick with fresh. Frozen berries release too much moisture when thawed, causing the chocolate to seize or not adhere properly.
How to get a shiny coating on chocolate covered strawberries?
Ensure your chocolate is properly tempered. This involves precise heating and cooling to stabilize cocoa butter crystals for a glossy finish.
Why does my chocolate seize when dipping strawberries?
A tiny amount of water is the culprit. Even a drop of steam or moisture on the berries or in your bowl will cause sugar particles to clump, resulting in a grainy, seized chocolate.
What's the best way to melt chocolate for dipping?
Melt gently over a double boiler or in short microwave bursts. Whichever method you choose, stir constantly to prevent scorching and ensure a smooth texture. If you mastered controlling cookie spread here, the same careful temperature management applies to chocolate.
How long do chocolate covered strawberries last?
They are best enjoyed the same day. For optimal texture and gloss, eat them within 12 hours, stored at cool room temperature. Refrigeration can cause condensation and blooming.
Can I substitute milk chocolate for dark chocolate?
Yes, but be mindful of the texture difference. Milk chocolate has a lower melting point and may be softer at room temperature, so it requires careful handling and setting.
How to add decorative drizzles to chocolate covered strawberries?
Melt white or contrasting chocolate and use a fork or piping bag. Flick thin lines of the melted chocolate over the set dipped berries for an artistic touch. If you nail the stable emulsion in your dressing, use the same precise drizzling technique here.
Chocolate Covered Strawberries
Ingredients:
Instructions:
Nutrition Facts:
| Calories | 97 kcal |
|---|---|
| Protein | 1.0 g |
| Fat | 5.3 g |
| Carbs | 11.6 g |
| Fiber | 0.4 g |
| Sugar | 10.1 g |
| Sodium | 8 mg |
