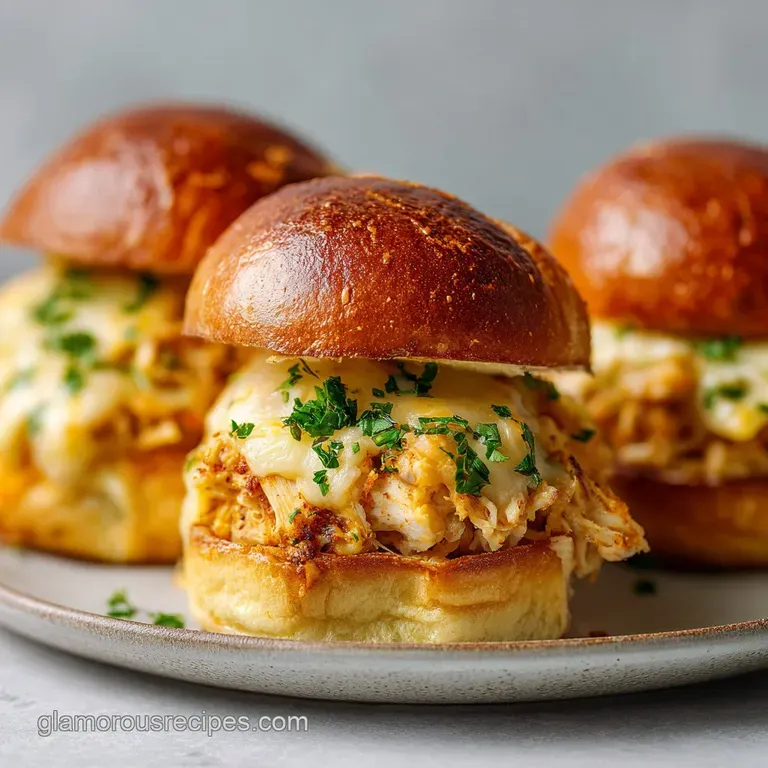
Cheesy Turkey Sliders: Buttery and Golden
- Time: Active 15 minutes, Passive 20 minutes, Total 35 minutes
- Flavor/Texture Hook: Shatter crisp buttery tops with a velvety, melted center
- Perfect for: Game day crowds, Sunday dinners, or busy weeknights
- Vital Stats for the Perfect Slider
- Components of a Classic Crowd Favorite
- Essential Tools for Easy Baking
- Step-by-Step Guide to Melty Perfection
- Avoiding the Most Common Baking Pitfalls
- Flavor Variations and Simple Swaps
- Storing Leftovers and Freezing Tips
- How to Serve and Enjoy
- Recipe FAQs
- 📝 Recipe Card
You know that feeling when you pull a tray of sliders out of the oven, and they look gorgeous, but as soon as you lift one, the bottom bun stays behind or turns into a wet sponge? It's heartbreaking.
I remember making these for a Sunday dinner years ago, thinking I'd nailed it, only to serve a plate of "sandwich mush" to my family. That was the day I realized that just stacking meat and bread wasn't enough. We need a strategy.
The secret I learned is all about the "fat barrier." By placing a layer of cheese directly against the bread before adding the meat, we create a shield that prevents the juices from the turkey and the moisture from the pickles from soaking into the rolls.
It's a small change that makes a massive difference in the final texture. When you take that first bite, you get the crunch of the poppy seed crust, the sweetness of the Hawaiian roll, and a center that is purely silky.
We are going for a specific contrast here: the sweetness of the bread against the salty, savory turkey and the sharp bite of Dijon. It’s the kind of comfort food that feels nostalgic but tastes refined.
If you've ever struggled with dry turkey or bread that feels like a brick, we are going to fix all of that right now. Trust me, once you see how the layers hold together, you’ll never go back to the old way of stacking.
- Sweet
- Hawaiian Sweet Rolls
- Savory
- Deli Turkey and Garlic Powder
- Tangy
- Dill Pickles and Dijon Mustard
- Rich
- Grass fed Butter and Havarti Cheese
The One Step Most People Skip: Creating a hydrophobic fat barrier. Most cooks put the meat down first, which lets the juices seep into the bread; by putting the cheese down first, the fat in the cheese repels water and keeps the bun dry.
- Gluten Structure: Covering the dish with foil during the first 15 minutes traps steam, which softens the roll's interior while the proteins in the turkey reach their ideal temperature without drying out.
- Browning Dynamics: Removing the foil for the final 5 minutes allows the sugars in the butter glaze and the bread to undergo a rapid transformation, creating a mahogany colored, crisp crust.
- Emulsification Stability: Whisking the Dijon mustard into the melted butter acts as a binder, ensuring the garlic and onion powders stay suspended in the fat rather than sinking to the bottom of the dish.
| Method | Time | Texture | Best For |
|---|---|---|---|
| Standard Oven | 20 minutes | Crispy tops, soft centers | Most home kitchens |
| Air Fryer | 12 minutes | Extra crunchy edges | Small batches (3-4 sliders) |
| Convection | 16 minutes | Evenly browned throughout | Large parties with multiple trays |
Vital Stats for the Perfect Slider
When we talk about sliders, precision actually matters. We aren't just making a sandwich; we are building a structural masterpiece that needs to withstand being picked up and pulled apart. I always tell my friends that the "shredded" look is great for tacos, but for sliders, we want thinly sliced deli meat. Why?
Because the air pockets created when you fold thin slices of turkey allow the heat to circulate, making the middle of the slider just as hot as the outside.
If you happen to have leftover turkey from a holiday, you can absolutely use it here, much like how you might use leftovers for a Turkey Meatloaf recipe. Just make sure it's sliced as thin as possible. A thick slab of turkey in a slider is often too "heavy" for the delicate Hawaiian roll and will cause the whole thing to slide apart.
| Ingredient | Science Role | Pro Secret |
|---|---|---|
| Havarti Cheese | High fat barrier | Use room temp slices for faster melting |
| Hawaiian Rolls | Sugar rich base | Don't separate them before slicing |
| Dijon Mustard | Acidic emulsifier | Provides "bite" to cut through the butter fat |
| Unsalted Butter | Moisture and browning | Use grass fed butter for a deeper yellow color |
The role of the Havarti here is non negotiable for me. While cheddar is great, Havarti has a lower melting point and a higher fat content, which results in that velvety, almost buttery mouthfeel. It flows into the nooks and crannies of the folded turkey, acting as a delicious glue that keeps everything together.
Components of a Classic Crowd Favorite
Gathering your ingredients is the most important part of the prep. I’ve tried these with low-fat cheese and turkey crumbles, and I’m telling you now don't bother. We want the full fat Havarti and the good quality deli turkey.
It’s the combination of these specific items that creates the "classic" taste we are looking for.
- 1 pack (12 count) Hawaiian sweet rolls: Why this? The high sugar content allows for a beautiful crust during the final bake.
- 1 lb deli turkey breast, thinly sliced: Why this? Folding thin slices creates volume and traps heat efficiently.
- 8 oz Havarti cheese, sliced: Why this? Its superior meltability creates the perfect "pull" when serving.
- 1/2 cup thinly sliced dill pickles: Why this? Provides a necessary acidic crunch to balance the sweet bread.
- 4 tbsp unsalted grass fed butter, melted: Why this? Carries the savory spices and creates the golden top.
- 1 tbsp Dijon mustard: Why this? Adds a sophisticated tang that yellow mustard just can't match.
- 1 tsp garlic powder: Why this? Distributes savory flavor more evenly than fresh garlic in this application.
- 1/2 tsp onion powder: Why this? Adds depth and umami to the buttery glaze.
- 1 tbsp fresh parsley, finely chopped: Why this? Adds a pop of color and a fresh, herbal finish.
- 1 tsp poppy seeds: Why this? Provides a subtle, earthy crunch that is visually iconic.
| Original Ingredient | Substitute | Why It Works |
|---|---|---|
| Havarti Cheese | Swiss Cheese | Similar melting point, but adds a nuttier flavor profile. |
| Deli Turkey | Sliced Ham | Classic pairing with Swiss; adds a saltier, smokier note. |
| Poppy Seeds | Sesame Seeds | Adds a similar crunch but with a more toasted, nutty aroma. |
If you find yourself out of Dijon, a spicy brown mustard can work in a pinch, though it will definitely change the personality of the slider. The Dijon is there to provide a smooth, back of-the throat heat that pairs perfectly with the sweet rolls.
Essential Tools for Easy Baking
You don't need a professional kitchen for these, but there are two tools that I swear by. First, a high-quality serrated bread knife. If you try to use a straight edge chef’s knife to cut the rolls, you’ll likely squish them, ruining that airy structure we love.
A serrated knife "saws" through the crust without putting pressure on the crumb.
Second, a pastry brush is your best friend here. I’ve seen people just pour the butter over the top, but that leads to "butter puddles" on the bottom and dry spots on the top. A brush ensures every single square inch of those rolls is coated in the savory poppy seed goodness.
Chef's Tip: Freeze your butter for 10 minutes before melting it if you are using a microwave. This prevents it from "popping" and making a mess, as the colder temperature slows down the heating of the water molecules inside the fat.
step-by-step Guide to Melty Perfection
- Preheat your oven to 350°F (175°C). Use a serrated bread knife to slice the entire block of Hawaiian rolls in half horizontally without separating the individual rolls. Note: This keeps the structure intact during assembly.
- Place the bottom half of the rolls into a 9x13 inch baking dish. Lay down half of the Havarti cheese slices to create a hydrophobic fat barrier. Note: This is the secret to a non soggy bun.
- Fold the turkey slices to create volume and distribute them evenly over the cheese layer. Evenly distribute the sliced dill pickles over the turkey if using. Note: Folding creates air pockets for better heat distribution.
- Layer the remaining Havarti cheese slices over the turkey and place the top half of the rolls back on.
- In a small microwave safe bowl, whisk together melted butter, Dijon mustard, garlic powder, onion powder, chopped parsley, and poppy seeds.
- Use a pastry brush to apply the savory glaze generously over the tops of the rolls. Brush the sides too for extra flavor.
- Cover the baking dish tightly with aluminum foil. Bake for 15 minutes until the cheese is visibly drooping and the turkey is steaming.
- Remove the foil and bake for an additional 5 minutes until the tops reach a mahogany colored, golden crust.
One thing I noticed while making these recently: the "mahogany" color happens fast! Stay close to the oven during those last 5 minutes. You want that deep gold, not a scorched black. The smell of the garlic and butter hitting the heat will tell you exactly when it's ready.
It should smell like a high end bakery that just opened a fresh batch of garlic knots.
Avoiding the Most Common Baking Pitfalls
The biggest disaster people face with Cheesy Turkey Sliders is the "sliding" effect. If you don't use enough cheese, the turkey and pickles will just fall right out when you try to take a bite. The cheese is the glue. If you cut corners on the cheese, you're going to have a messy time.
Why Are My Sliders Dry?
This usually happens because the foil wasn't sealed tightly enough. The foil's job is to create a mini sauna for the turkey. If steam escapes, the meat loses its moisture. Also, make sure you're using 1 lb of turkey; too little meat means the bread to filling ratio is off, making the whole thing feel dry.
How Do I Stop the Bottoms From Burning?
If your oven runs hot from the bottom, place the 9x13 dish on a baking sheet. This adds an extra layer of insulation between the heat source and the bottom of your rolls. It's a lifesaver for older ovens!
| Problem | Root Cause | Solution |
|---|---|---|
| Smashed Rolls | Using a dull knife | Use a serrated bread knife in a sawing motion. |
| Uneven Browning | Crowded oven | Place the dish in the center rack for even air flow. |
| Soggy Bottoms | Liquid from pickles | Pat the pickles dry with a paper towel before adding. |
Common Mistakes Checklist:
- ✓ Pat the pickles completely dry before adding to prevent extra moisture.
- ✓ Ensure the foil seal is airtight to trap the steam effectively.
- ✓ Don't skip the second layer of cheese; it's vital for structural integrity.
- ✓ Let the sliders sit for 3 minutes after baking before slicing for a cleaner cut.
Flavor Variations and Simple Swaps
Once you master the classic, the world of sliders is your oyster. One of my favorite things to do is a "Thanksgiving" version where I swap the pickles for cranberry sauce and use a bit of leftover stuffing inside. It's the ultimate comfort food for those chilly November nights.
If you're looking for something with a bit more kick, try adding sliced jalapeños instead of pickles. The heat of the pepper against the sweet Hawaiian roll is a match made in heaven. You could even serve these alongside a big bowl of Buffalo Chicken Dip for the ultimate party spread.
- The Spicy Kick: Use Pepper Jack cheese and add a teaspoon of red pepper flakes to the butter glaze.
- The Honey Mustard Twist: Swap Dijon for honey mustard and add a drizzle of honey over the turkey before the second cheese layer.
- The Breakfast Slider: Use cooked turkey bacon and a layer of scrambled eggs instead of pickles.
If you are cooking for a crowd, you'll need to scale this up. For 24 sliders, don't just double the spices. Use 1.5x the salt and spices but go ahead and double the butter and meat. When you double recipes, spices can sometimes become overwhelming if you do a literal 2x conversion.
For the baking time, if you put two 9x13 dishes in at once, you might need to add 5 minutes to the "covered" portion of the bake since the oven temperature will drop slightly when you open the door.
Storing Leftovers and Freezing Tips
If you actually have leftovers which is rare in my house they store surprisingly well. You can keep them in the fridge for up to 3 days. The key is to reheat them in the oven or an air fryer.
A microwave will turn the bread into a rubbery mess, but 5 minutes in a 350°F oven will bring back that "shatter crisp" top we worked so hard for.
For freezing, you can actually assemble these (without the butter glaze) and freeze them for up to 2 months. Wrap the whole block of rolls tightly in plastic wrap and then foil. When you're ready to eat, let them thaw in the fridge overnight, then add the butter glaze and bake as directed.
It’s the ultimate "emergency dinner" for those days when you just can't bring yourself to cook from scratch.
To minimize waste, don't throw away any leftover glaze! If you have extra, toss some broccoli or green beans in it before roasting. The garlic, poppy seed, and mustard combo is incredible on vegetables. Also, save the bottom of-the bag crumbs from the Hawaiian rolls; they make fantastic toasted breadcrumbs for salads.
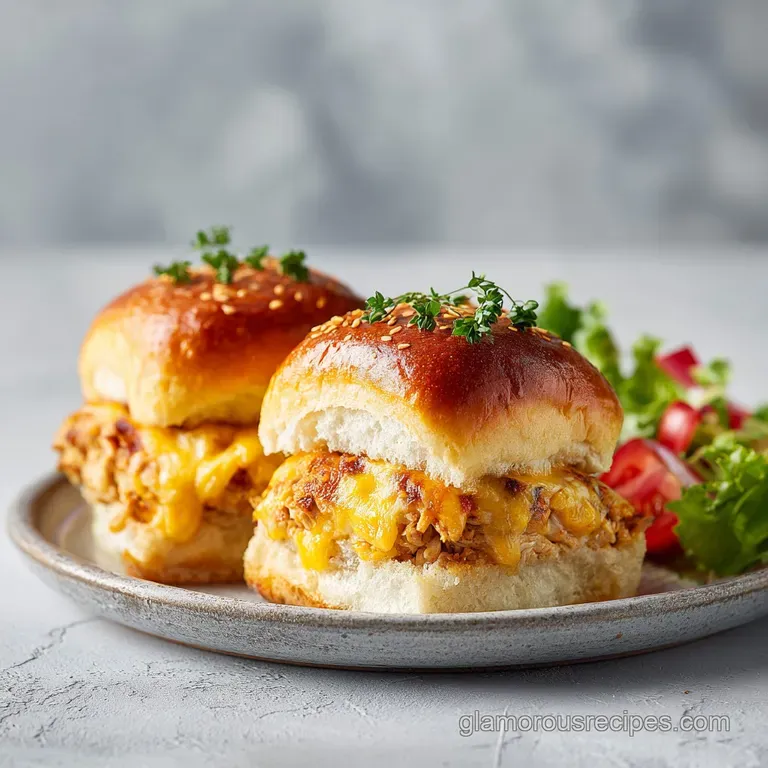
How to Serve and Enjoy
Presentation is everything with these. I love to bring the whole 9x13 dish to the table and cut them right there. The sight of the melted Havarti stretching as you pull a slider away is enough to make anyone hungry.
If you're serving these at a party, I recommend cutting them into individual squares before guests arrive, but keep them together in the dish so they stay warm.
I usually serve these with a side of simple kettle chips or a crisp green salad to cut through the richness of the butter and cheese. If it's a Sunday dinner, maybe some roasted carrots or even a bowl of Chicken and Dumplings on the side for a truly Southern inspired feast.
When you're ready to serve, a little sprinkle of fresh parsley on top at the very end adds a brightness that makes the colors pop. It shows your guests that you didn't just throw this together you crafted it.
These sliders are more than just a snack; they are a conversation starter and a recipe that will likely become a staple in your rotation, just as they have in mine. Enjoy every buttery, cheesy bite!
Myths About Oven Baked Sliders
One common myth is that you need to butter the rolls before putting them in the oven at all. In reality, adding the butter at the start of the bake often leads to the bread absorbing too much fat and becoming greasy rather than crisp.
By adding it right before the 15 minute mark and then finishing uncovered, you get the perfect balance of infusion and crust formation. Another myth is that you can't use cold turkey. You absolutely can!
The 15 minute covered bake is specifically designed to bring cold deli meat up to a safe, steaming temperature while the cheese melts into it. Finally, some people think you have to use Hawaiian rolls.
While they are the classic choice for their sugar content and soft texture, you can use savory brioche rolls as long as you adjust your "doneness" cues, as brioche browns even faster than Hawaiian rolls.

Recipe FAQs
How to prevent the bottom rolls from becoming soggy?
Place half the Havarti slices directly on the bottom buns before adding turkey. This creates a hydrophobic fat barrier that prevents moisture from the turkey and pickles from soaking into the Hawaiian rolls.
Can I assemble these sliders ahead of time?
Yes, you can assemble them and freeze for up to 2 months. Wrap the unbaked, unglazed rolls tightly in plastic wrap and foil, then apply the butter glaze only after thawing and right before baking at 350°F.
Is it necessary to use a serrated knife to cut the rolls?
Yes, it is highly recommended to maintain the structural integrity of the block. A serrated knife allows you to slice the entire block of rolls horizontally in one motion without crushing the delicate bread.
How to achieve the signature golden crust on the buns?
Remove the foil for the final 5 minutes of baking. This direct heat exposure turns the butter and mustard glaze into a rich, mahogany colored crust, similar to the technique used for a crispy baked finish.
What is the best way to store and reheat leftovers?
Reheat in a 350°F oven for 5 minutes. Avoid the microwave, which will ruin the texture; the oven restores the crisp exterior that typically softens in the refrigerator after 3 days.
Why is the butter glaze applied after the rolls are assembled?
Applying the glaze to the tops ensures every roll gets coated evenly. Brushing the mixture of melted butter, Dijon, and herbs directly onto the top buns allows the seasonings to toast properly during the 20-minute bake time.
Is it okay to separate the rolls before baking?
No, keep the block intact during assembly and the first 15 minutes of baking. Keeping the rolls connected creates a better seal, which helps the turkey steam and the cheese melt perfectly without the heat escaping.
Cheesy Turkey Sliders

Ingredients:
Instructions:
Nutrition Facts:
| Calories | 237 kcal |
|---|---|
| Protein | 12.1g |
| Fat | 12.6g |
| Carbs | 17.9g |
| Fiber | 0.8g |
| Sugar | 5.2g |
| Sodium | 565mg |
